
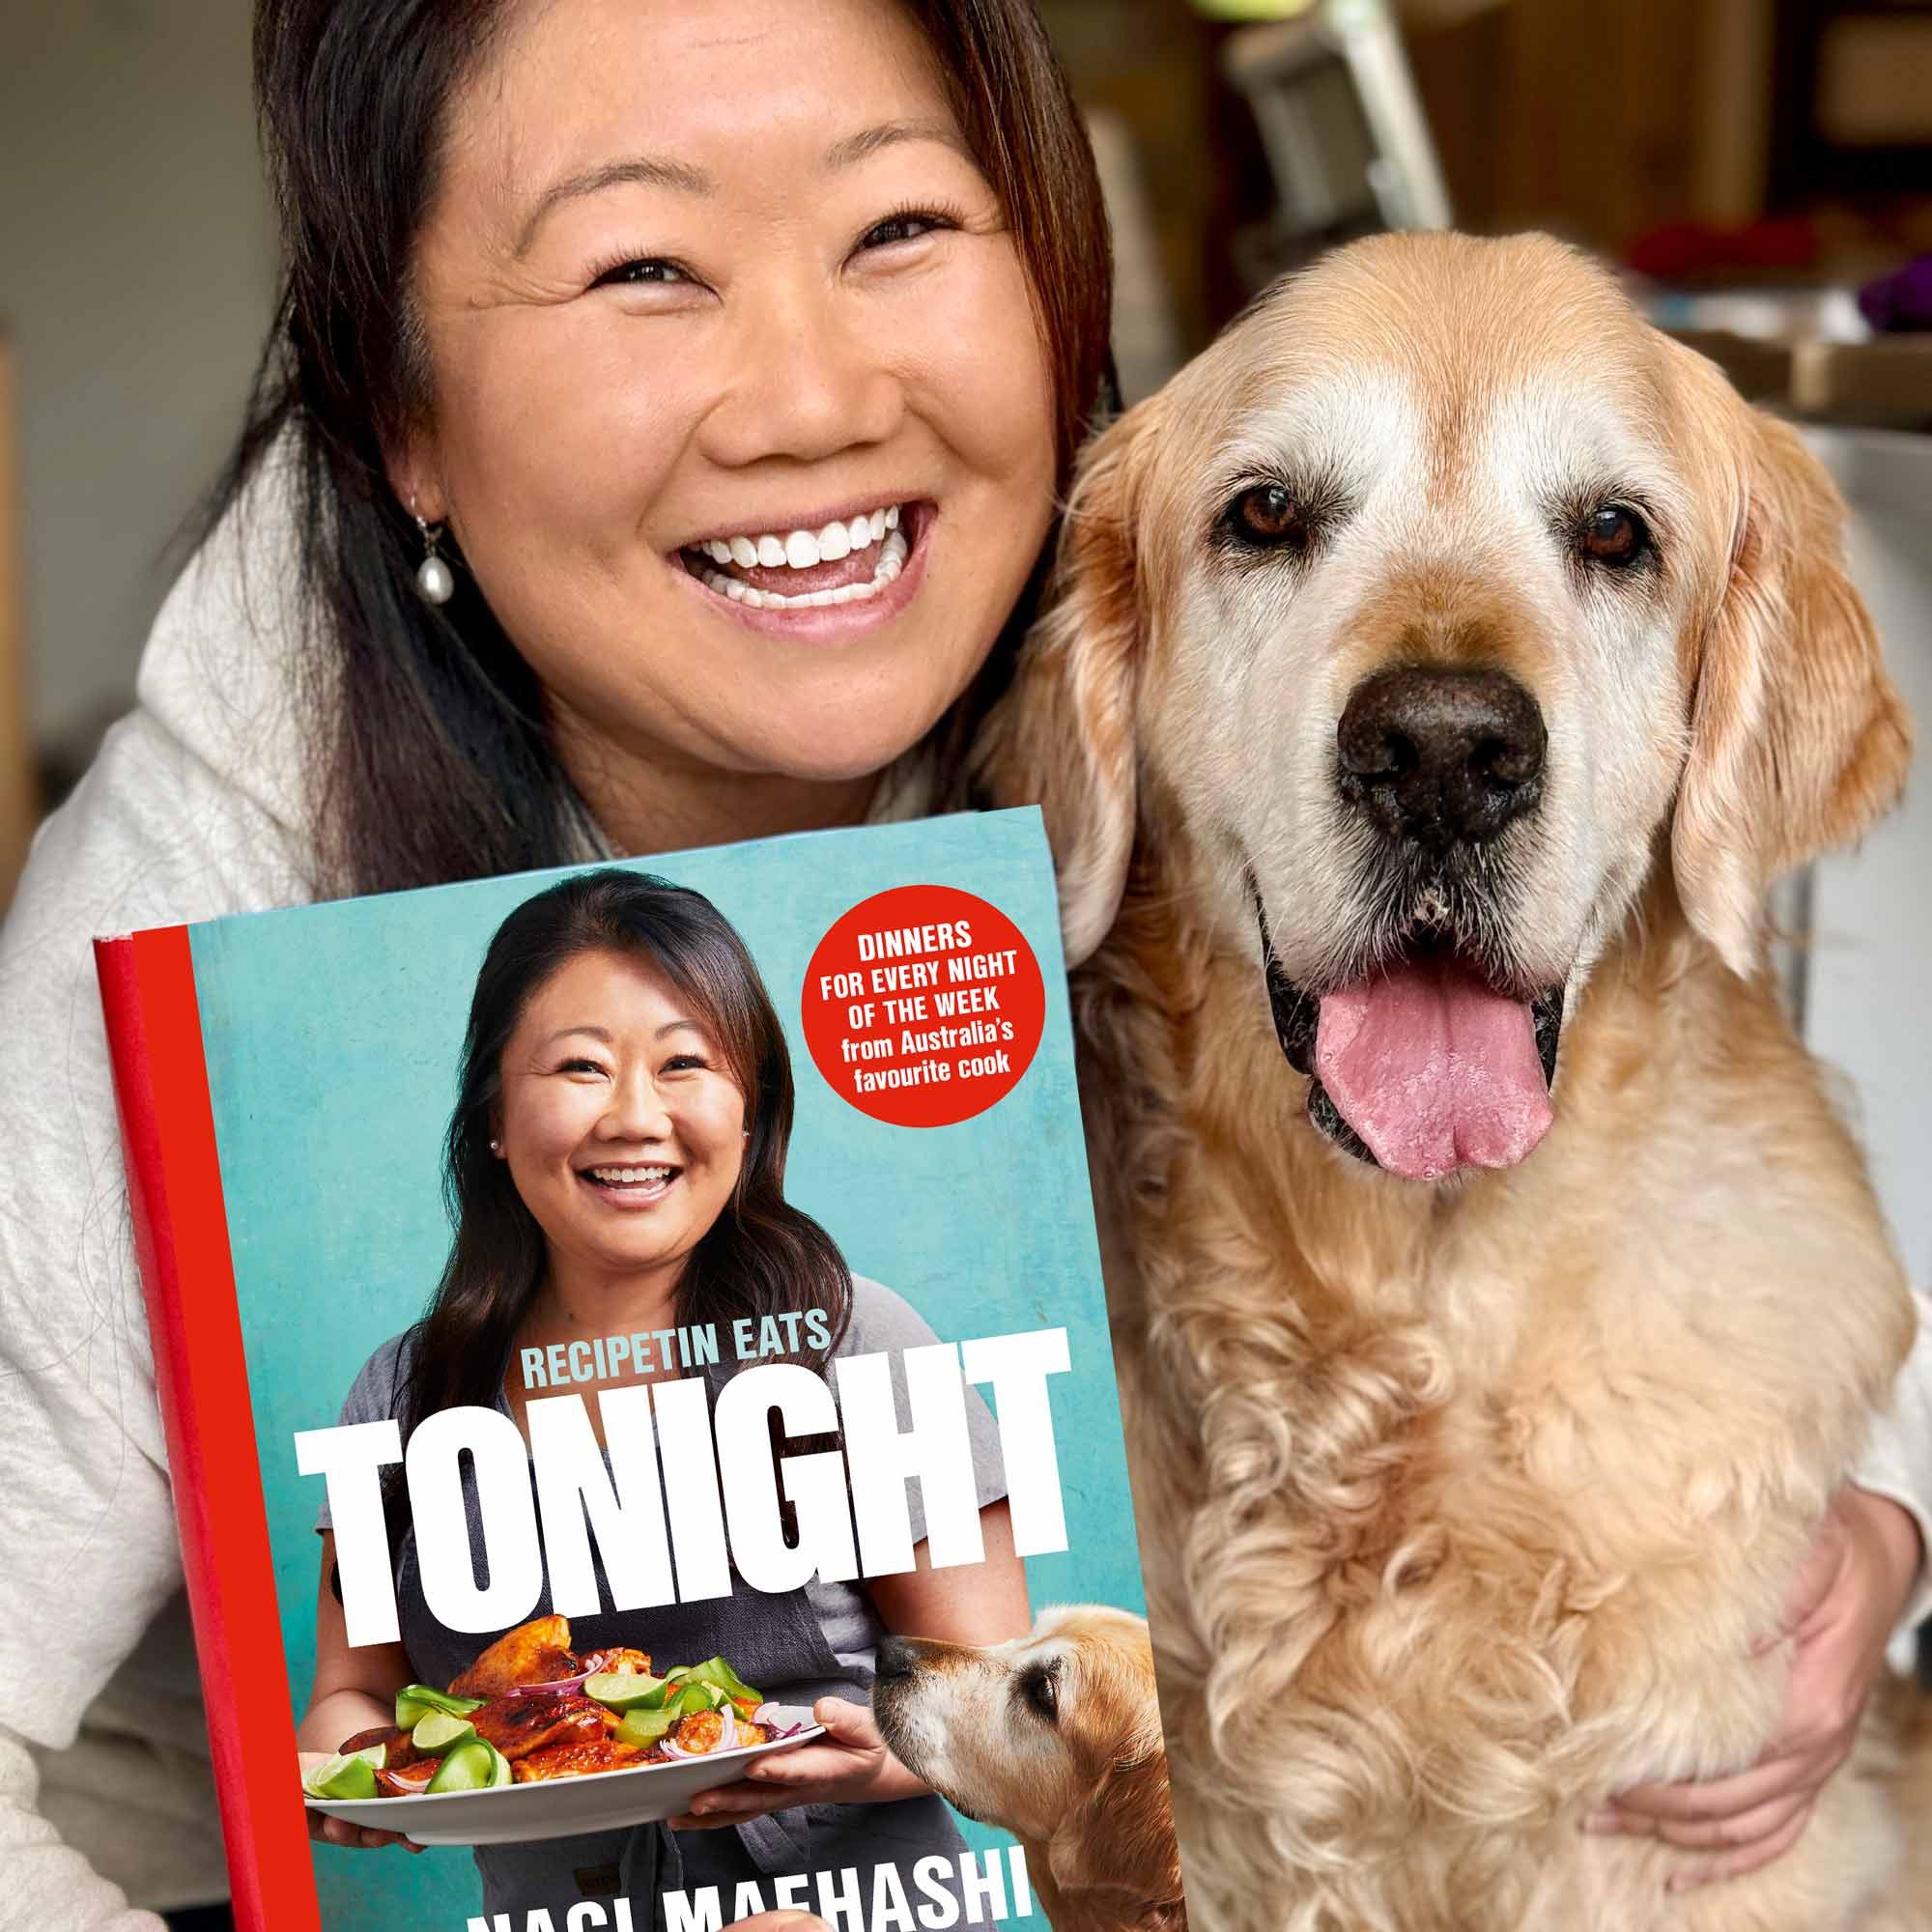
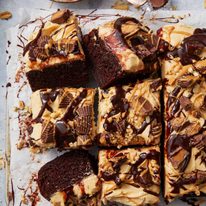
A sinfully delicious Chocolate Peanut Butter cake to celebrate my new cookbook, TONIGHT! A killer combination of rich Chocolate Cake smothered with fluffy peanut butter frosting, topped with peanut butter cups, it’s decadent and perfect for gatherings as it will easily serve 20 to 25 people.

Many thanks! And why my new cookbook was a secret.
First order of business today is a big and heartfelt thank you for sharing my excitement when I surprised you with my new cookbook, TONIGHT!
I also wanted to tell you why I kept it a secret for the last year I’ve been working on it. A stark contrast to my first cookbook Dinner where I shared my journey with you all the way. Readers have wondered, so I’m explaining.
Speaking honestly (and I imagine my publisher is feeling very nervous right about now!), keeping it a secret wasn’t any kind of intentional marketing strategy. It was because even though I committed to the book a year ago, I didn’t know for sure that I’d have it in me to finish it this year due to various life things getting in the way – team movements and health issues with Dozer included. Also, unlike my first cookbook, Dinner, my team had little involvement with my second cookbook.
Rather than fail publicly, I decided to stay quiet until I knew for sure I could deliver. Then by the time I knew, it was so close to the date of the pre-order announcement, I decided I may as well hold out! 😂
So there you go. That’s the truth behind why I kept it a secret until I surprised you with the news last week. 😇
And now, let’s celebrate. Bring out the cake! – Nagi x

Layer cakes for a crowd are a logistical nightmare!
Today’s cake is dedicated to everyone who has tried to cut a towering 4 layer cake into 30 slices to share with co-workers. It’s impossible!!
Enter – slab cakes. A name commonly used for single layer cakes baked in rectangle pans, these are the perfect solution for a cake to serve many that’s easier to construct than layer cakes, more fun to decorate (larger canvas to play with), and easier to transport too (no Leaning Tower of Pisa situation).
Bonus: higher cake-to-frosting ratio per person. It matters!
Today’s slab cake involves the never-fail combination of peanut butter and chocolate, decorated with casual abundance (ie no stress). It looks like a Jackson Pollock – but better, because it’s edible!

Ingredients in this Chocolate Peanut Butter Cake
This cake is made with my classic, forever Chocolate Cake (beautiful chocolatey flavour, a soft moist crumb and ridiculously simple to make – no electric beater required), fluffy peanut butter frosting and decorations (Reece’s peanut butter cups, chocolate and peanut butter drizzle plus chopped nuts). Abundance!
The chocolate cake
Here’s what you need for the chocolate cake.

Flour – just plain / all purpose flour. No need to use pricier cake flour (actually makes the crumb too damp, I find).
Cocoa powder – regular, unsweetened cocoa powder (unsweetened is the default here in Australia), not hot chocolate powder (sweetened). The cake works with dutch processed cocoa powder (pricier, with more intense chocolate flavour) but it doesn’t improve it by a noticeable amount so it’s not worth using for this cake, in my opinion.
Coffee powder (OPTIONAL!) – This unusual sounding ingredient in a chocolate cake is a little secret trick to enhance the flavour of chocolate in cakes. You can’t taste coffee at all! And it’s just a small amount. There’s no need to hunt down an expensive brand, just any brand is fine. Just be sure to get the dissolvable granules (ie that dissolve when you add hot water), not the ground coffee beans that is used for plungers, filters and coffee machines (does not dissolve).
Substitute with hot freshly brewed coffee instead of boiling water.
Baking powder and baking soda (bi-carb soda) – These both make cakes, muffins etc rise but have different effects on different batters. As a general rule, baking soda is 3x stronger than baking powder. For this cake, a combination of both makes the cake rise so it has a relatively flat surface (rather than a dome) and the crumb is lovely and light.
Substitute – Just use baking powder. The cake rises slightly less but no one will notice unless you’re a recipe control-freak like, say, me, who will test versions of the cake and line them up side by side to compare.😂
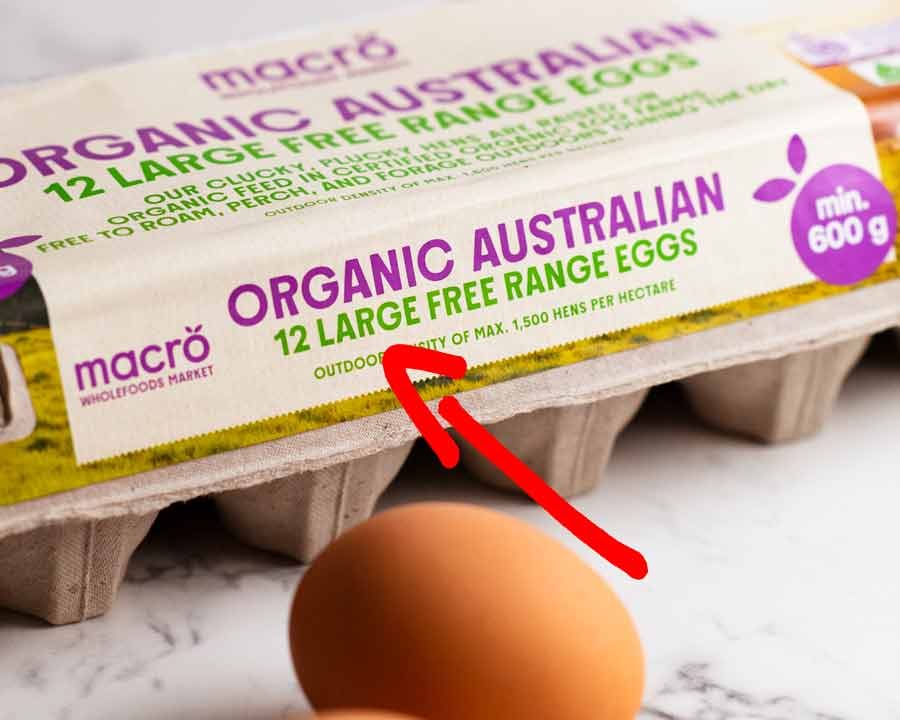
Eggs – This recipe calls for “large eggs” which are eggs sold in cartons labelled as “large eggs”. The weight for a 12 egg carton is 600 – 660g (24 oz), with each egg weighing 55 – 55g / 2 oz in the shell. Unlike most recipes, there is no need to bring the eggs to room temperature because boiling water is added into the batter which brings the temperature of fridge-cold ingredients up to ensure everything combines together properly!
Sugar – Just regular white sugar (granulated sugar). Caster sugar / superfine sugar ist fine to use here too but not necessary. Don’t use brown sugar, makes the cake too damp and alters the flavour.
Salt – This recipe calls for 1 whole teaspoon of salt which I know sounds like a lot but it really helps bring out the chocolate flavour and does NOT make it taste salty at all! Be sure to use cooking salt (sold labelled as such) or kosher salt (US). If you only have table salt (the fine, sand-like salt) use 3/4 teaspoon and if you only have fancier sea salt flakes, use 1 1/2 teaspoons.
Milk – Full fat cow milk is best though low fat works too. And in my travels, I’ve discovered / read from readers that non-animal milks work as well, including soy, almond and oat milk.
Oil – Any neutral flavoured oil, like vegetable oil, canola, rapeseed, grapeseed or sunflower oil can be used. This recipe uses oil rather than butter as the fat and this is partly what makes the cake so moist and gives it excellent shelf life (it stays fresh for 5 days). Rule of thumb for baking – butter gives things flavour but oil keeps things moist! (Reason: butter hardens when cold, oil stays liquid).
Vanilla extract – For flavour enhancement. It doesn’t make the cake vanilla-forward, it compliments the chocolate flavour.
Boiling water – This makes the chocolate flavour from the cocoa bloom! It also warms up fridge-cold ingredients (eggs and milk) to ensure everything combines together thoroughly. So nice to have a cake recipe that does call for anything to be “at room temperature”!

The peanut butter frosting
The frosting is a buttercream frosting which is whipped until beautifully light and fluffy with a good amount of peanut butter!

Peanut butter – I use peanut butter spread for this recipe which has sugar and salt added to it, rather than pure, natural peanut butter which I use for things like Satay Peanut Sauce. If you only have natural peanut butter, you will need to use less because it’s runnier (see recipe notes).
Unsalted butter – Softened to room temperature so it can be whipped into a fluffy frosting. Don’t let it get too soft and sloppy else your frosting will be too! Technically in baking terms, “softened butter” should be 17°C/63°F – firmer than you think! 🙂 This is soft enough to whip into creamy fluffiness but firm enough so it doesn’t turn frosting into slop.
Soft icing sugar / powdered sugar – If you’re in Australia, be sure to get soft icing sugar which is used for fluffy frostings like this, NOT pure icing sugar which is used for icings that set hard like royal icing (used for piping decorations on Gingerbread Men etc). If you are not in Australia, you don’t need to worry about this as soft v pure icing sugar options seems to be a uniquely Australian thing.
Vanilla – For flavour.
Pinch of salt – To bring out the flavours in the frosting.

TOPPINGS – recommended but optional!
You could make this without any toppings at all and I’d still scoff it down. But with the toppings, it takes it over the top into Outrageous Land which I’m always happy to be in! Pick and choose as you please, what you like and what suits your budget. 🙂

Reece’s peanut butter cups (optional) – some regular miniature ones and some mini, mini ones, some chopped, some kept whole! Yes this adds that extra “wow” factor to this cake but I would not hesitate to make this cake without.

Melted chocolate drizzle – Just chocolate chips or melts, melted with a little cream so it doesn’t solidify when it cools.
Melted peanut butter – Literally just peanut butter melted in the microwave turns it into perfect drizzle-able form! (Is that a word??)
Chopped peanuts (oops, forgot a photo) – For sprinkling! I like to use salted peanuts.
How to make Chocolate Peanut Butter Cake
Make the cake first. It will take a good couple of hours to fully cool which is essential before slathering on the frosting (hot cake = melted frosting = 😭). Speed things up by popping it in the fridge.
1. The cake
The cake part is so easy – just one bowl and a wooden spoon! (Well, whisk. 🙂 )
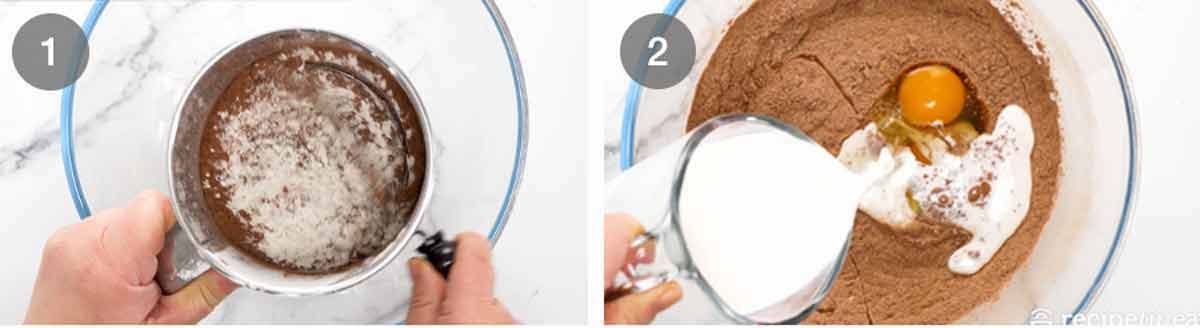
Whisk dry – Sift the flour, cocoa, baking powder and baking soda into a bowl. Add the sugar and salt, then whisk to combine.
Add wet – Add the egg, oil, milk and vanilla, then whisk.
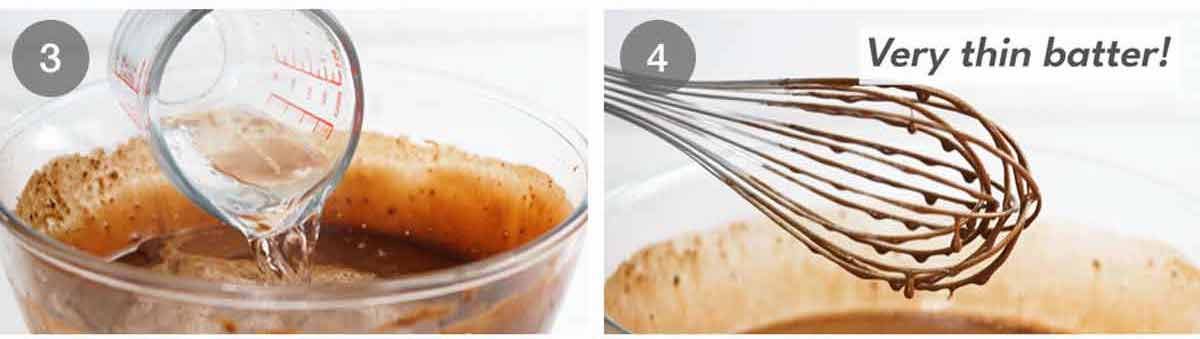
Boiling water & coffee – Add the coffee powder then pour in the hot water (so the instant coffee powder dissolvers). Whisk well to combine.
Heads up: the batter is VERY thin!
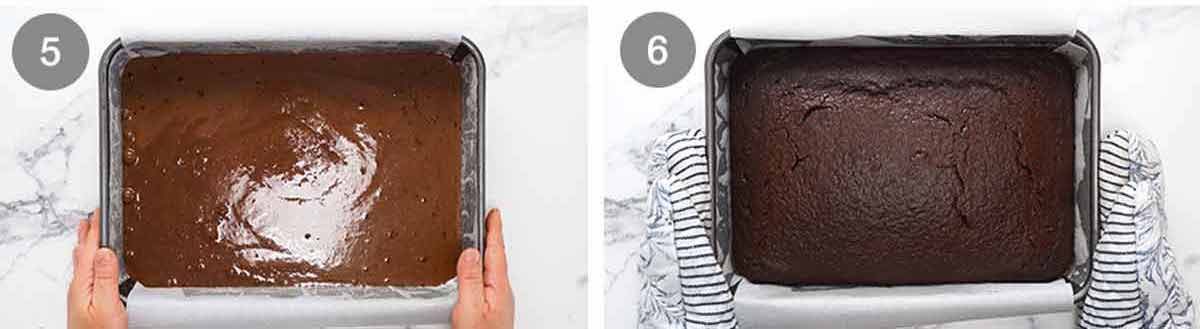
Pour the batter into a 23 x 33cm / 9 x 13″ pan lined with paper.
Bake for 45 minutes or until a skewer inserted into the centre comes out clean. Then fully cool on a rack before frosting and decorating!
2. DECORATING

Spread the frosting on the cake.
Drizzle – Melt the chocolate with the cream (15 second bursts in the microwave). Heat the peanut butter until it’s runny enough to drizzle. Let them both cool for a few minutes then randomly drizzle across the cake. Use most now and reserve some for drizzling again once the other toppings are on.

Peanut butter cups – Randomly scatter the peanut butter cups across the surface. I cut the miniature ones in half and keep the mini, mini ones whole.
Sprinkle & drizzle again! Then sprinkle the entire surface with finely chopped peanuts and a another drizzle of chocolate and peanut butter (I TOLD YOU THIS WAS OUTRAGEOUS!!).
Stand back and admire your edible Jackson Pollock!


Matters of serving and storing
Another side benefit of a slab cake compared to towering layers cakes is that there is no need to refrigerate for a bit to stabilise it before cutting. This cake is ready to go the moment you finish that last drizzle of chocolate!
Cut slices to whatever size you desire, and because we’re generous with toppings the slices don’t need to be that large to still be indulgent! 20 slices is a nice size (6.5 x 5.75cm / 2.25 x 2.6″) – cut 5 on the long side then 4 on the short side. Though it can easily serve 25.
Store it in the fridge though always bring to room temperature before serving because the buttercream frosting will go hard. The cake will stay fresh for 5 days so it’s got a terrific shelf life.
Enjoy! – Nagi x
PS Today’s photos were taken by Rob Palmer whom I hope to be working with on a regular basis from hereon as I look to get more sleep and maintain my focus on the recipe development, testing, post writing and video making side. One less thing to do – and, well, you know. He’s a pro. I love working with Rob!
Watch how to make it
Hungry for more? Subscribe to my newsletter and follow along on Facebook, Pinterest and Instagram for all of the latest updates.
Chocolate Peanut Butter Cake for a Crowd
Ingredients
- 1 3/4 cups flour , plain / all purpose
- 3/4 cup cocoa powder , unsweetened (Note 1)
- 1 1/2 tsp baking powder
- 1 1/2 tsp baking soda (bi-carb soda) (Note 2)
- 2 cups white sugar or caster/superfine sugar
- 1 tsp cooking / kosher salt (yes, really!)
- 2 large eggs (~55-65g / 2 oz each – see here for size info)
- 1 cup milk (low or full fat)
- 1/2 cup vegetable oil , or other plain flavoured oil like canola, grapeseed, rapeseed, sunflower
- 2 tsp vanilla extract
- 2 tsp instant coffee powder , OPTIONAL (Note 3)
- 1 cup boiling water (makes the chocolate flavour "bloom")
Peanut Butter Buttercream Frosting
- 250g / 2 sticks unsalted butter , softened
- 4 cups (500 g) soft icing sugar / powdered sugar , sifted (Note 4)
- 1/2 cup (120 g) smooth peanut butter (spread, not pure) (Note 5)
- 1/4 tsp cooking/kosher salt
- 1 tbsp milk
Toppings (optional, recommended)
- 1/2 cup chocolate chips or melts (US: semi sweet chips)
- 2 tbsp cream (thickened/heavy or pure, not low fat)
- 3 tbsp peanut butter , warmed in microwave to make it runny
- 120g / 4 oz mini Reece's Peanut Butter Cups
- 10+ miniature Reece's Peanut Butter Cups , halved
- 1/4 cup salted peanuts , finely chopped
Instructions
- Preheat oven to 180C°/350°F (160°C fan).
- Grease a 23 x 33cm / 9 x 13" metal cake pan with butter. Then line with paper with overhang, to make it easier to lift out. (For round pans, see Note 4).
Batter:
- Dry ingredients – Sift flour, cocoa, baking powder and baking soda into a large bowl. Add Sugar and salt. Whisk briefly to combine.
- Wet ingredients – Add eggs, milk, oil and vanilla. Whisk well to combine until lump free – about 30 seconds.
- Boiling water – Add the coffee powder then the boiling water. Whisk to incorporate. The batter is VERY thin (see video). Pour batter into the cake pan.
Bake:
- Bake for 45 minutes or until a wooden skewer inserted into the centre comes out clean.
- Cool for 10 minutes, then fully cool on a wire rack before frosting (~2 hours).
Peanut butter buttercream frosting
- Beat butter for 3 minutes on high until soft and fluffy, using a stand mixer with the paddle attachment or handheld beater.
- Icing sugar – Add icing sugar in 3 lots. Beat it in, starting on low speed then increasing the speed (to avoid a snow storm). Once incorporated, add more icing sugar and repeat.
- Beat 3 minutes – Once the icing sugar has all been added, added the peanut butter, salt and milk. Beat on high speed for 3 minutes to make it really nice and fluffy. Ready to use!
Decorating
- Chocolate drizzle – Place the chocolate and cream in a small bowl. Microwave in 15 second increments on high, stirring in between, until smooth. Cool for 10 minutes before using.
- Frost – Spread all the frosting across the surface of the cake, from edge to edge.
- Decorate – Drizzle the top randomly with half the chocolate drizzle and melted peanut butter. Sprinkle with the peanut butter cups. Drizzle with remaining chocolate and peanut butter and sprinkle with the peanuts.
- Serve immediately! Cut into pieces as large (or small 😢) as you want. Refrigerate leftovers for 5 days though always bring to room temperature (because the frosting goes hard when cold).
Recipe Notes:
- 2 x 20cm / 8″ pans – 38 minutes
- 3 x 20cm / 8″ pans – 25 minutes
- 2 x 22cm/9″ pan – 25 to 25 minutes
Nutrition Information:
Life of Dozer
When Dozer was on the cover of Australia’s most respected food paper – but he just wanted to get to a pile of chicken on the bench!
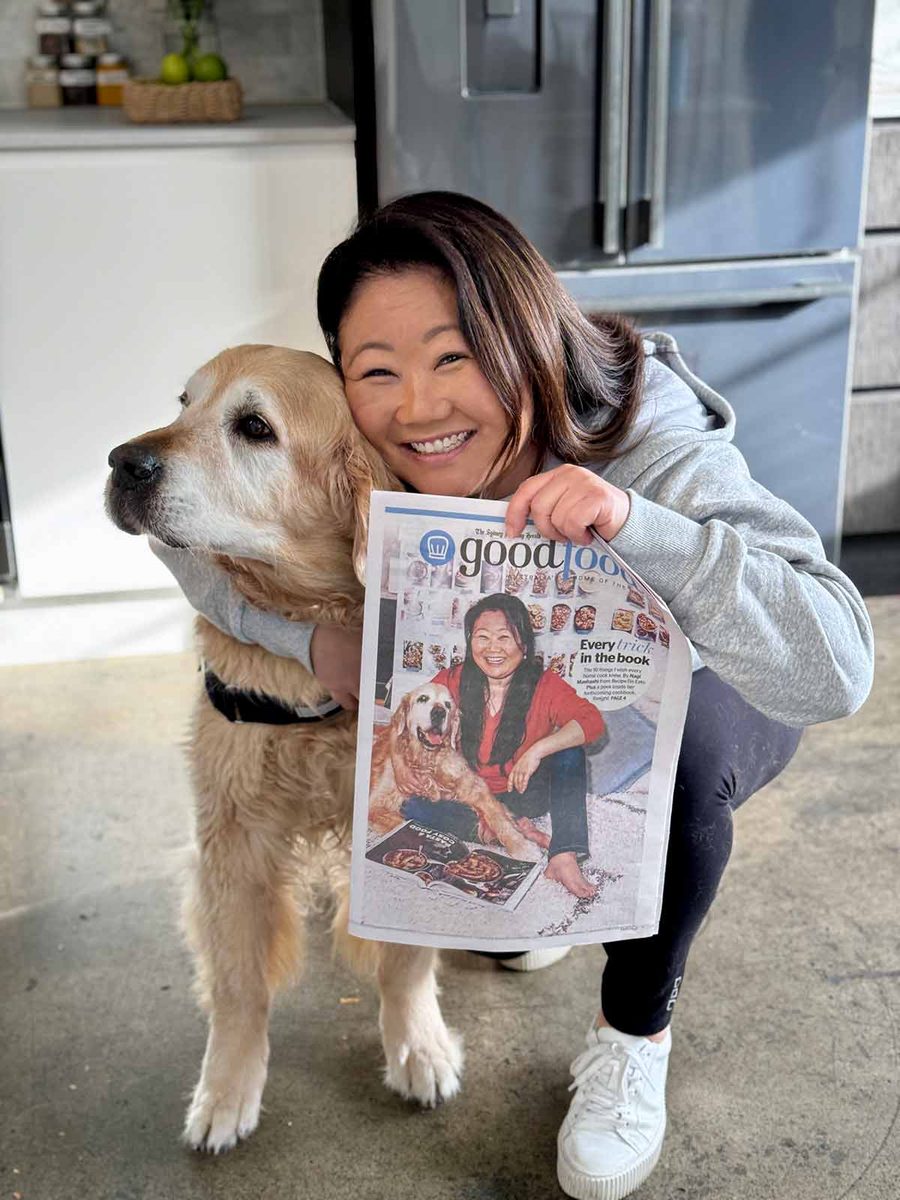
And he was in the paper too.
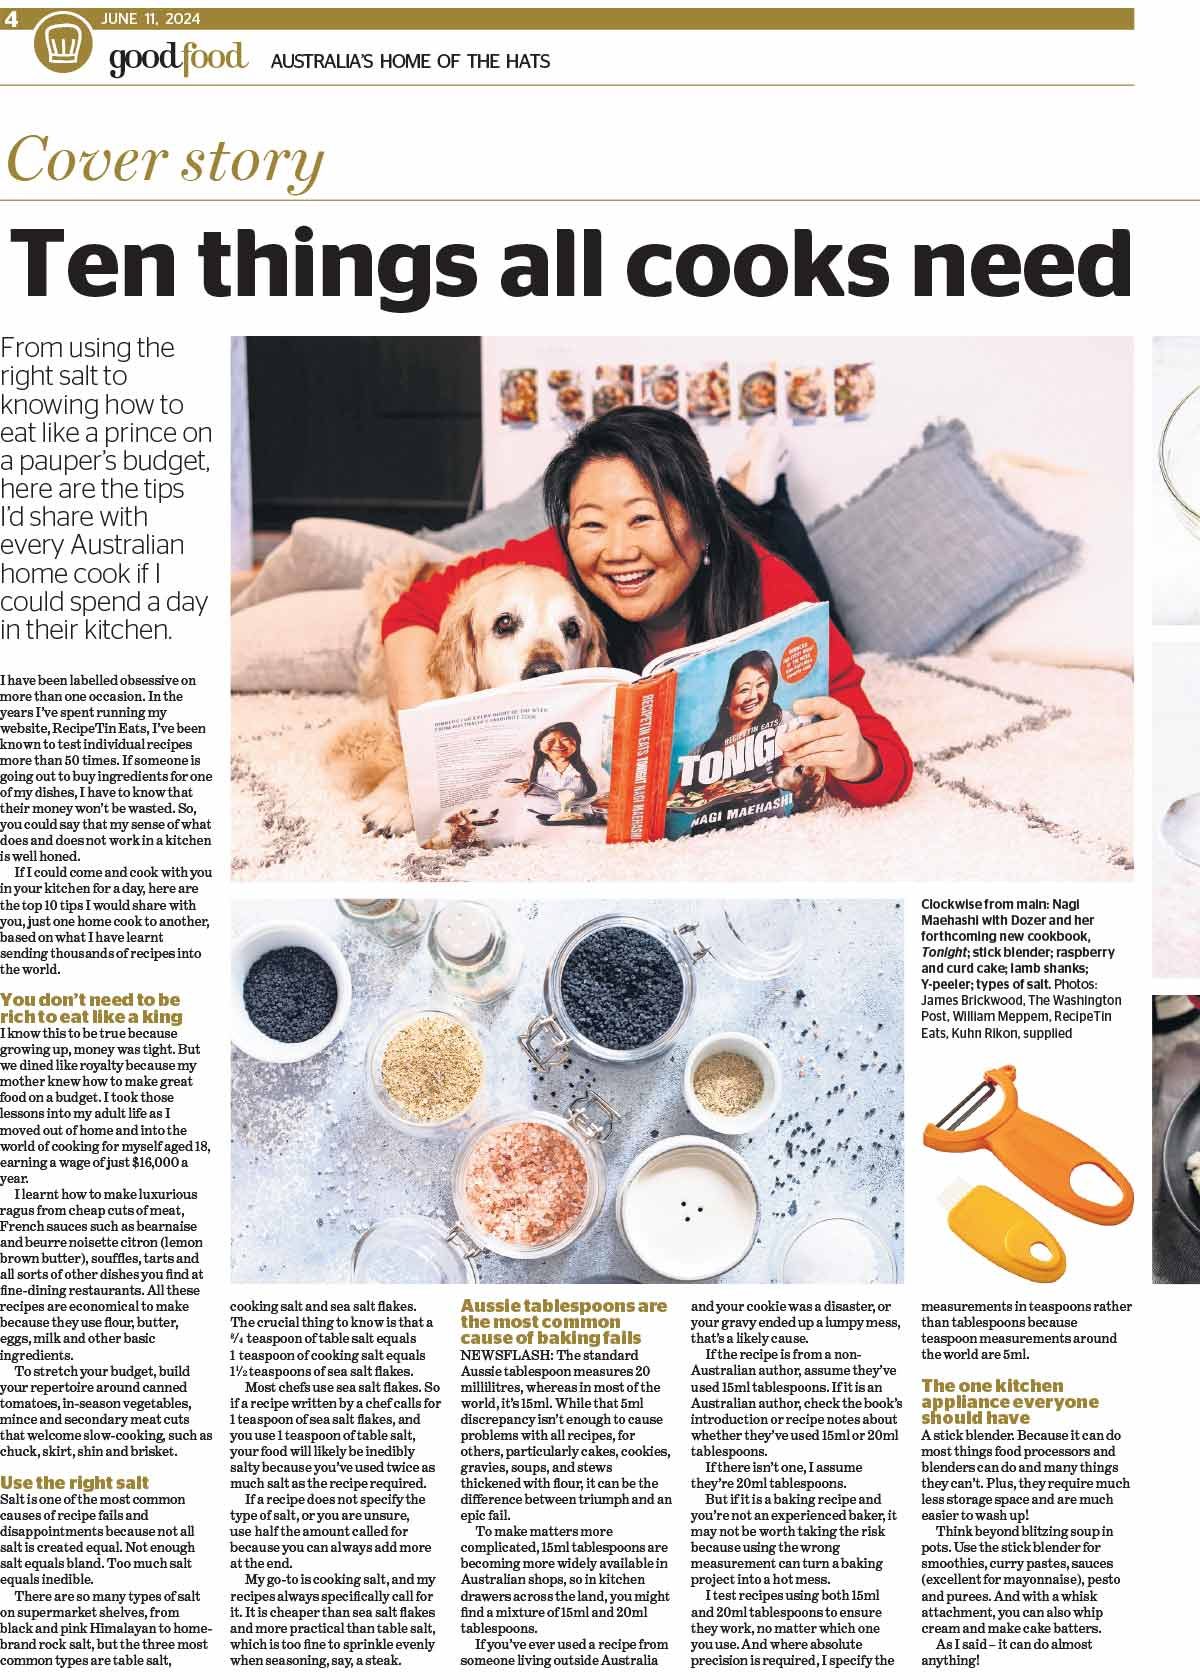
I have a feeling the editor never imagined running an edition of Good Food with a dog so prominently featured. 😂
This article was a story relating to my second cookbook, TONIGHT, which I surprised you with in my last post. Now that you know about it, I can start sharing cheeky Dozer behind-the-scenes photos from the making of Tonight! Here’s the first – Dozer disrespecting my work, trampling all over the proofs.

Impossible to get mad at that face!
Just pre-ordered Tonight
90% of cookbooks sent to charity shops yours are keepers
Looks like a lovely easy cake to make especially for a party, looks like itd freeze ok too. Might be my next bake n freeze cake for afternoon treats. Congrats to uou both on the food and wine show. Pats to Dozer.
Omg Nagi!!
This looks out of this world x
It was my son’s birthday yesterday and if only I’d seen this haha it’s on the to make list next occasion x
it sounds delicious, on my to try list , thanks Bella
I can’t wait for my Tonight cook book. It’s already ordered.
Then I will have 2 cooking bibles…Dinner and Tonight.
I have recommended so many of your books or given them away as gifts…everyone loves them, especially my husband who cooks 1-2 nights a week
“What am I cooking tonight” he says, then answers himself…’I’ll just ask Nagi” and opens your book.