
This no bake Christmas cheesecake is designed for sizzling Aussie summers – no sweating over a hot oven! Designed to serve a crowd, it’s the easiest cheesecake recipe I know yet it still captures all the hallmarks of a beautiful classic baked cheesecake.
Decorate with whipped cream, berries and rosemary sprigs for an effortless, pretty festive look.
A Christmas dessert for hot summer days
This Christmas dessert is made especially with fellow Aussies in mind. While half the world is enjoying the magic of snowy Christmases, here in Australia, we’re soaking up the blazing summer sun!
So although there will always be a place in my heart for the great Aussie Pav and classic Christmas cake, anything that doesn’t require an oven gets an extra big thumbs-up from me. Introducing – my brand-new Christmas cheesecake that does not require use of the oven at all!
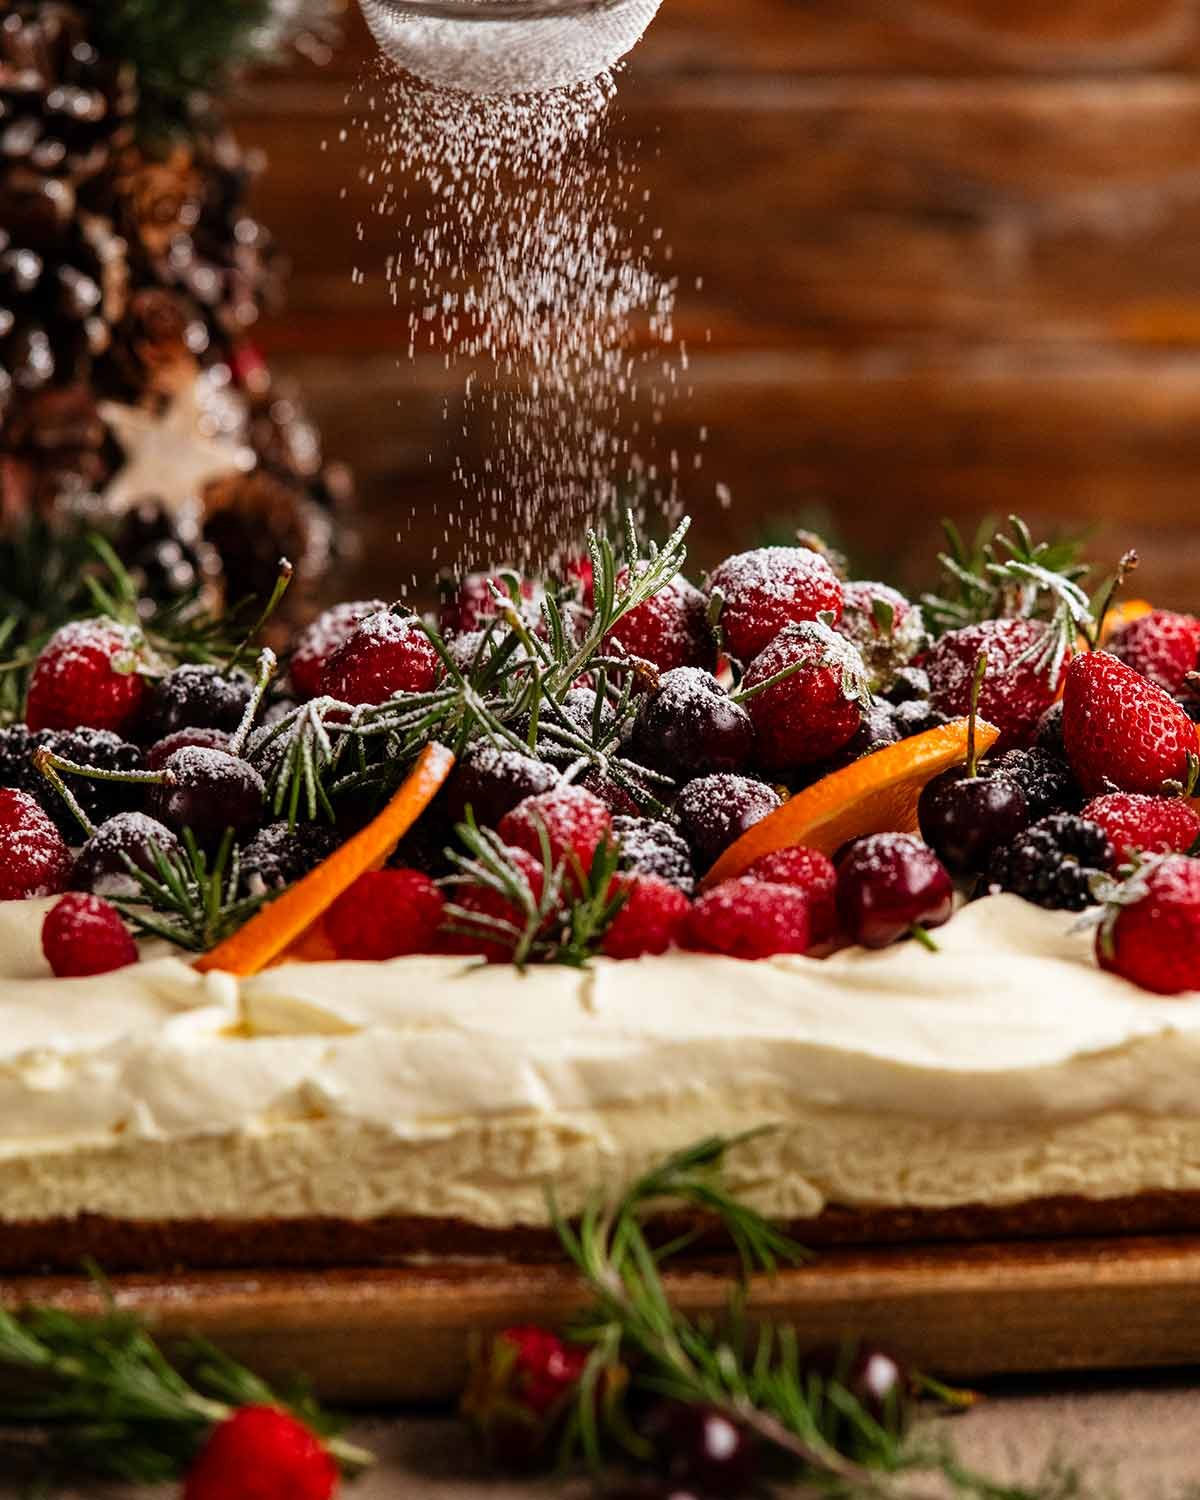
I love that it looks so festive yet there’s no fiddling with fondant or hunting down Christmas cake toppers. It’s just berries, orange slices, rosemary and a dusting of icing sugar!
About this Christmas Cheesecake
This is officially the easiest cheesecake recipe I know. It’s easier and faster than baked cheesecakes because there’s no baking, cooling or stressing about a cracked surface.
And it’s easier than my round no-bake cheesecake because this slab form has no biscuit sides (which can be fiddly), just the base!
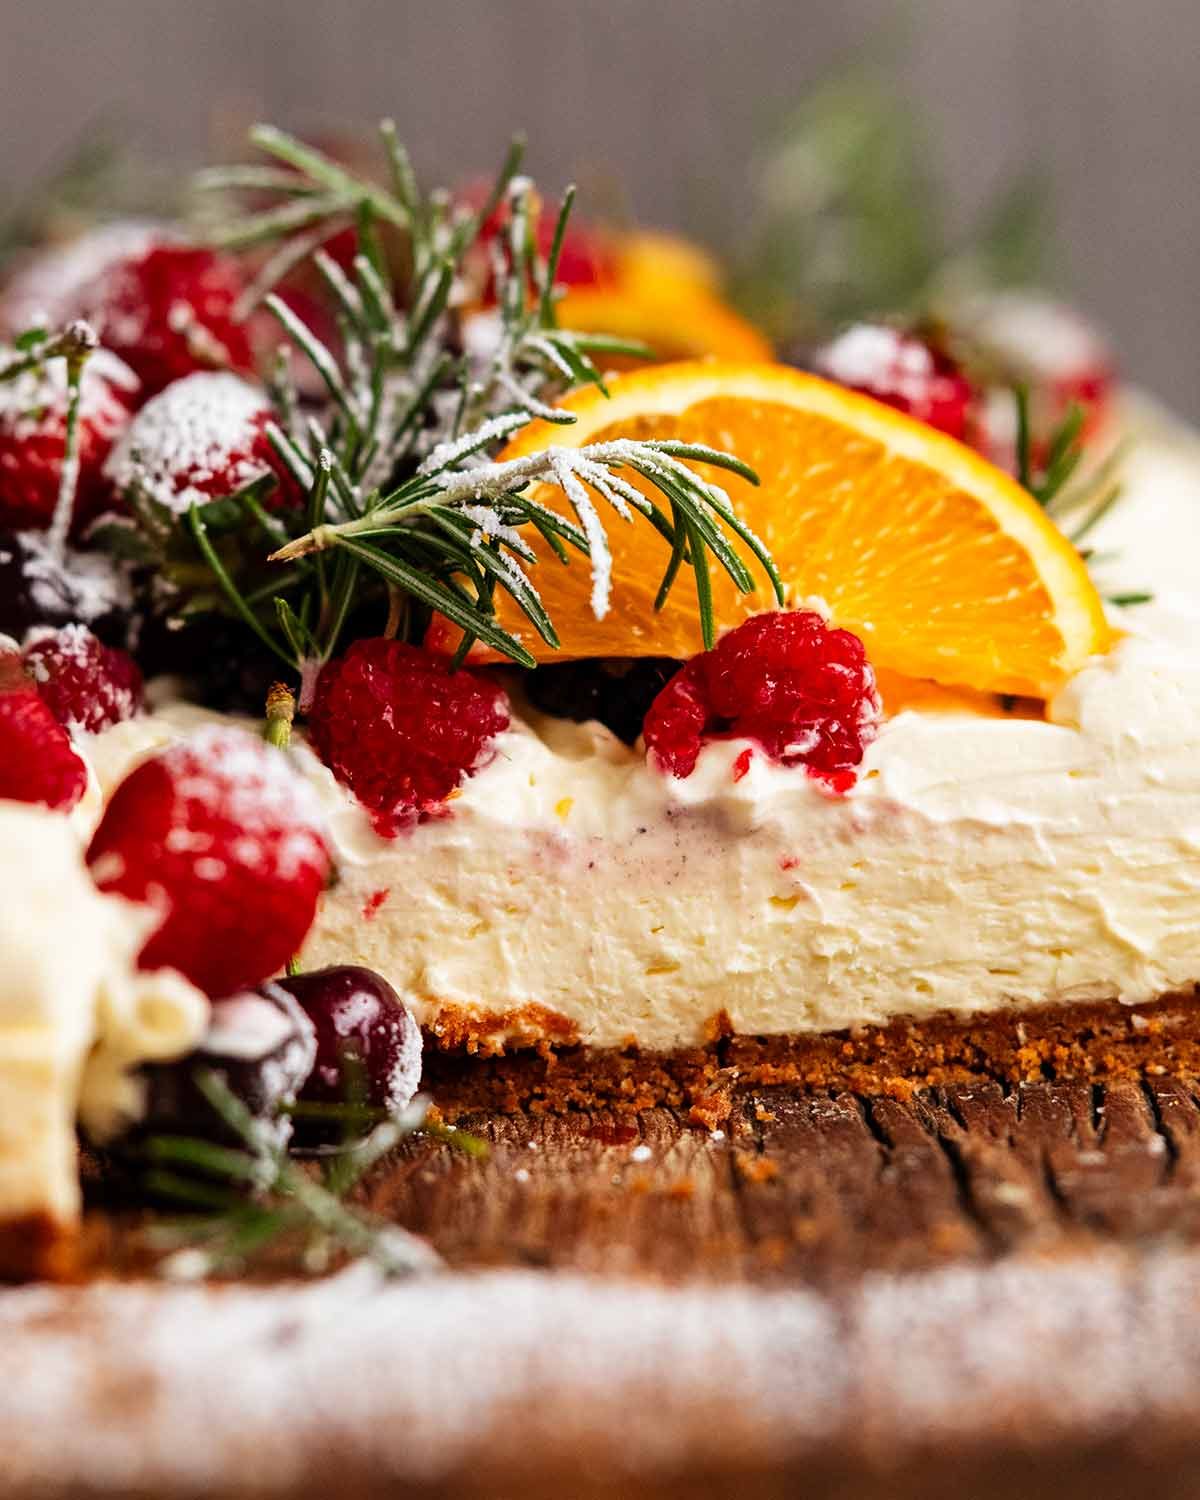
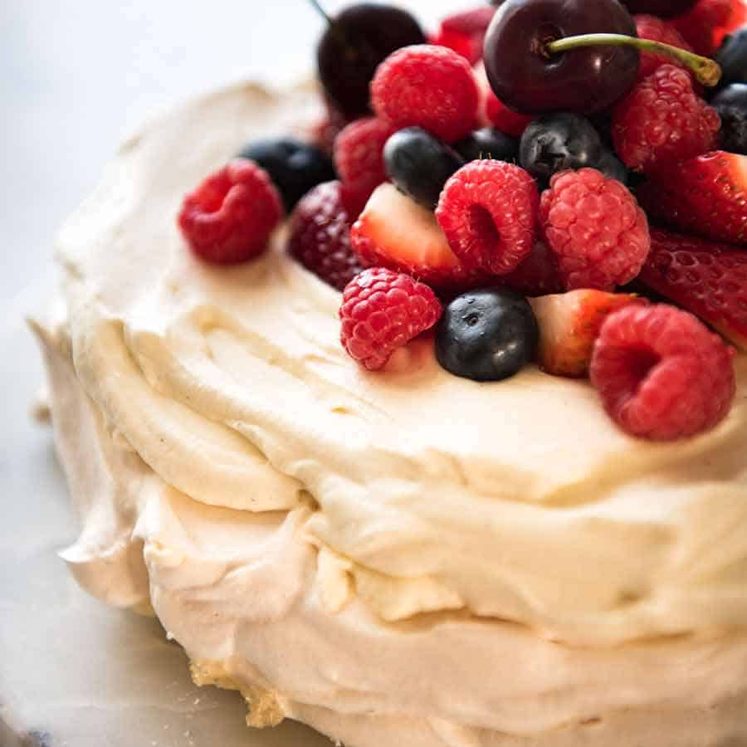
Yet , this slab-form festive Christmas cheesecake captures all the light-but-creamy, indulgent charm of a beautiful classic baked cheesecake. It’s not too sweet as I’m very particular about sweetness level in cakes. I describe it as French / Japanese patisserie level sweet, which is less sweet than typical Western desserts.
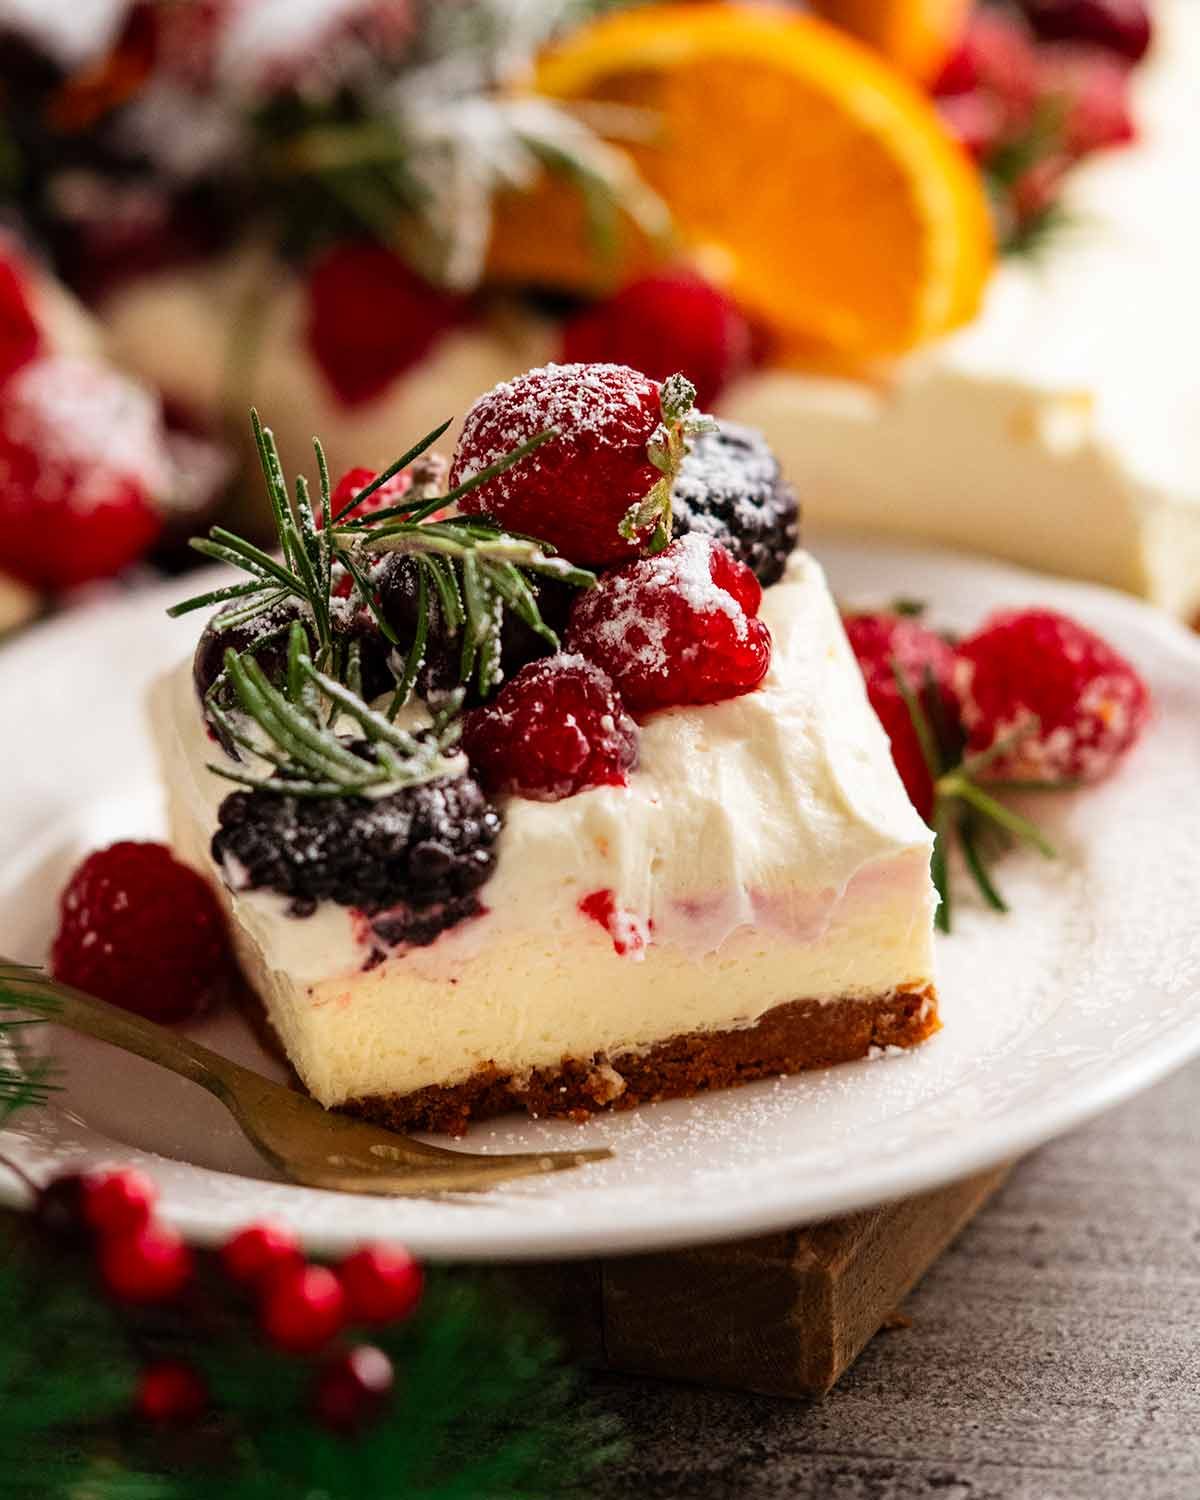
It’s in a large rectangle shape “slab form” and thinner than regular round cheesecakes because it’s designed to serve a large number of people – 18 to 24 people. It’s also ideal for gatherings where there’s plenty of food because the serving portion can be smaller than cutting wedges of tall round cheesecakes.
And have I mentioned the Biscoff biscuit base?? Love the Christmasy flavour!
Ingredients
This no bake Christmas cheesecake is based on the classic no-bake cheesecake I published earlier this year – pop over to read glowing reviews! Here’s what you need:
Biscoff biscuit base (or not!)
I use Biscoff for the base because it’s having a moment (so you get street cred, especially with the under 25 crowd), it has built-in holiday flavours (cinnamon, ginger, nutmeg – that sort of thing) and I like the rich golden colour. However, you can use any plain biscuits you want – see below for suggestions.

Biscoff – This is spiced biscuit from Belgium has been around “forever” in Europe but really gained popularity in recent years thanks to social media. It’s a lovely spiced cookie, and ideal for this particular recipe because of the holiday spicing, but I really don’t know why people lose their minds over it. (Speaking frankly, as a thoroughly un-hip foodie!).
It’s also a little dearer than other plain biscuits. Don’t fret if you can’t find it or prefer a more economical option, noting that you need to buy 2 packets as the recipe calls for 300g/10oz and each packet is 250g/8.8oz. (I did try with just one packet but the base was too thin and lacked structure).
Other biscuit options – you can use any plain biscuits you want. Marie Crackers (common cheesecake base here in Australia), digestives, graham crackers (US). You can also add a touch of extra spices for holiday flavour if you want (nutmeg, ginger, all spice), see recipe notes for amounts.
Avoid biscuits/cookies coated with chocolate, or sandwiched with filling (like Oreos) because it may affect how well this no-bake base sets.
Butter – This is what holds the cheesecake base together because it solidifies when the cheesecake is refrigerated.
Sugar – Just a smidge, for a boost of sweetness in the base. It is, after all, the holidays! 🙂
Cinnamon – For an extra touch of holiday flavour.


The no-bake cheesecake filling
Alarmed because you spotted gelatine? Don’t be! See below for why.

Cream cheese – I always use Philadelphia but if you’ve had success with another brand, feel free to use that.
Softened to room temperature – Take it out of the fridge at least 1 hour prior so the cream cheese is softened, not fridge-cold-hard. We want to be able to beat it so it’s quite soft, smooth and fluffy so the whipped cream mixes effortlessly into it without knocking out the air (which means a lovely light aerated cheesecake filling = win!). It’s also important to ensure the gelatine mixes in smoothly. Nobody wants little bits of gelatine in their cheesecake! 😱
Blocks not tubs – This recipe calls for cream cheese blocks which are firmer than cream cheese in tubs which are softer as they are designed for spreading. If you can only get tubs, you just need to use a little more gelatine. See notes in the recipe card for quantity.
Gelatine – This is essential for a no-bake cheesecake that rivals the texture of a beautiful classic baked cheesecake (which has egg in the filling, that’s what sets it), one that is light-yet-creamy yet set enough to cut slices. Without gelatine, you need more cream cheese so the cheesecake sets enough to cut, which means it’s heavier and denser. See FAQ below for some background on versions I tried.
Gelatine is cheap, easy to use, and sold at regular grocery stores. I prefer to use powder rather than gelatine leaves when I can because it’s more accessible and (important to me) the strength is relatively universal around the world. The same cannot be said for gelatine leaves. 🙂
Find gelatine powder in the baking aisle in small tubs (pictured above) or packets of small sachets (open and measure using a teaspoon).
Water – This is to “bloom” the gelatine (explained in the step photos below). I use the bare minimum for the amount of gelatine I use – just 3 tablespoons – so we don’t dilute flavour.
Whipping cream – Whipped cream helps create a lovely light textured filling by aerating the cream cheese. You can use thickened / heavy cream, or regular cream. Just make sure it can be whipped because not all cream is made for whipping (for example, pouring cream, dolloping cream). The label should say if it can be whipped.
Couple more cream rules:
1. No low fat! Now is not the time! It will compromise the texture.
2. Fridge cold! The cream needs to be fridge cold else it will not whip properly.Sugar – Best to use caster sugar (superfine sugar) which are finer grains than regular sugar (granulated sugar) so we can be confident it will dissolve. It’s especially important because this is a no-bake recipe so we don’t have heat on our side here to melt the sugar. If you only have regular sugar, that’s ok. Just beat the cream cheese for a little longer than per the recipe and rub the mixture between your fingers to ensure there’s no sugar grains left.
Vanilla – Please use vanilla extract which is real flavour extracted from vanilla beans (hence the name!) rather than vanilla essence which is imitation. It’s especially important for no-bake recipes because the vanilla flavour is “raw” and doesn’t have the benefit of baking in the oven to bring out the flavour.
Lemon juice – Just a touch, to bring a smidge of tang to the filling. It’s not a deal breaker if you don’t have it, just leave it out.
Salt – Standard baking practice these days to bring out the flavours in sweet baked goods. We use just a tiny amount so it doesn’t make it salty by any stretch of the imagination.
Decorations
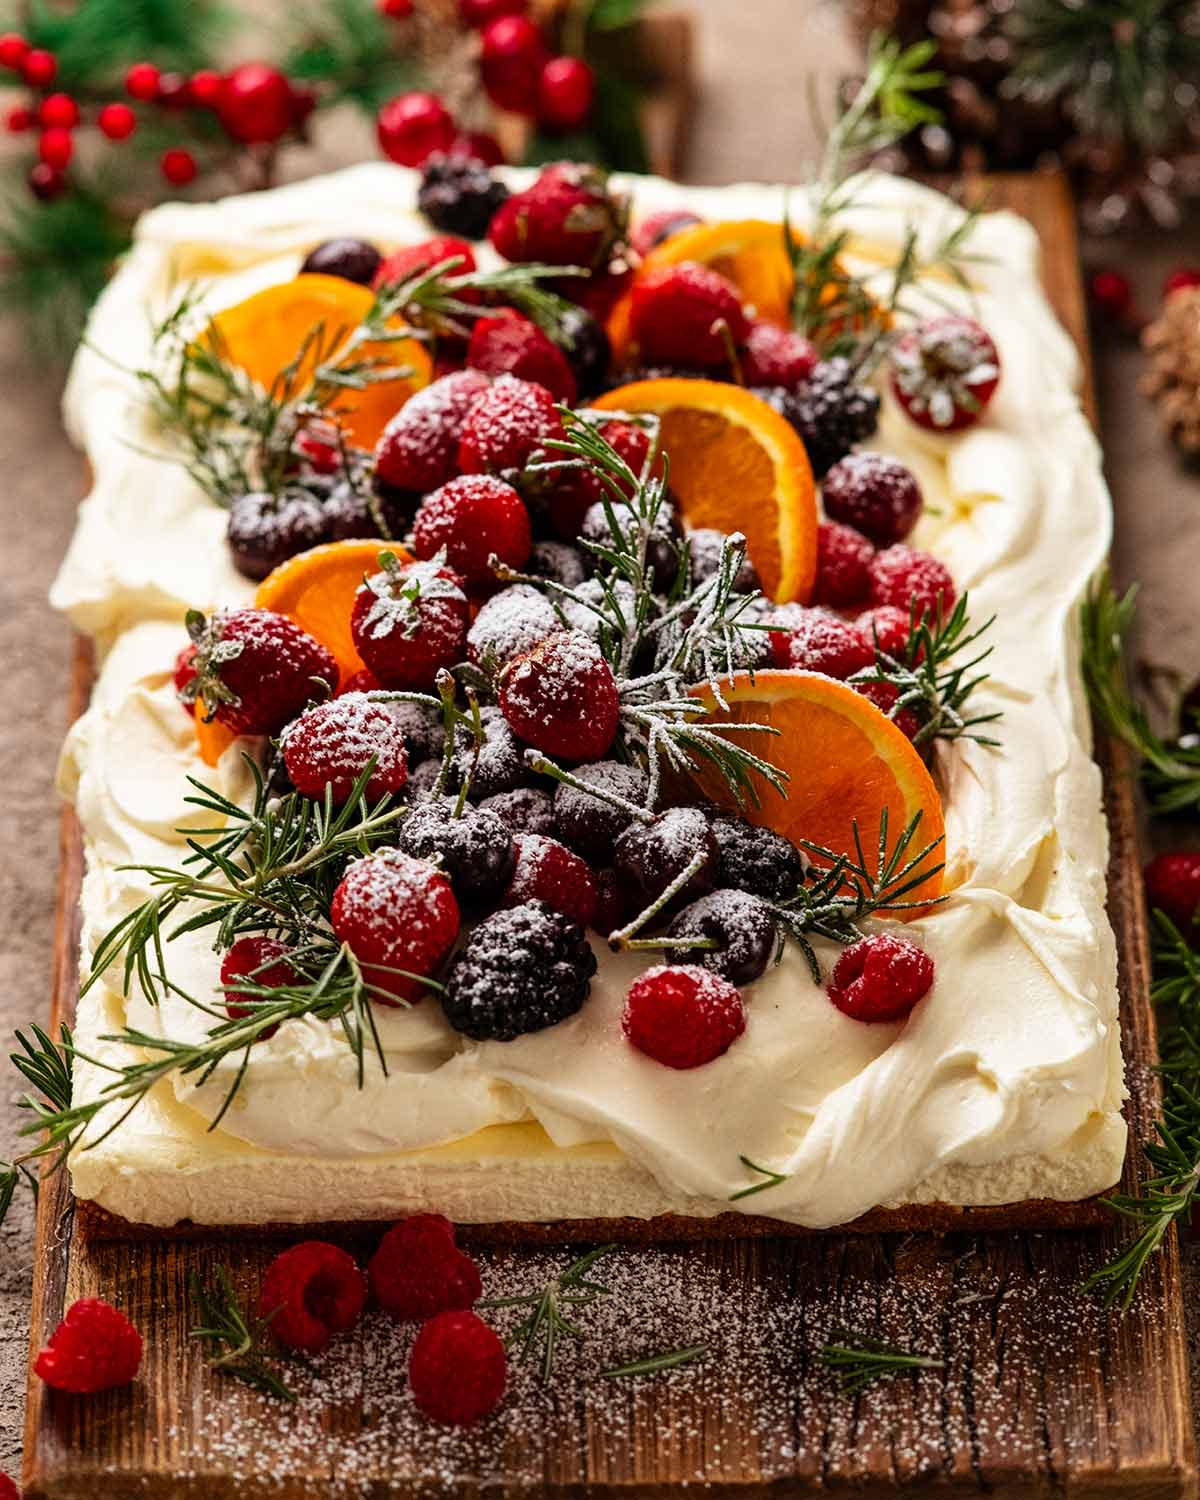
For a Christmas look, I smothered the cheesecake with a fairly generous amount of whipped cream then decorated it with berries and rosemary dusted with icing sugar.
I also tucked in some orange slices to add a nice splash of bright orange and break up the busy mass of berries. I think it works quite well!
Other decorating ideas – The rectangle cheesecake surface is literally like a blank canvas, ready for you to work your magic! Here are a few more decorating ideas:
Aussie summer Pavlova style! I see passionfruit, mango slices, strawberries and blueberries with little mint leaves for a splash of colour. Gorgeous!
Fruit compote and sauces (also see Mango Cheesecake, Strawberry and Blueberry Cheesecake, and Blueberry Cheesecake Bars);
Sauce – Serve with a chocolate or salted caramel sauce, though when I make chocolate or caramel cheesecakes I like to get those flavours inside the cheesecake too by swirling them in (I also usually add a hidden layer inside, for extra impact). They will be coming onto my website eventually! 🙂
Sprinkle of nuts and/or chocolate shavings – Think, macadamia and white chocolate, peanuts and dark chocolate, pecans and chocolate, pistachios or almonds. Lovely addition of texture!
Pretty spring garden – Edible flowers, petals and leaves (dried or fresh), pistachios, gold leaf! I have visions I hope to make a reality one day. 🙂
How to make this Slab No Bake Cheesecake
This slab form cheesecake is easier than my classic round no bake cheesecake which has a biscuit wall. Although not technically difficult, biscuit walls can be a bit fiddly if you’re a first timer.
The one important step to remember is to line the pan with plenty of paper overhang so you can easily lift the cheesecake out of the pan once it is set.
1. biscoff crust
If you don’t have a food processor, just put the biscuits in a ziplock bag and bash with a rolling pin or meat mallet (it’s very satisfying). Because of the volume we are using, you might find it easier to do this in two batches.

Prepare pan – Lightly grease a 23 x 33cm / 9 x 13″ rectangle pan with butter or a plain oil spray (I use canola), just enough for paper to stick. I emphasise LIGHTLY because if you use too much butter, it acts as a glue once refrigerated so you have to wait until the butter softens before removing the cheesecake (Yes I know this from personal experience 😁)
Then line the pan with baking paper (parchment paper) with LOTS of overhang on the long side, to make it easy to lift the cheesecake out at the end. It’s ok if you don’t get 100% coverage on the base (like mine, because standard baking paper is a little shorter than my pan).
Blitz – Break the Biscoff biscuits up roughly by hand and blitz until they become fine crumbs, about 10 to 15 seconds on high, depending on how powerful your food processor is. Add the butter, cinnamon, sugar and salt, then blitz again until it becomes wet sand.
CHECK for clumping ability! The mixture should press together well when pinched between fingers. This is important to check because structural integrity of the base is key to ensure your cheesecake holds together when you lift it out of the pan!
⚠️ Not pressing together? Just add a little extra melted butter. You might have this problem if you used a lower fat biscuit than Biscoff, or if they were a bit stale.

Pour the crumbs into the prepared pan.
Press it in firmly. The firmer you press it in, the more stable your base will be. Then refrigerate until required.
Note: The idea here with this no-bake biscuit base is that the melted butter solidifies and this is what holds the biscuits crumbs together.
2. BLOOM THE GELATINE
There is no need to fear gelatine! It’s simple to use if you just follow the steps I’ve provided. There’s a reason for every direction!

Bloom gelatine – Put the water in a small bowl then sprinkle the gelatine across the surface. Mix with a small whisk (or spoon) – it will become like lumpy jelly. Then leave it for 5 minutes. This is called “blooming” the gelatine, and it makes gelatine powder dissolve so it can be stirring into liquids to make them set.
⚠️ Don’t dump the gelatine in one place and don’t pour water into the gelatine. This can cause the gelatine to turn into a big lump immediately.
Rubbery! The gelatine should solidify into a firm rubber. If it doesn’t, then your gelatine is dead – time to get another!

Gently re-melt – Microwave for 15 seconds on high to melt it then mix until lump free.⚠️ Do not let it boil as it can destroy the setting abilities of gelatine.
Cool for 5 minutes while you make the filling. The melted gelatine will be whipped into the filling.
⚠️ Make sure the gelatine does not have a skin on the surface or sides when you pour it in as this will not mix into the cheesecake filling properly. If it does, re-heat for 5 seconds in the microwave.
⚠️ Do not pour hot gelatine into cream or anything that it could melt or deflate. Cool it first but make sure it’s still in liquid form. It’s ok to use slightly warmer than room temperature.
3. MAKE FILLING
I prefer using a handheld electric beater to make the filling as you can move it around the bowl rather than stopping and scraping down the sides like you’d need to do with a stand mixer. You also only need to use one attachment (the whisks). If you use a stand mixer, use the whisk attachment to whip the cream, then the paddle attachment for the cream cheese step (stand mixer whisk may aerate it too much because it’s more powerful = large unsightly bubbles + risk of collapse mid-setting).

Whip cream – Put the cream in a bowl and whip it on high for 2 minutes or until stiff peaks form. We’re not looking for silky soft whipped cream, we want full on stiff whipped cream, as this makes our cheesecake beautiful light and fluffy.
Beat cream cheese – Put the cream cheese and sugar in a separate bowl and using the same whisk (no need to clean it), beat for 1 minute on high just until it’s softly smooth. Then add the vanilla, lemon, salt and melted cooled gelatine, then beat it in just until dispersed.⚠️ Don’t beat excessively because it can cause unsightly large air bubbles in the filling (not the end of the world though, I’m just fussy!).

Fold in whipped cream – Using a rubber spatula, fold through about 1/4 of the cream into the cream cheese filling. This lightens up the cream cheese mixture a bit before adding the rest of the cream, so less air is knocked out of the cream.Once the initial cream is mostly mixed through, gently mix through the remaining cream. Don’t stir vigorously as you will knock air out of the whipped cream which will make the cheesecake filling denser than we are aiming for!
Pour the mixture into the prepared crust.

Smooth – Gently spread the filling across the base and smooth the surface.
Set – Cover the pan with a large cutting tray, baking tray or foil (not cling wrap, it might sag and touch the surface). Refrigerate for at least 12 hours until the filling is set.
4. REMOVING FROM THE PAN AND DECORATING

Remove cheesecake from pan – Use the paper overhang to lift the cheesecake out of the pan and transfer it to your serving platter. Then slide the paper out from underneath.
Tips/notes:
– Sagging base: Don’t fret if your base sags a little bit when you lift it out, it still holds together. You’ll see in the recipe video mine is not 100% stiff and straight, and it’s totally ok.
– Stuck! It you were a little too enthusiastic greasing your pan with butter and your cheesecake is stuck, just wet a tea towel with hot water and put the pan on it to accelerate softening the butter without having to leave the cheesecake out for too long (blazing hot Aussie summers are not a friend of cheesecake). It should only take a minute or two.Decorate as you please! Here’s what I did for a Christmas Cheesecake look. First, spread generously with whipped cream.

Pile on berries (I used cherries, raspberries, small strawberries), tuck in orange slices (to break up the visual mass of berries), poke some rosemary sprigs in.
Dust with icing sugar / confectionary sugar. This always makes things look so pretty!

Assemble ahead with stabilised whipped cream!
There you go! My brand new Christmas dessert for 2024 built with practicality in mind.
Speaking of which, I have a gold tip for making this ahead! Because even though it’s easy to write the instruction to decorate the cheesecake just prior to serving, the reality is that nobody wants to leave the party to go and whip cream, spread it on the cheesecake, decorate and dust…
But whipped cream, being the delicate thing that it is, starts to deflate within a few hours. But not if you stabilise the whipped cream! You just need to add a little gelatine when you whip the cream, and this will stabilise it enough so it stays fluffy for a couple of days, like it was freshly whipped. It doesn’t alter the texture or taste of the whipped cream, and nobody except you (and anyone you decide to disclose your secret to) will know.
See the recipe notes for how to make the stabilised whipped cream. It’s a game changer for cream decorated cakes – so handy! – Nagi x
Christmas cheesecake FAQ
The shorter of the cream shelf life and 7 days. The biscuit base is at its best 12 to 36 hours after putting it in the fridge to set (ie. crispest), still excellent on days 2 to 4 (though loses bit of crunch), then on day 4 it does soften a bit but not enough for anyone to complain. (Except me about my own cheesecakes 😂)
Note: the whipped cream decorations will deflate and weep with time unless you stabilise it, see Making Ahead below.
The cheesecake needs to be made 12 hours before serving so it has time for the gelatine to make the filling set. The cake is best decorated with whipped cream and berries etc as close as possible to serving because whipped cream deflates with time (~ 3 hour mark). Get organised with everything measured out, berries in tubs etc to make your life easier.
To decorate the day before, it is best to stabilise the whipped cream using gelatine (we’ve got it anyway!) so it stays fluffy like freshly made for a couple of days. See recipe card notes for how to do this, and commentary in the post above for chatter about this whipped cream stabilising business that’s going to change your cake decorating life!
No. If you are ok with a denser, more rich cheesecake that uses more cream cheese to make the filling set, or one that doesn’t set properly so it’s kind of melty and weepy when you cut it, then you can make a no-bake cheesecake without gelatine! Unfortunately I don’t have a recipe for those versions on my website so you’ll have to do some Googling. I suspect the same recipes I tried will surface at the top of your search results.
I really want my no-bake cheesecake to have the same texture as my classic baked one, where the filling is light (think – mousse-like qualities) rather than thick and dense (like cutting into a block of cream cheese), and melts into creamy lusciousness in your mouth. It’s what I describe as that elusive combination of light-yet-rich.
And have tried all sorts of versions with and without gelatine, I really can say the gelatine version delivers the best results for my taste.
Still dubious? Worth growing the glowing reader reviews on my classic round no-bake cheesecake which is the base for this Christmas cheesecake!
A classic cheesecake is baked and it is made using egg that is whipped to aerate the cream cheese filling and then sets the filling when it’s baked in the oven. No-bake cheesecakes are not baked so they don’t include egg, but instead rely on other means to set the filling. Either more cream cheese, gelatine (my preferred method) or the cheesecake is made flatter with less filling (which means making it set properly isn’t as tricky).
See the FAQ above for a comparison of the methods ie gelatine v no gelatine.
Block cream cheese is firmer than tub cream cheese (which is softer because it’s designed for spreading). In some countries, only tub cream cheese is available – like the UK (or, it was the case previously, is it still the case?).
But that’s ok! You will just need to use a little more gelatine to help the filling set.
This recipe uses the cream cheese filling from my no bake cheesecake so the work I did creating that recipe paid off here!
The biggest challenge creating my original no-bake cheesecake was getting the gelatine amount exactly right so the filling set just enough but not so much that it was in panna cotta or jelly territory.
For this slab-form cheesecake, I fiddled with the base thickness a few times, thinking it might need to be thicker so it was stiff enough to lift out of the pan without sagging at all. Because it does sag a bit (just a smidge) when you lift the cheesecake out (and it’s a sizeable amount of cheesecake!).
But, as it turns out, a little sagging doesn’t compromise the structure of the base at all because, I guess, the filling holds the base together too. So I went back to a sensible amount of biscuit base, and a happy equilibrium was found in the land of no-bake cheesecake slabs!
Actually, the biggest “challenge” for this recipe was deciding how to decorate it! The whole point of today’s recipe was to make it Christmassy. But I’m just not a fondant sort. I do it, but it’s not something I am particularly fond of (using or eating).
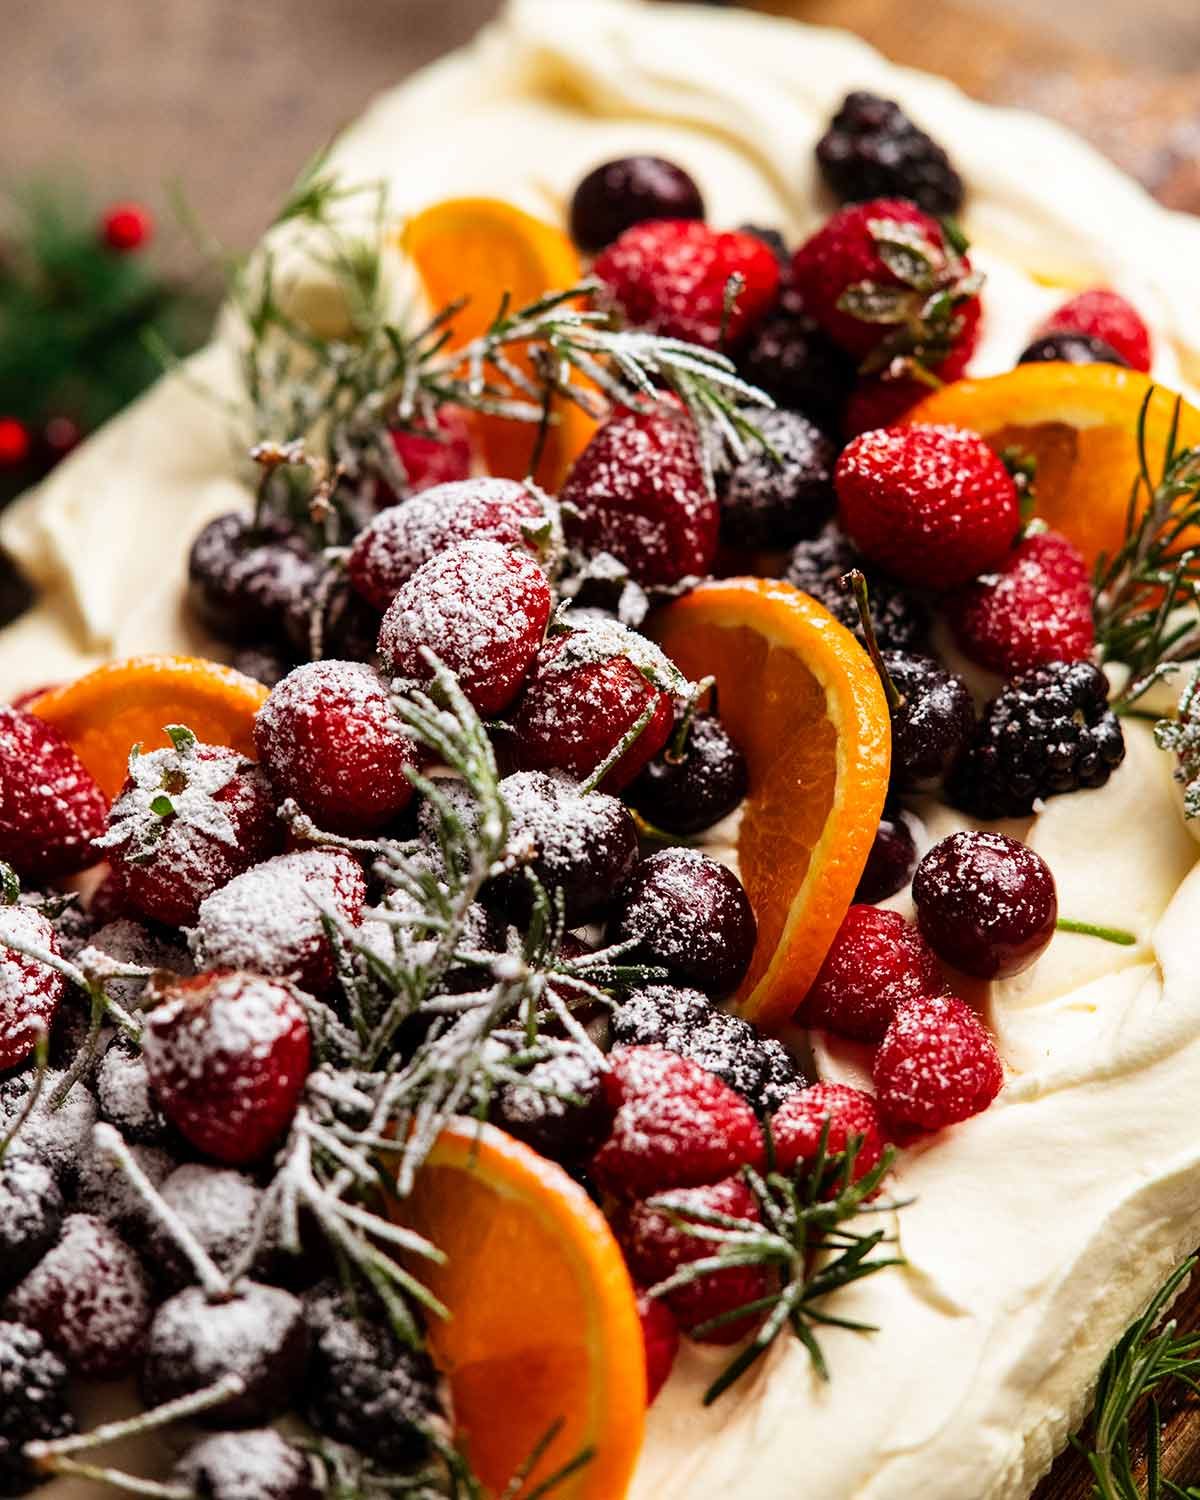
I brainstormed all sorts of ideas for how to decorate this cheesecake to make it look festive but without having to hunt down speciality cake toppers. In the end, I stuck with berries and cherries, safe Christmas-dessert choices.
I piled them on but thought it looked a bit too much like a giant mass of berries, too busy, and too same-same colours (yes, this is how my mind thinks).
So I grabbed a few orange slices and stuck them in to break up the business and add a splash of bright orange colour. Stuck a few rosemary sprigs in, dusted with icing sugar (everything looks Christmassy with a dusting of icing sugar!!).
I think it works! 🙂
See above in the post in the Ingredients > Decorating section.
Watch how to make it
Hungry for more? Subscribe to my newsletter and follow along on Facebook, Pinterest and Instagram for all of the latest updates.

Easy Christmas Cheesecake Slab – no bake!
Ingredients
Biscuit crust:
- 300g/10 oz Biscoff (38 pieces) or other plain biscuit/cookies 1 1/2 cups crumbs) (Note 1)
- 120g (8 tbsp) unsalted butter , melted
- 1/2 tsp cinnamon powder (optional, recommended)
- 1 tbsp brown sugar
- Pinch of salt
No-bake cheesecake filling:
- 3 1/2 tsp (13.5 g) gelatin powder , unflavoured (Note 2)
- 3 tbsp cold tap water
- 1 1/2 cups thickened or heavy cream , or any whipping cream, FRIDGE COLD (Note 3)
- 750g/ 24 oz cream cheese block (3 blocks, , well softened at room temperature – don't use tub (Note 4)
- 1 1/4 cups caster sugar / superfine sugar (Note 5)
- 1 1/2 tsp vanilla extract
- 1 tbsp lemon juice (not critical, can do without)
Whipped cream (Chantilly cream)
- 2 cups thickened or heavy cream , or any whipping cream, FRIDGE COLD (Note 3)
- 3 tbsp caster sugar / superfine sugar (or double quantity of icing sugar, sifted)
- 1 1/2 tsp vanilla extract
Christmas decoration
- Strawberries (halve or quarter larger ones, mine were small)
- Berries – I used blackberries and raspberries
- Cherries
- Rosemary sprigs
- 6 orange slices , cut into half moons
- Icing sugar / confectionary sugar , for dusting
Instructions
ABBREVIATED RECIPE:
- Blitz crumb. Press into 33 x 23 cm / 9 x 13" lined pan with paper overhang (important). Bloom gelatine in the water, re-melt. Whip cream. In separate bowl whip cream cheese + sugar, then vanilla, lemon, salt and gelatine. Fold in 1/4 cream, then remaining cream. Fill pan, fridge 12 hours, decorate!
FULL RECIPE:
Line pan with overhang:
- Line – Grease a 23 x 33 cm / 9 x 13" can VERY lightly with butter or spray with a plain oil (I use canola). Line with parchment/baking paper with lots of overhang on the long side to lift the cheesecake out once set (see photos).
Biscuit crust:
- Blitz – Break up biscuits roughly by hand and place in a food processor. Blitz until it becomes fine crumbs (~30 seconds).
- Add butter – Add the butter, cinnamon and salt. Blitz until it resembles wet sand (~ 10 second). It should stay together when pinched between your fingers.
- Press – Pour into the prepared pan. Spread then use your hand or something flat to press it in firmly (firmer = more stable base). Refrigerate until required.
Gelatine (Note 2):
- Bloom gelatine – Put the water in a small bowl and sprinkle the gelatine across the surface (don't dump it in one place. Whisk until dissolved then set aside for 3 minute or until it firms up like rubber.
- Melt – Microwave for 15 seconds on high or until it melts (do not let it boil). Cool for 5 minutes while you make the filling (make sure it's still liquid when you use it, if there's a skin on surface or walls, warm for 5 seconds to liquify).
No-bake cheesecake filling:
- Whip cream – Put the cream in a bowl and whip it with an electric beater on high for 2 1/2 to 3 minutes until firm peaks form (ie not softly whipped, we want good aeration!).
- Whip cream cheese – Put the cream cheese and sugar in a separate large bowl. Using the same beater (no need to clean), beat on high for 1 1/2 minutes just until it's soft and smooth. Add the vanilla, lemon and melted gelatine, then beat for 10 seconds on high to mix it through thoroughly. Don't beat excessively as we don't want too many air bubbles in the cheesecake (unsightly).
- Fold – Add about 1/4 of the whipped cream into the cream cheese mixture. Gently fold through using a rubber spatula or large spoon (don't mix aggressively, you'll knock all the air out of the cream!). Then fold in the rest of the cream.
- Refrigerate – Pour into the pan and smooth the surface. Refrigerate for 12 hours+ to set.
Decorating:
- Remove – Use the paper overhang to lift the cheesecake out of the pan and transfer it onto a serving platter. Then slide the paper out from underneath. Refrigerate until ready to decorate.
- Whip cream – Put the ingredients in a bowl and whip on high for 2 to 3 minutes until softly whipped. (Use an electric beater or stand mixer fitted with a whisk. Also, see Note 6 for stabilising to assemble ahead).
- Decorate – Spread the cream in big swirls across the surface of the cake. Pile on the berries and cherries, tuck in the orange slices and rosemary. Dust with icing sugar then cut into slices and serve!
Recipe Notes:
Nutrition Information:
My signature Christmas desserts


Life of Dozer
After Dozer’s fertiliser munching emergency-vet-run earlier this week, happy to report he seems fine. Here he is, looking contrite and apologetic for all the worry and hassle he caused. (You need to look closely to catch the apology in his eyes. You might need to blow up the photos. Dozer also thanks everybody for their concern and well wishes.)


Hi Nagi. Maybe a dumb question but are the cream measurements pre or post whipping?
I haven’t made this recipe but generally measurements are pre whipping
I printed this recipe. Then for some reason looked up the recipe on line. The filling on the printed version had 250ml thickened cream and 150g caster sugar. When I looked online, the amounts were 375ml cream and 250ml sugar. Also the abbreviated version says add salt with vanilla, lemon juice etc. I didn’t see the salt till too late, but added it to the base, and for the filling did 375ml cream and 200g sugar. Think it will be ok.
Tasted ok. The big eat still to come.
Can i half the recipe as we have only a few of us
Hi Nagi!
Is there anything to take into consideration if using lactose free cream cheese and cream?
It’s pretty good, but I had gelatin problems that made the filling and topping a little more stiff than they probably should be. I used Walmart “Great Value” gelatin. Their no-bake cheesecake uses 1 packet dissolved in 1 cup of boiling water for 4-5 minutes… I don’t think Nagi’s measurements work exactly the same with this stuff. I had to double the water and add the gelatin warm to both the filling and the topping (!) because it gelled immediately. Fortunately I didn’t get clumps in either and it seems okay, other than a little dense, like me… Oh, it’s very good with lime juice instead of lemon. My topping was ugly dense, so I covered it with a mosaic of thin quartered slices of kiwi fruit, as I can’t get fresh berries now. It’s funky, so what? Hey, Biscoffs don’t have bioengineered ingredients like grahams here do, that’s why I use them, maybe that’s why they’re supposedly a thing?
I made this last Friday and it was fabulous. Everyone loved it. Served 12 people with large serves and there were still leftovers to be enjoyed. Highly recommend.
Can this recipe be halved for a small group? If so not sure of quantities
I made a halved size for Christmas, I just slid the 18-24 serve slider back to 9 – 24 and followed the ingredients for that. Worked beautifully. Just remember Nagi’s notes are for the full sized cake and don’t change with the serving size slider, so when she says 3 blocks of Philly, you’d only use 1.5 blocks.
Just wondering what style of cake tin you used for half the recipe?
Oh Wow! I just looked at your weather forecast. I’m in Chicago. it’ll be 3°C on Christmas. 28°C sounds nice 🙂
Could I top the cheesecake with pavlova kisses and fruit ? Making a cheesecake / pavlova for the Christmas table?
ABSOLUTELY!! Tag me on Instagram if you do it, I’d love to see it!! N x
I made this on the weekend and it was a HUGE hit, the only issue – I could not get it out of the tin. It was about to crack in half and break so I had to serve it in the tin. Any tips on how to avoid this? I had plenty of paper overhanging but may needed more?
Hi Lisa! I had a really specific step in the greasing of the pan to ensure it is either oil sprayed or if using butter, to make it VERY very light because butter makes the paper stick really firmly! That’s the only thing that sort of “glues” it to the tin which can make it a bit hard to pull out. If you use oil spray or a super light coat of butter, the paper (and cheesecake on it!) should lift out effortlessly. Talking from firsthand experience here! Because unlike you, I persisted, yanked, and cheesecake cracked 😂
Hi Nagi, made this for a get together and turned out really well. Forgot to bloom the gelatin for the whipped cream topping so it didn’t peak but redid and came our perfect! Thank you x
Australia
Can I half the ingredients to make this cheesecake (looks fabulous) – I have a small family.
I have a tin of gelatin I bought to make my baby food can I use it? I tried substituting it in a panna cotta and stuffed it up as the ratio & bloom is different (it set in layers) Is there an easy way to understand how to substitute different gelatine?
Hi Sunshine! I suggest googling your brand of gelatine (if it’s a special one for baby food) to find out the bloom then compare to McKenzie’s which is a standard bloom 🙂 Then you can fix the gelatine ratio based on this. N x
Any recommendation for gluten free base?
There is a recipe online for an “almond flour graham cracker pie crust” that is my go-to staple for this kind of thing. You toast the almond flour in a pan until it is golden and it has a wonderful flavor from this step. However, insert caveat here, Nagi’s recipe relies on being able to Eject the cheesecake and I’m not sure the almond flour recipe would manage that. If you are okay serving from the pan, the almond flour recipe is a great stand-in for graham cracker style crusts. Also, I just use sugar in the recipe when I make it, not erythritol or whatever. If I need to eject such a thing from a sheet pan on parchment and it seems dodgy, I just lift one side and slide 1 or 2 of those flexible/thin cutting boards under it first, then navigate from there. So the almond flour version might be a tad crumblier but is a wonderfully gluten-free option, and the recipe has those heady spices in it, too.
I’m going to try this for Christmas (in South Africa- so also hot).
Does the cheesecake need to stay in the fridge right up until serving time? Or can it survive being taken out a few hours in advance (as we are taking it to family lunch Xmas and fridge space will be at a premium!)
I would leave in fridge or at least an ice bucket (esky)
Hi Nagi, First time on your site? I am super keen to try this, can you suggest a gluten free biscuit? I am keen to make this on the weekend however a guest is gluten intolerant.
Hi MG, I haven’t made this with a GF biscuit but any plain one should be fine as the butter holds the crumbs together. Just do the pinch test I described in the recipe to make sure it holds together and you can always just add extra butter if needed! – N x
Google “almond flour graham cracker pie crust” made by toasting the almond flour in a pan and then mixing in the rest of the spices and binders (butter, butter/oil you choose). This is my go-to for this style of base/crust and adds a wonderful flavor from the toasted almonds. May be a little crumblier than Nagi’s recipe and if you are okay serving from the pan, this is a great option. I shove a couple of those flexible/thin cutting boards under the parchment before doing a “flat lift,” to give me the extra stability, then navigate judiciously from there, then they just slide off easily onto whatever surface you choose. I may also shove a flat/rigid white cutting board under those, depending on weight of the item, because remember – they are Flexible! You may have to be dapper and quick, but it works a treat if done right – smoothly, cautiously and quickly.
Hello Nagi, thanks for so many wonderful recipes this year and the BOOKS! This desert looks amazing, definitely on my Christmas menu, but also wondering can i halve it for less people? So glad Dozer is ok, perhaps he has now ‘processed’ the fertilizer for you??!
BEST WISHES to you and your family and Dozer of course for Christmas and 2025.
What gelatin substitutes can you suggest? Would the quantities be the same?
My question as well. We have a vegetarian (not vegan) in our family who would not like gelatin. I once tried using agar in a vegetarian cheesecake recipe and it turned into a brick so you cannot sub in the same amount and I’m curious if there is a rule of thumb for the quantity if subbing in agar?
Simply Delish, also from Australia, makes a plant-based gelatin in Unflavored, as well as many Jello-like flavors, such as raspberry, etc. and puddings. Great sub for vegetarians and vegans!
Simply Delish, also from Australia, makes a plant-based gelatin in Unflavored, as well as many Jello-like flavors, such as raspberry, etc. and puddings. Great sub for vegetarians and vegans!
My family is very excited about the prospect of scoffing this cheesecake on Xmas day and I love the whole MAKE AHEAD when there is so much other stuff to focus on – only problem there are only 5 of us this year. Does this recipe work the same if halved. I know not all recipes respond well to this. Cheers
Absolutely Kerynn! Halve it and use a 20cm/8″ square pan, or make the classic round one instead (linked plenty in the post because it is the recipe this is based on 🙂 ) – N x
Perfect. Thank you so much. Too many other things occurred for this to happen Xmas Day including Mother going into hospital xmas eve day etc etc so it’s now going to be a New Years Eve Special! Thank you
Yes
I personally prefer baked cheesecake but will give this a go as it looks amazing. Don’t use gelatine but there are a few good substitutes. Aren’t we the luckiest to have a summer Christmas with all the berries and stone fruit. Heaven!
We are VERY lucky Faye!! N x