
Homemade crackers! How much do you spend on your favourite artisan crackers? This whole recipe might cost $1 – and they’re so easy. No kneading, no yeast, with flavour you’ll never get in store bought. Use for cheese platters, dips, or snack on them like chips!

Homemade crackers
More than ever, I’ve been making homemade versions of snack-type foods I used to buy due to two reasons. First, the cost. I’ve always thought “gourmet crackers” were overpriced, but inflation has made them virtually impossible to justify buying.
Second, the flavour. If all you know is store bought, you can live your whole life thinking that’s what something tastes like. But just one experience of homemade, and you realise how much better something can be.
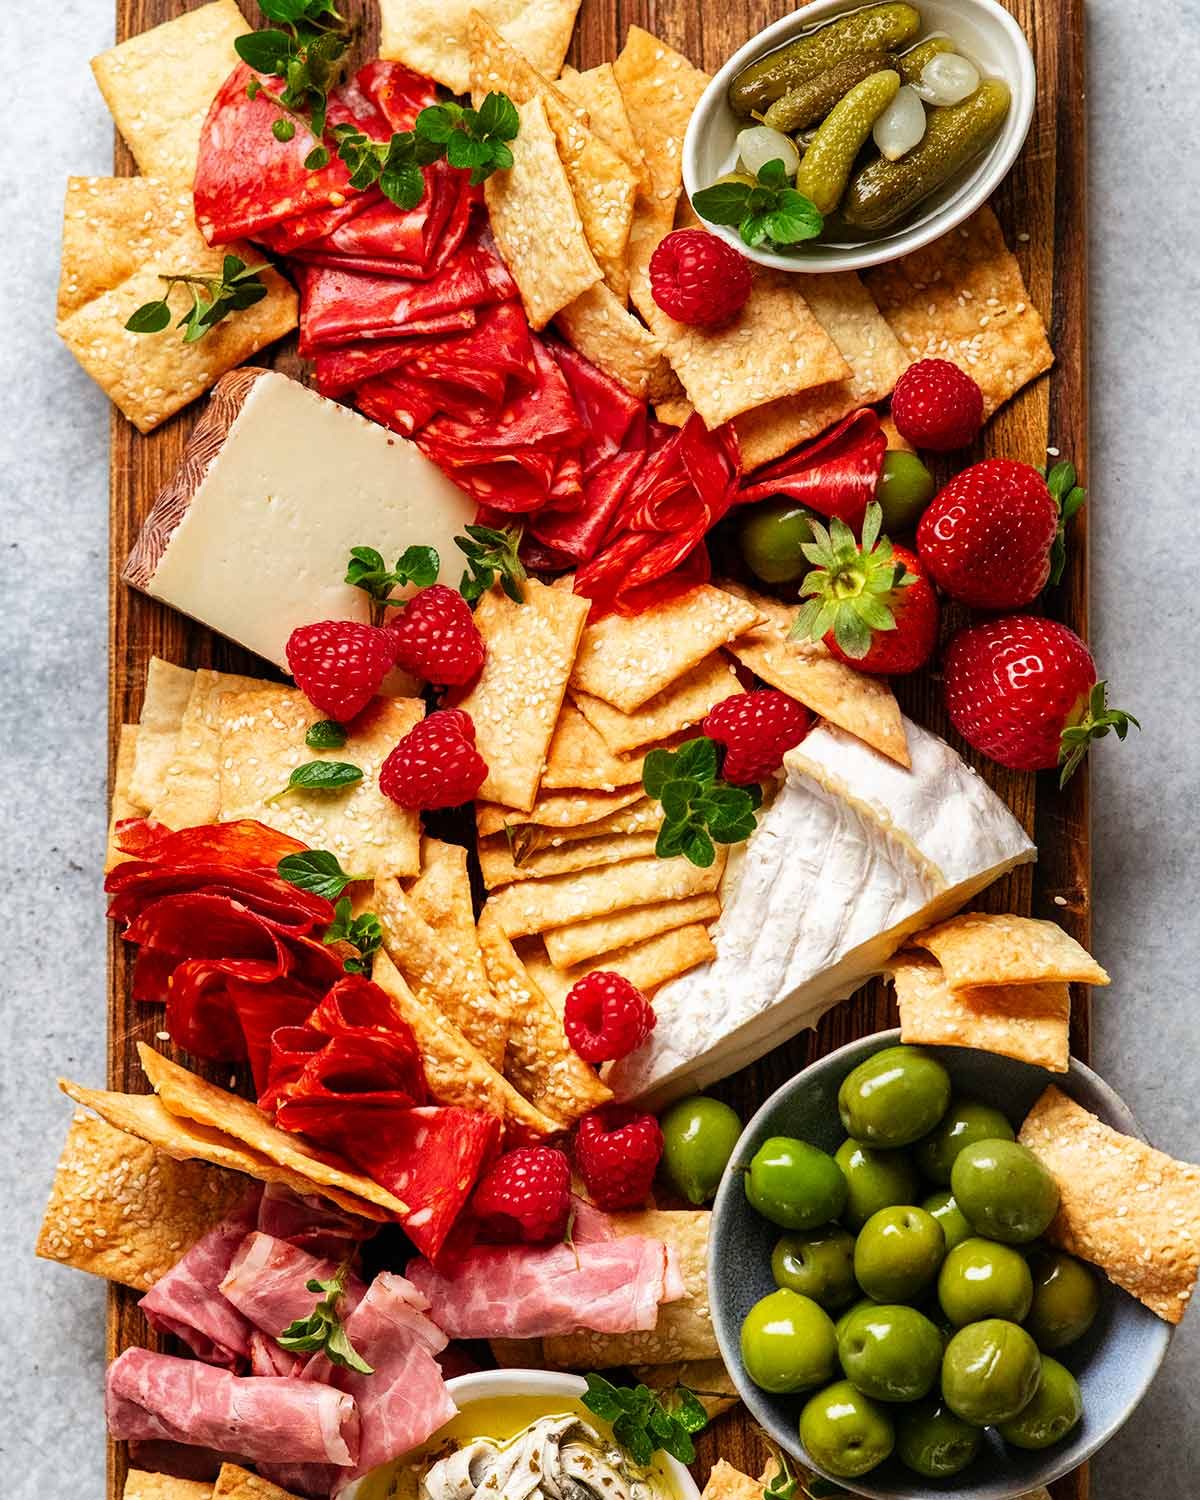
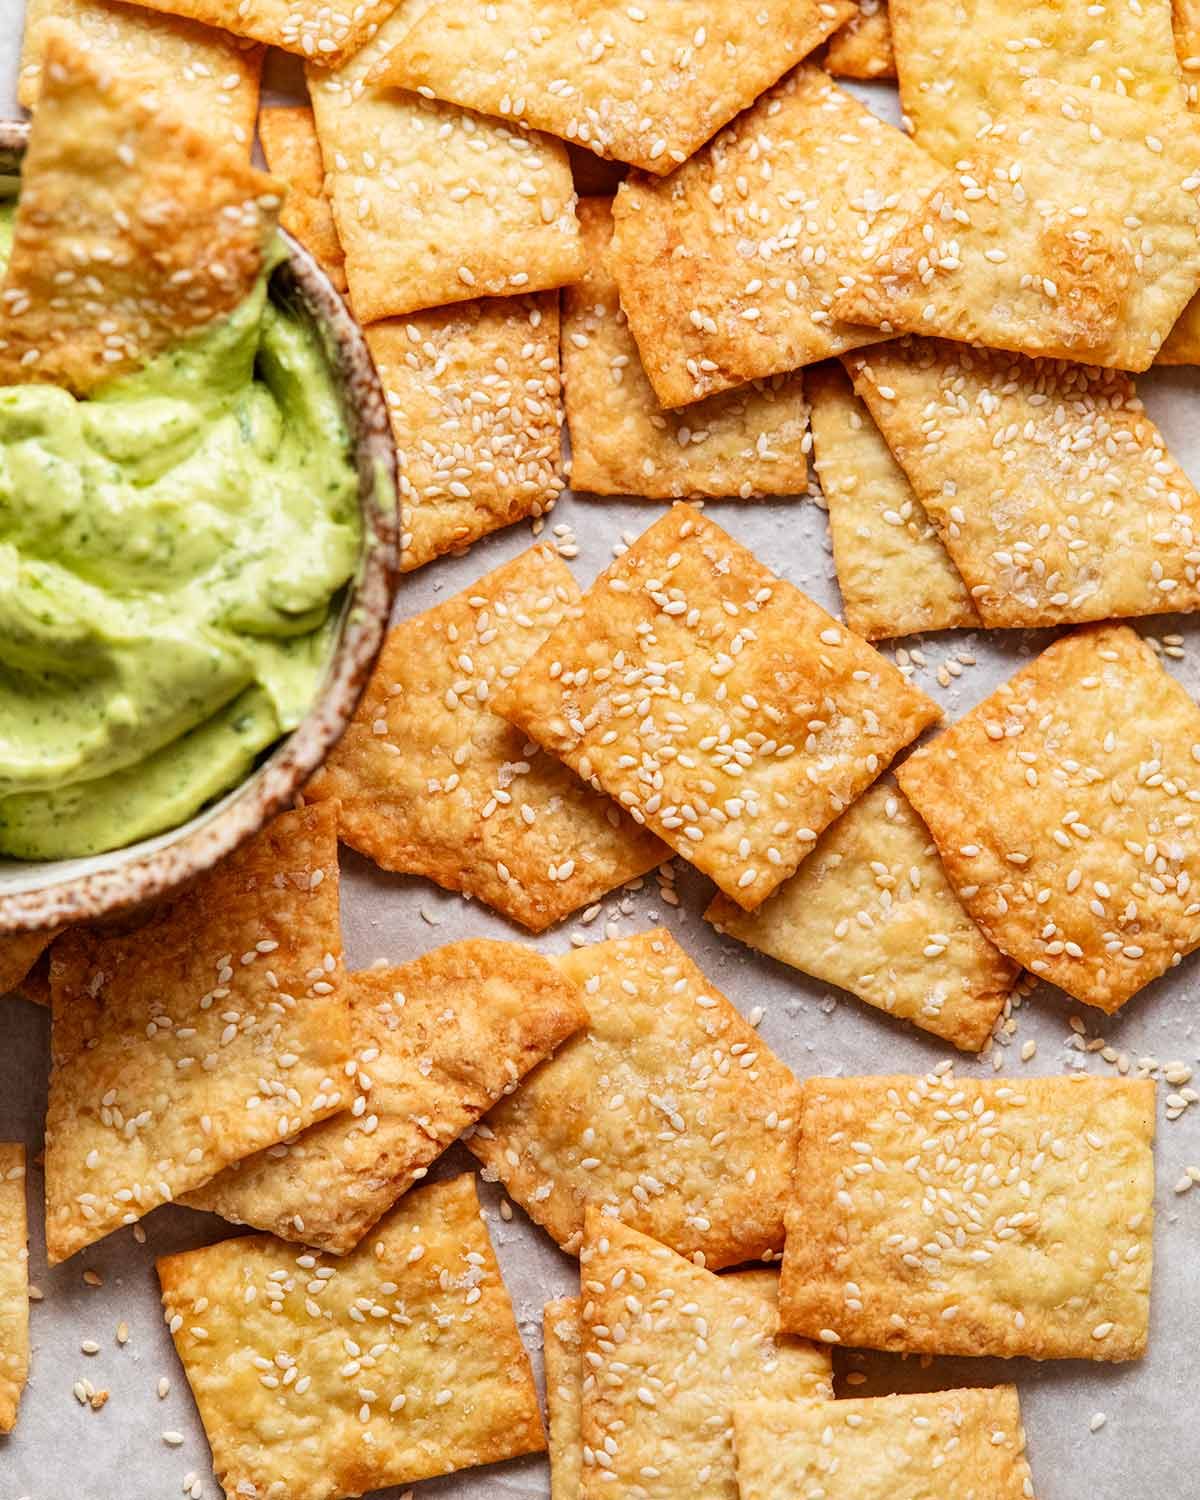
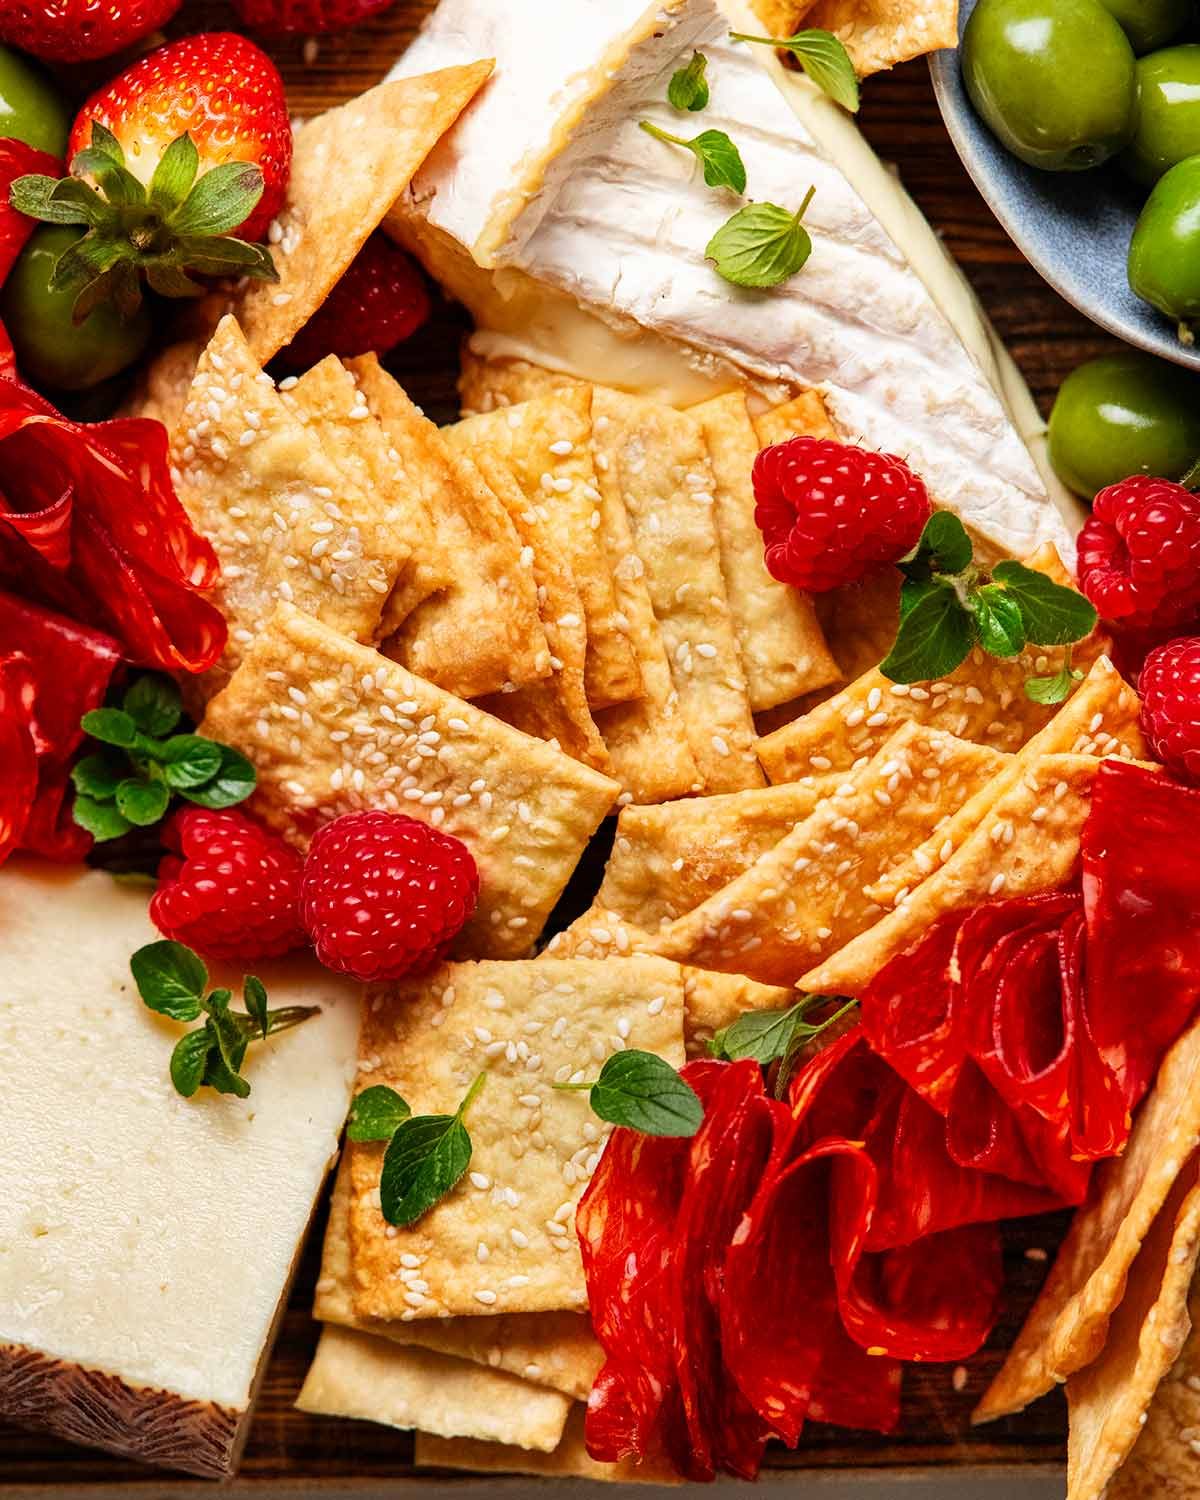
And such is the case with these homemade crackers, with sesame seeds and sea salt flakes. The sesame flavour really stands out, in a way you never get in packets so you’ll be munching on them plain, like chips. Though of course, they are right at home on cheese platters too – imagine the reaction from your friends when you glide into the room with THIS!!! ⬇️⬇️⬇️
What you need to make homemade crackers
You can actually make crackers with just flour, water and salt. ie water crackers! But a little olive oil and sesame seeds gives them extra flavour so you can even snack on them plain. You know I do!
For the cracker dough
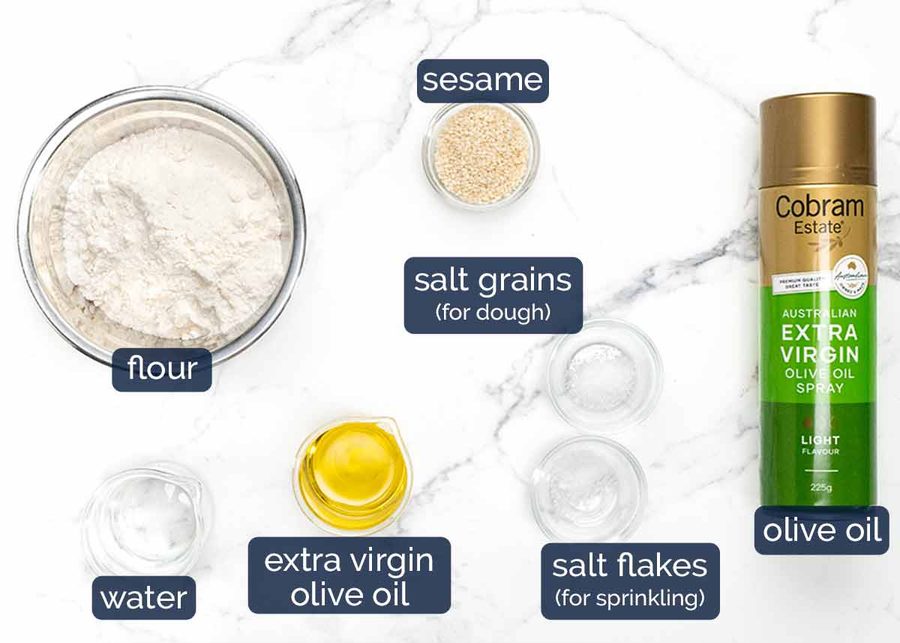
Flour – Just plain / all-purpose flour. If using wholemeal, you’ll need to add a touch of extra water as it is more absorbent. Don’t use self raising flour, else your crackers will puff up and won’t be as crispy.
Sesame seeds – For mixing into the dough. We also sprinkle on top, for visual purposes and to ensure these crackers have unmissable sesame flavour!
Extra virgin olive oil – To add flavour. You can actually just make crackers with flour and water, but adding a bit of fat makes them tastier!
Salt – Essential, for flavour.
Water – The liquid for the dough. Just regular tap water.
FOR SPRINKLING
More sesame seeds! It will look like a lot when you sprinkle but they will spread out as you roll the dough out.
Salt flakes – I like to use flakes so you get lovely subtle salt pops when you munch on the crackers. But don’t make a special trip to the shops just to get sea salt flakes, see the recipe notes for how to make this with cooking or kosher salt or even table salt.
Olive oil spray – This helps the crackers bake up with a lovely golden colour. If you don’t have spray, brush the surface of the rolled out dough with olive oil (do it before cutting, easier and faster).
How to make homemade crackers
This is a very simple dough to make that doesn’t involve yeast, kneading or rising. It’s also a friendly dough to work with, easy to roll out thinly (so the crackers bake up nice and crisp) and pick it up without tearing.
1. Make the cracker dough
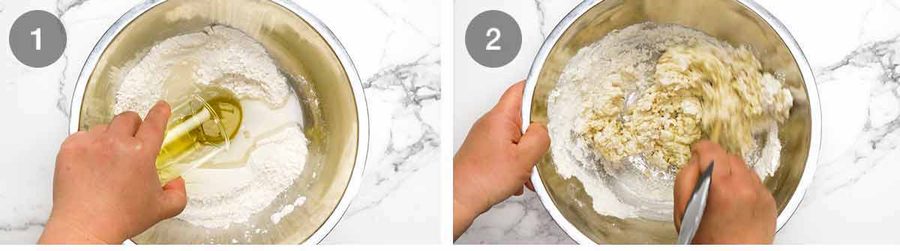
Make dough – Mix the dry ingredients (flour, sesame seeds and salt) using a rubber spatula (or wooden spoon). Make a well in the centre then add the water and oil.
Mix using the handle of the spatula until the flour is incorporated. I find using something thin like the handle or a chopstick is easier to bring the mixture together and there’s less surface area the dough mixture gets stuck onto.
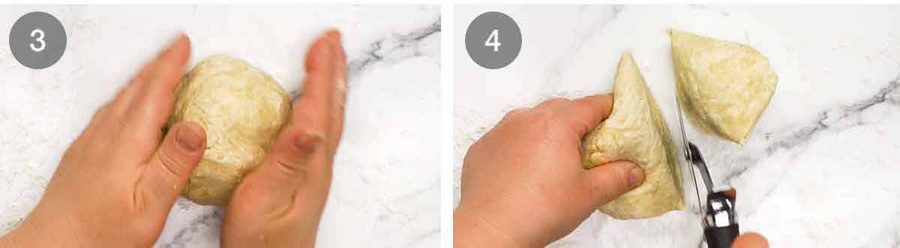
Bring together – The dough will be a little sticky and shaggy, not smooth. Scrape it out onto a lightly floured work surface. Then knead it briefly just to bring the dough together into a ball. The dough will look a bit bumpy and splotchy. That’s ok. That’s why our crackers look rustic and artisan! 😊
Cut the dough in half. We will roll and cut each out separately, and bake them on separate trays.
You can do one giant cracker sheet on one large tray but I find it a little difficult to make all the crackers bake evenly. ie some become overly golden before others crisp up.
2. ROLL AND CUT
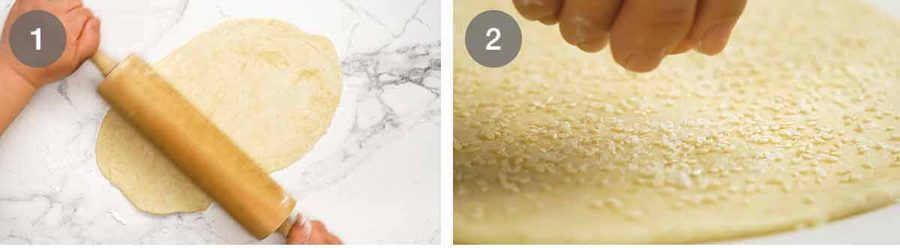
Roll out #1 – Cut the dough in half then roll out into a 3mm / 1/8″ thin oval shape. Or whatever shape you end up with. It doesn’t really matter because we cut it, and misshaped offcuts from the edges are rustic and real! Use a little sprinkle of extra flour as needed to stop the dough from sticking to the counter or the rolling pin.
Sesame seed sprinkles – Transfer the dough onto a sheet of baking paper (parchment paper). Sprinkle with sesame seeds and the salt flakes.
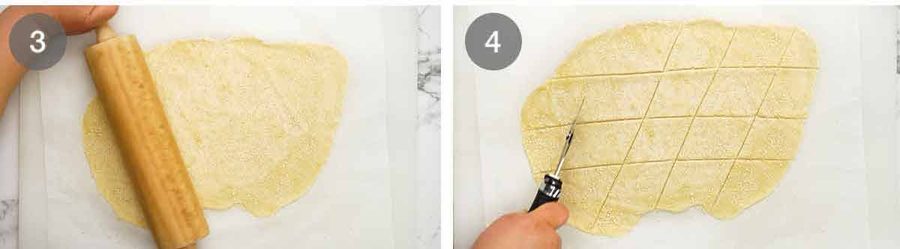
Roll out #2 – Then with the dough still on the paper, roll it out even more thinly. Aim for 2mm / 1/12″. Thinner = crispier crackers! In this step, we’re also rolling the sesame seeds and salt into the surface of the dough so it sticks properly. (They fall off if you just sprinkle them after rolling it out. Using water or oil doesn’t glue them on enough either.)
Cut – Use a pizza cutter (or knife) to cut them into 5cm / 2″ (ish) square(ish) or diamond shapes. You will get nice even pieces from the middle and offcuts on the edges (artisanal! rustic! authentic!).
Notes:
– You have total creative freedom here with the shapes. I aim for squares and diamonds but darn pizza cutters have a mind of their own, like shopping carts!! So I end up with all sorts of shapes.
– They shrink about 15% and smaller pieces cook faster.
– I tried baking the sheet whole and also two large sheets, like the large (expensive!) cracker sheets you see at gourmet stores. But found that the edges got a little too golden before the middle became crisp.* If using a knife, cut straight up and down, rather than dragging the knife through the dough which will make the edges untidy.
3. spray and bake
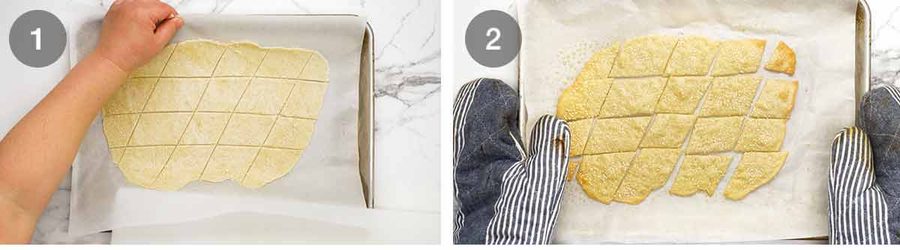
Transfer the cut crackers still on the paper onto baking trays. Don’t re-arrange, they’re too thin to handle.
Bake – Spray the surface of the crackers with the olive oil (or brush lightly with oil, if you don’t have spray). Then bake for 12 minutes at 200°C / 400°F (180°C fan-forced).
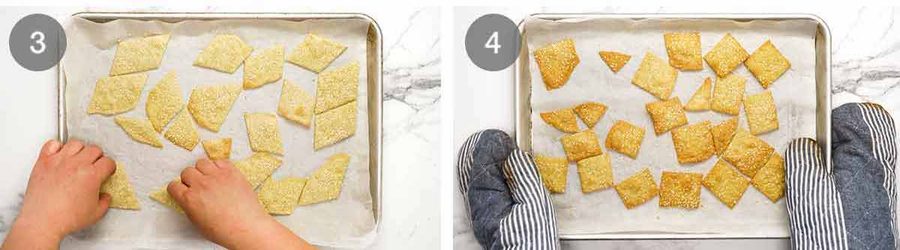
Re-arrange – Remove the trays from the oven and re arrange the crackers to move the ones on the outer rim to the centre, so they brown more evenly. Also, thinner and smaller pieces brown faster so move them to the centre of the tray too.
Golden and crisp! Bake for a further 8 to 10 minutes or until the crackers are light golden and they are all crispy. Pale white crackers = not crispy inside!
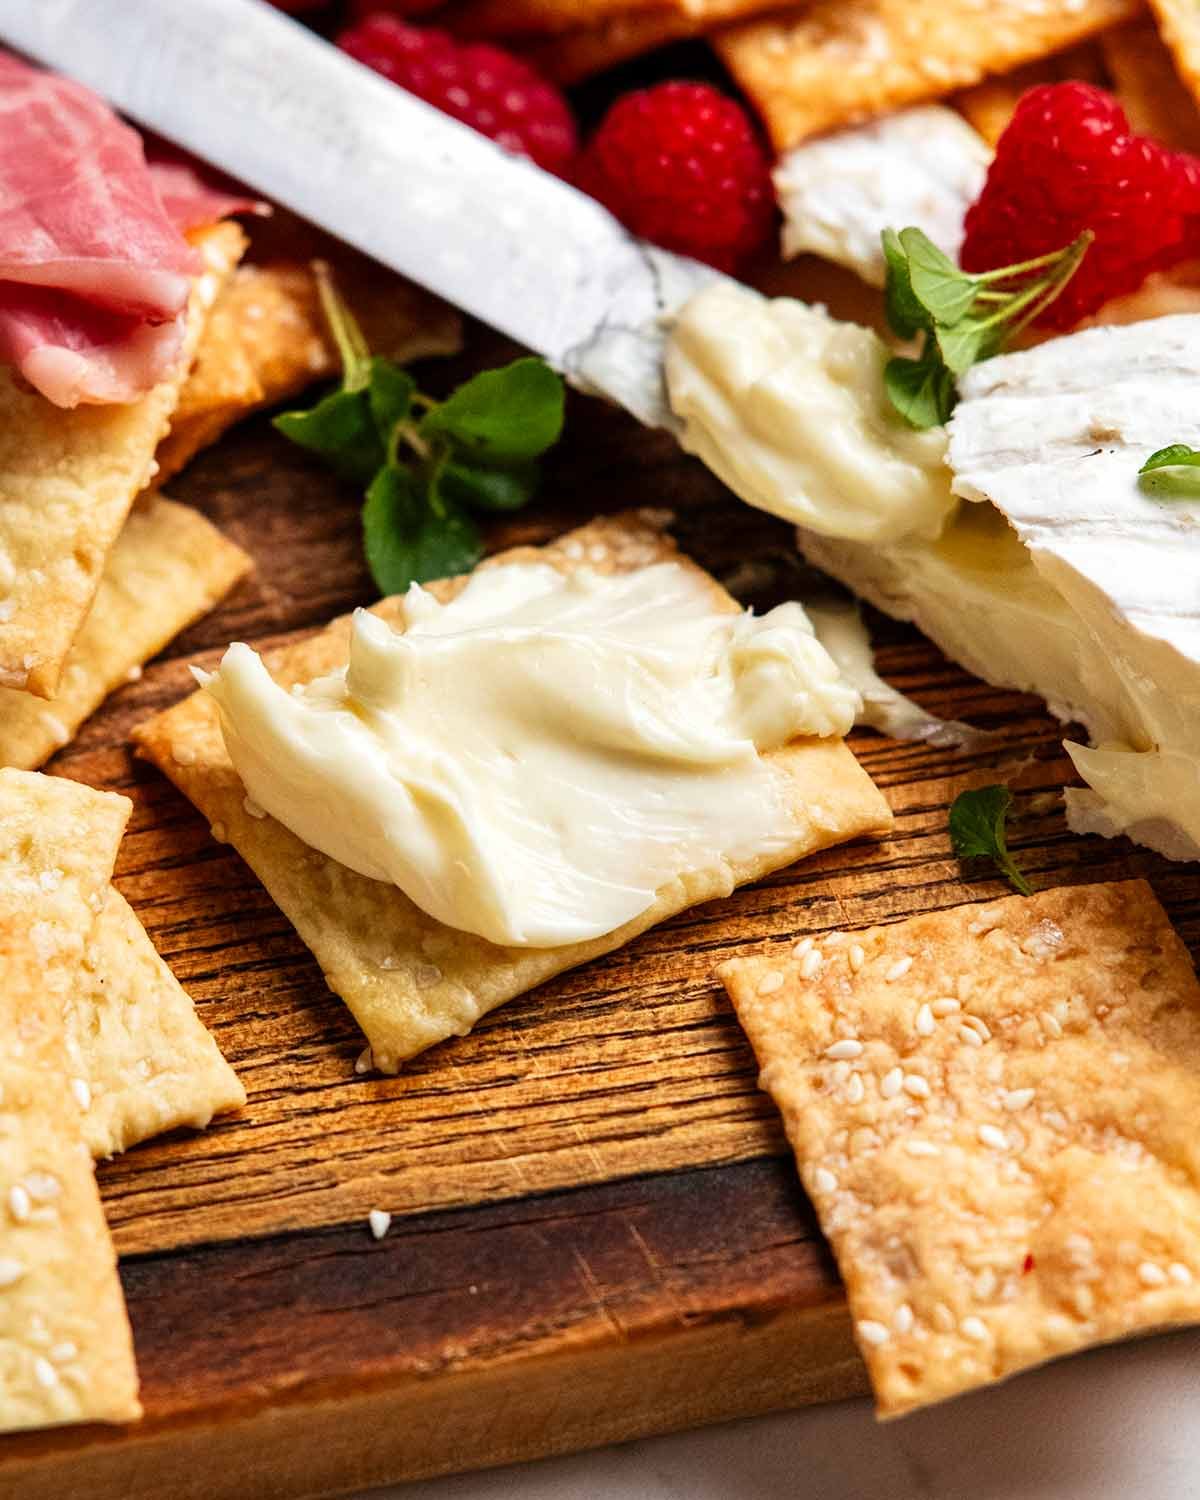
Cool on the trays, during which time they will become properly crispy (about 15 minutes). Use this time to assemble your cheese platter or make a dip. Then it’s snack time!
How to serve homemade crackers
As mentioned in the opening, these are flavoured and salted enough to snack on them plain, like you would chips.
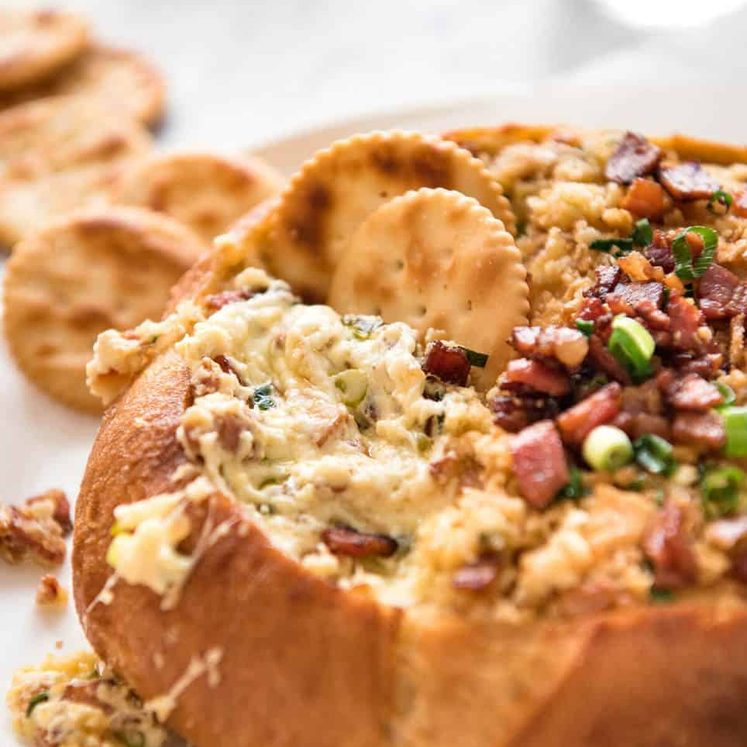
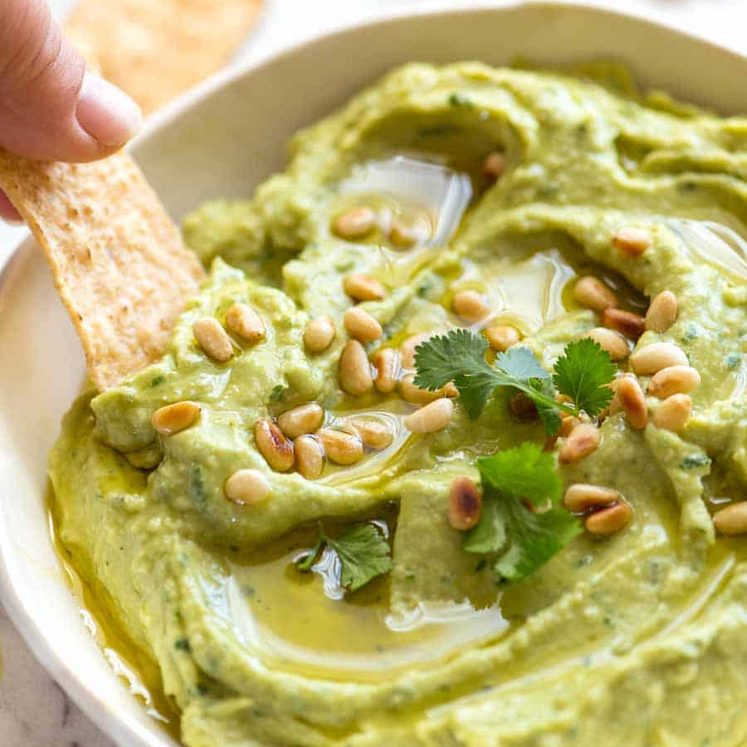
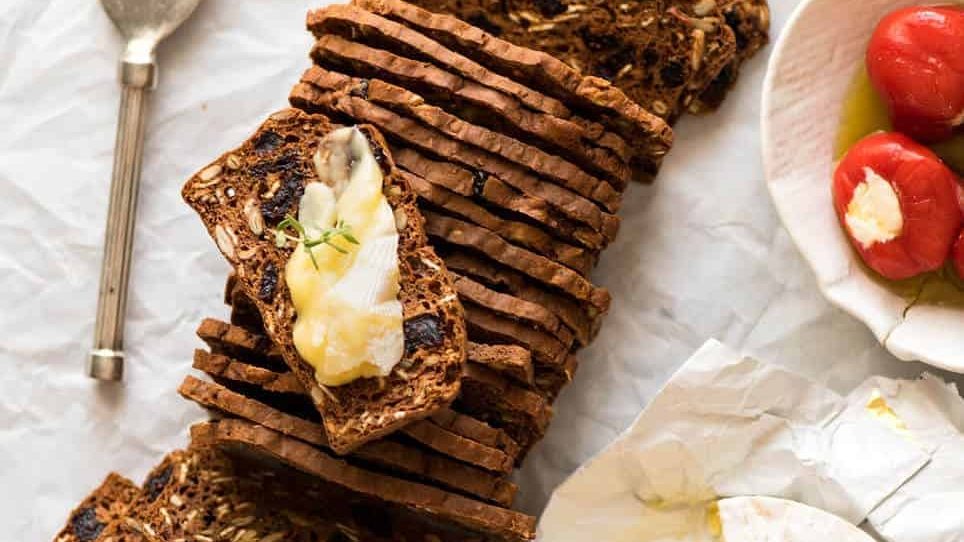
However, they are neutral flavoured enough for dipping and spreading. Think – Guacamole, Whipped Feta dip (great quick one), Avocado sauce (peeking out of the left of the above image), cheese and bacon dip, French onion, potted smoked trout or how about a baked brie!! Head over to my Dips recipe collection for more ideas.


Though honestly, for me, I feel like homemade crackers is the sort of thing that needs to be really showed off to your family and friends, to bask in the glory of their praise (because you deserve it).
So the highest and best use for homemade crackers? Cheese platter, definitely! All that colour. All that cheese!
But, don’t reveal how easy they are to make. Let them believe you’re a kitchen-wizard domestic goddess (or god). 😈 – Nagi x
Artisan crackers FAQ
I’m afraid I haven’t tried, sorry to say!
I haven’t tried but it should work. I find the flour is a little more absorbent though so you might need a touch of extra water.
3 to 4 days in an airtight container. Make sure they are nice and crisp when you make them as crackers that are a wee bit soft in the centre will soften more with time.
If your crackers got a bit stale or soft, just pop them back in the oven to crisp up again. Works a treat!
So many possibilities! Just copy the flavours of your favourite crackers at the shops. 🙂 Poppyseed, thyme, mixed seed, cracked pepper and rosemary come to mind.
For parmesan flavoured, you will need to mix finely grated parmesan into the dough. I used around 1/2 cup (50 g) and added a touch of extra water. I mixed most of the parmesan into the dough and rolled some onto the surface. Also, I used butter instead of oil and a good amount of cracked black pepper. It was so good! (I plan to share parmesan crackers separately 🙂 )
For the gourmet crackers with fruit and nut, use this recipe here.
Watch how to make it
Hungry for more? Subscribe to my newsletter and follow along on Facebook, Pinterest and Instagram for all of the latest updates.

Homemade artisan crackers – sesame sea salt flavour
Ingredients
Cracker dough:
- 1 cup plain flour / all-purpose flour , plus extra for rolling out
- 1/4 tsp cooking salt (kosher salt)
- 1 tbsp white sesame seeds
- 1/3 cup water (just regular tap water)
- 2 tbsp extra virgin olive oil
Sprinkling / spraying:
- 1 tbsp white sesame seeds
- 1/2 tsp salt flakes (Note 1)
- Olive oil spray (Note 2)
Instructions
Abbreviated recipe:
- Mix dry ingredients, make well, stir in wet. Divide in half, roll out 3mm / 1/8" thick. Transfer to paper, sprinkle with sesame and flakes, roll to 2mm / 1/12". Cut into 5cm / 2" pieces, transfer to tray, spray with oil. Bake 12 min, rearrange to colour evenly, bake 8 to 10 min until light golden.
Full recipe:
- Preheat the oven to 200°C / 400°F (180°C fan-forced).
- Mix the flour, sesame and salt in a bowl using a rubber spatula or wooden spoon. Make a well in the centre then add the water and oil. Using the handle of the spatula to mix until the flour is incorporated.
- Roll out #1 Sprinkle the counter lightly with flour. Scrape the dough out then knead a few times to bring it together into a ball. Cut in half. Roll one piece out to 3mm / 1/8" thin oval shape. (Note 3)
- Sprinkle – Place a sheet of baking paper (parchment) on a cutting board. Transfer the rolled out dough onto the paper. Sprinkle with half the sesame and half the salt flakes. Roll out even thinner on the paper to 2mm / 1/12" (thinner = crispier).
- Cut into 5cm / 2" squares using a pizza cutter or knife (Note 4). You'll have smaller pieces on the edge and corners, that's fine. Leave the pieces as is, don't try to move them (so thin, it's too hard!). Slide the paper onto a tray. Repeat with the other piece of dough.
- Bake – Spray with oil. Bake both trays together for 12 minutes. Remove from the oven. Re-arrange to move the more golden pieces on the outer rim of the tray to the centre (so they cook evenly). Bake for a further 8 to 10 minutes or until all the pieces are light golden (white = not crispy!).
- Serving – Remove from the oven and leave the crackers to cool on the tray (~20 minutes). Make dip or prepare cheese platter worthy of your homemade crackers. Then attack!
Recipe Notes:
Nutrition Information:
Life of Dozer
Fun little video of Dozer behind the scenes today, in his self-appointed role as Shoot Director!
And just because I have them – some photos of Dozer helping me shoot today’s crackers! My former shoot assistant, apparently now my boss.


These are terrific 💯
Nagi, can you make the dough ahead of time and freeze please? Thinking about Xmas.:)
Thanks
Rhonda
Very easy and tasty – made them on Sunday morning in time for football games / apps. Followed recipe and used the notes as I didn’t have OO spray. Used Better Than Everything Bagel spice from Oaktown Spice Shop which I highly recommend. Great recipe – will definitely make again!
I finally made these in my solar oven (GoSun Go) and it worked very well! It took an hour in midday sun, and they’re probably not as crispy as with a regular oven at 400 degrees, but the Go trays shape them into curls that hold a heavy dip nicely. Doesn’t work well cooked in a pan on a stovetop, might as well make tortillas instead. I used half ww/regular flour and that was good, next time I’ll try 100% ww.
Nagi, since this recipe appeared, you have me making a double batch of these weekly – for the rest of our life – my partner loves cheese and declares these the best. Using silicone sheets, cutting with a serrated silicone knife, so much paper and plastic packaging is saved. Now when will you make a rice flour version please? (I tried and failed).
My skills with a rolling pin are not great, but these are an excellent alternative use for a pasta maker. My go-to seeds are sesame, poppy and chia, and I tend to load them up with lots.
This is so easy and yummy. I don’t bother cutting the crackers, just break up the sheet when it’s baked into big lavosh style pieces. So good!
These crackers are delicious and easy. Will definitely be making these regularly. Did one tray with a mixture of white and black sesame seeds and the other tray with white sesame and poppyseeds.
Nagi. I love that you have an “abbreviated” recipe at the start of the instructions. Great idea. I often write my own version on my print outs.
Hi . Made these today using the air fryer . Worked a treat and tasted a treat . Also did a batch using rosemary and poppy seeds 🙂 Just need to make sure there is a spare mesh tray sitting on top , or they start flying around like pop corn 🙂 🙂
Made these crackers a couple of days ago, gone. Making more now, Yum. Thank You.
Well these worked out great, I wanted to experiment with some beetroot powder and result was still great. Will now use this recipe for easy crispy crackers.
So easy & quick to make. These crackers turned out wonderfully. I had black sesame seeds on hand & they worked perfectly. Thanks Nagi.
I LOVE DOZER!! He melts me x
Delicious. What would these freeze like ??
I haven’t tried Jane, sorry! Instinct tells me they will be soggy when thawed but could be saved by baking again 🙂 N x
This is now my cracker recipe! They’re fabulous! I’ve been trying to make crackers for years! Cheese and crackers is my favorite thing…I’m going to go everywhere with these crackers! God bless you Nagi! And Dozer too!♥️
Made these from the recipe but I had trouble getting the dough thin enough, so will try again. In the interim, I thought I’d try cutting yiros wraps into squares and then added the olive il, toppings etc. Worked a treat.
Excellent and very easy. I’m not a baker but I did just fine. Highly recommend.
These are amazing. I now make a double batch putting different herbs, seeds and spices in each. They are always gobbled up fast. They are so crisp too. Brilliant Nagi.
Hi Jean, what are you combinations of different herbs and spices that worked well. I am really interested to know any variations, thanks.
I haven’t tried it yet, but I think the “everything seed seasoning mix” you get on top of bagels would be also good on these crackers.
1 tbs poppy seeds
1 tbs sesame seeds
1 tbs dried minced garlic
1 tbs dried minced onion
1 ½ tsp sea salt
Just mix and store in a sealed glass jar. Use 1 tablespoon of this in place of the sesame seeds and salt for sprinkling.
Hello to Nagi and Dozer
Made your pho recipe again Sunday and it was a huge hit.
Oooh! It’s definitely Pho weather here 🙂 I’m jealous! N x