
Homemade crackers! How much do you spend on your favourite artisan crackers? This whole recipe might cost $1 – and they’re so easy. No kneading, no yeast, with flavour you’ll never get in store bought. Use for cheese platters, dips, or snack on them like chips!

Homemade crackers
More than ever, I’ve been making homemade versions of snack-type foods I used to buy due to two reasons. First, the cost. I’ve always thought “gourmet crackers” were overpriced, but inflation has made them virtually impossible to justify buying.
Second, the flavour. If all you know is store bought, you can live your whole life thinking that’s what something tastes like. But just one experience of homemade, and you realise how much better something can be.
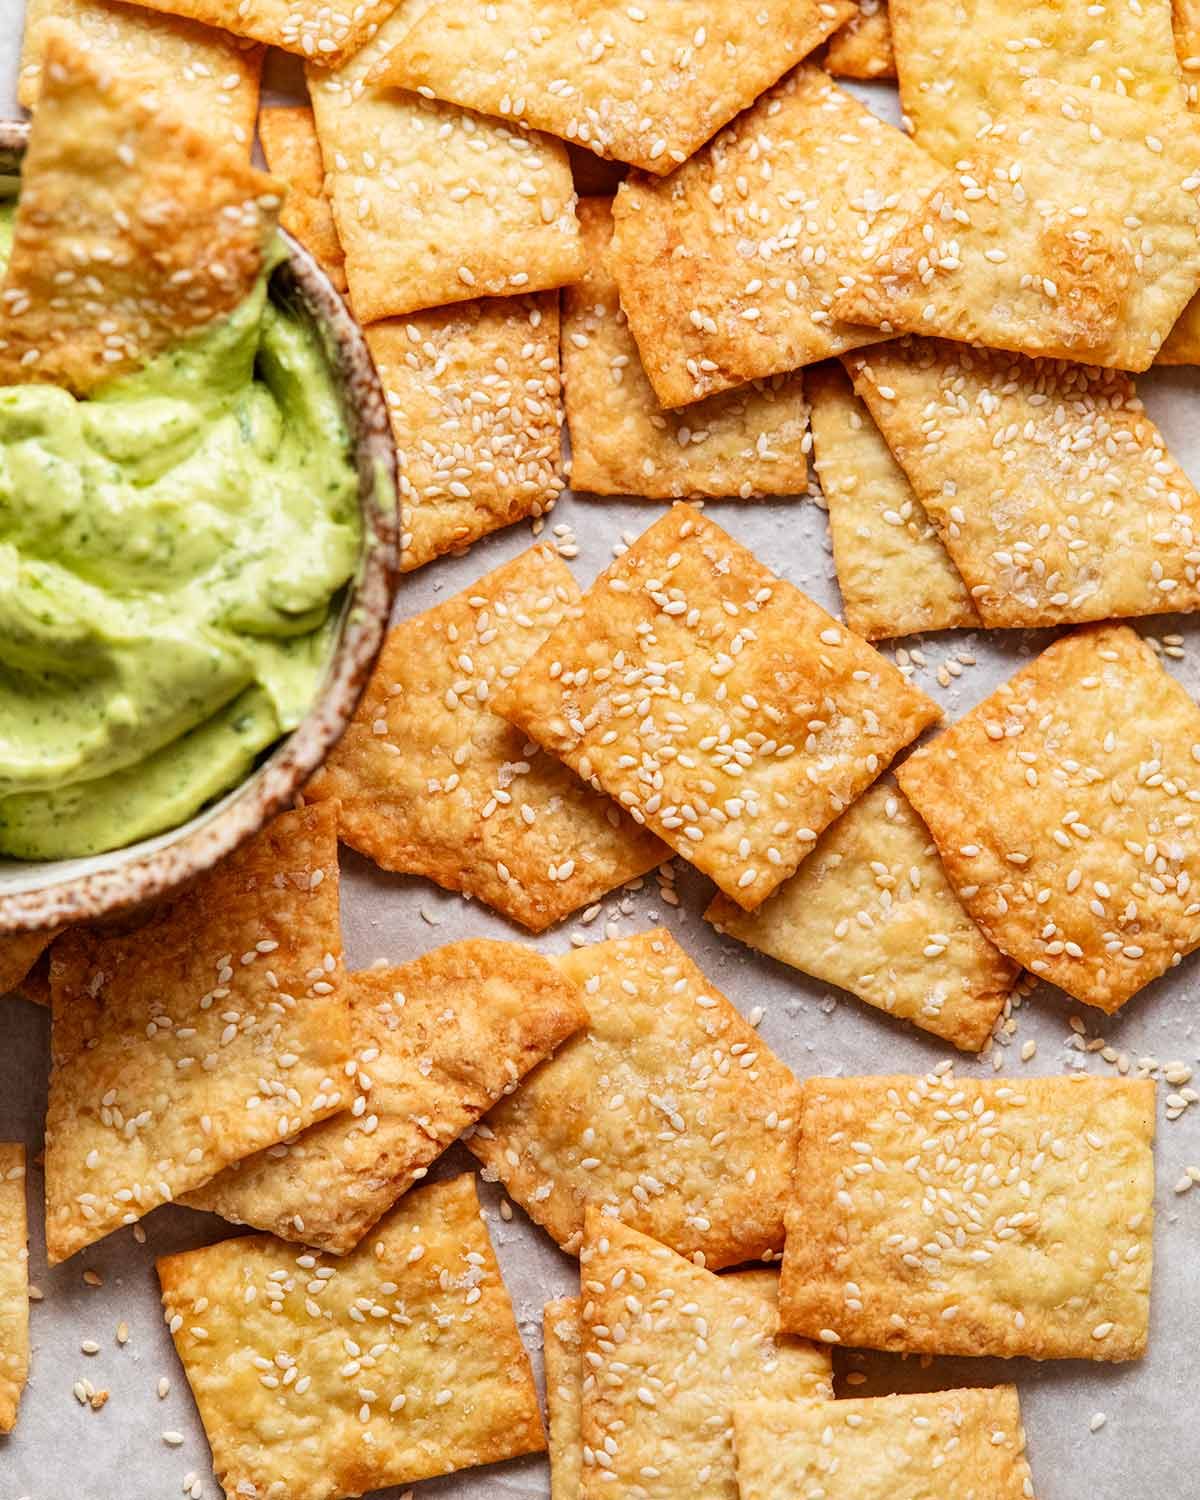
And such is the case with these homemade crackers, with sesame seeds and sea salt flakes. The sesame flavour really stands out, in a way you never get in packets so you’ll be munching on them plain, like chips. Though of course, they are right at home on cheese platters too – imagine the reaction from your friends when you glide into the room with THIS!!! ⬇️⬇️⬇️
What you need to make homemade crackers
You can actually make crackers with just flour, water and salt. ie water crackers! But a little olive oil and sesame seeds gives them extra flavour so you can even snack on them plain. You know I do!
For the cracker dough
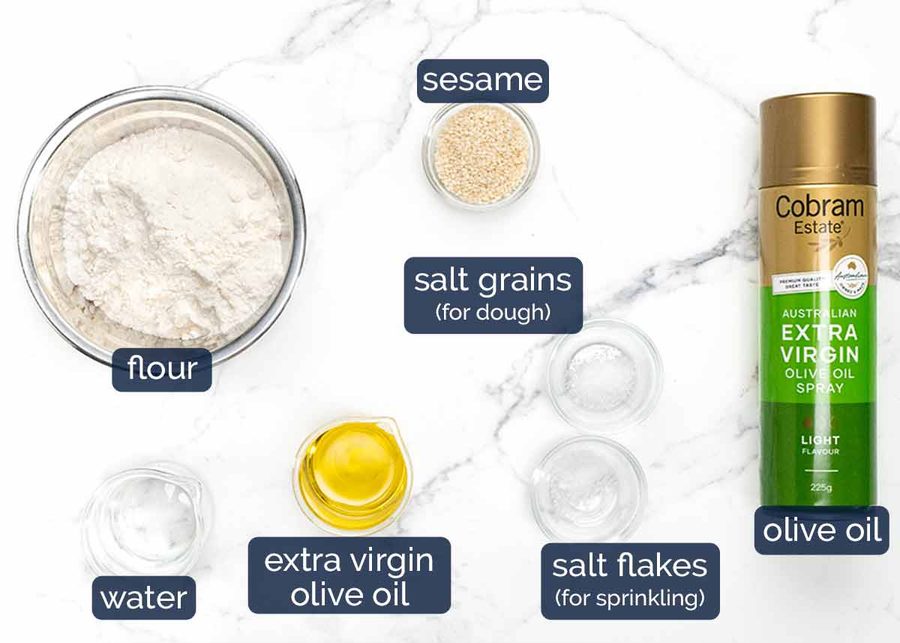
Flour – Just plain / all-purpose flour. If using wholemeal, you’ll need to add a touch of extra water as it is more absorbent. Don’t use self raising flour, else your crackers will puff up and won’t be as crispy.
Sesame seeds – For mixing into the dough. We also sprinkle on top, for visual purposes and to ensure these crackers have unmissable sesame flavour!
Extra virgin olive oil – To add flavour. You can actually just make crackers with flour and water, but adding a bit of fat makes them tastier!
Salt – Essential, for flavour.
Water – The liquid for the dough. Just regular tap water.
FOR SPRINKLING
More sesame seeds! It will look like a lot when you sprinkle but they will spread out as you roll the dough out.
Salt flakes – I like to use flakes so you get lovely subtle salt pops when you munch on the crackers. But don’t make a special trip to the shops just to get sea salt flakes, see the recipe notes for how to make this with cooking or kosher salt or even table salt.
Olive oil spray – This helps the crackers bake up with a lovely golden colour. If you don’t have spray, brush the surface of the rolled out dough with olive oil (do it before cutting, easier and faster).
How to make homemade crackers
This is a very simple dough to make that doesn’t involve yeast, kneading or rising. It’s also a friendly dough to work with, easy to roll out thinly (so the crackers bake up nice and crisp) and pick it up without tearing.
1. Make the cracker dough
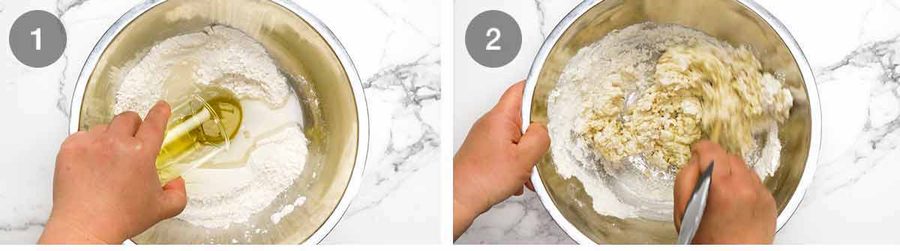
Make dough – Mix the dry ingredients (flour, sesame seeds and salt) using a rubber spatula (or wooden spoon). Make a well in the centre then add the water and oil.
Mix using the handle of the spatula until the flour is incorporated. I find using something thin like the handle or a chopstick is easier to bring the mixture together and there’s less surface area the dough mixture gets stuck onto.
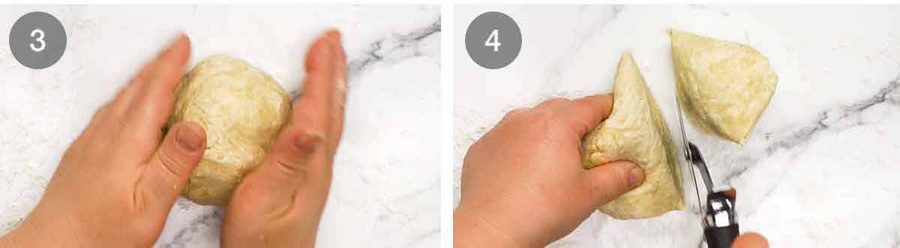
Bring together – The dough will be a little sticky and shaggy, not smooth. Scrape it out onto a lightly floured work surface. Then knead it briefly just to bring the dough together into a ball. The dough will look a bit bumpy and splotchy. That’s ok. That’s why our crackers look rustic and artisan! 😊
Cut the dough in half. We will roll and cut each out separately, and bake them on separate trays.
You can do one giant cracker sheet on one large tray but I find it a little difficult to make all the crackers bake evenly. ie some become overly golden before others crisp up.
2. ROLL AND CUT
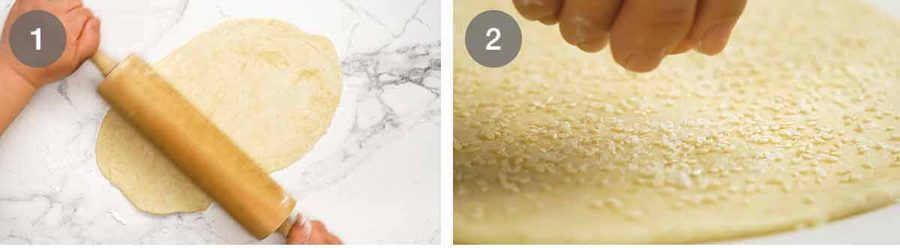
Roll out #1 – Cut the dough in half then roll out into a 3mm / 1/8″ thin oval shape. Or whatever shape you end up with. It doesn’t really matter because we cut it, and misshaped offcuts from the edges are rustic and real! Use a little sprinkle of extra flour as needed to stop the dough from sticking to the counter or the rolling pin.
Sesame seed sprinkles – Transfer the dough onto a sheet of baking paper (parchment paper). Sprinkle with sesame seeds and the salt flakes.
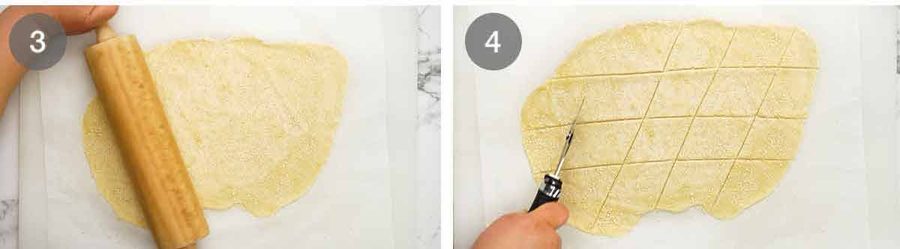
Roll out #2 – Then with the dough still on the paper, roll it out even more thinly. Aim for 2mm / 1/12″. Thinner = crispier crackers! In this step, we’re also rolling the sesame seeds and salt into the surface of the dough so it sticks properly. (They fall off if you just sprinkle them after rolling it out. Using water or oil doesn’t glue them on enough either.)
Cut – Use a pizza cutter (or knife) to cut them into 5cm / 2″ (ish) square(ish) or diamond shapes. You will get nice even pieces from the middle and offcuts on the edges (artisanal! rustic! authentic!).
Notes:
– You have total creative freedom here with the shapes. I aim for squares and diamonds but darn pizza cutters have a mind of their own, like shopping carts!! So I end up with all sorts of shapes.
– They shrink about 15% and smaller pieces cook faster.
– I tried baking the sheet whole and also two large sheets, like the large (expensive!) cracker sheets you see at gourmet stores. But found that the edges got a little too golden before the middle became crisp.* If using a knife, cut straight up and down, rather than dragging the knife through the dough which will make the edges untidy.
3. spray and bake
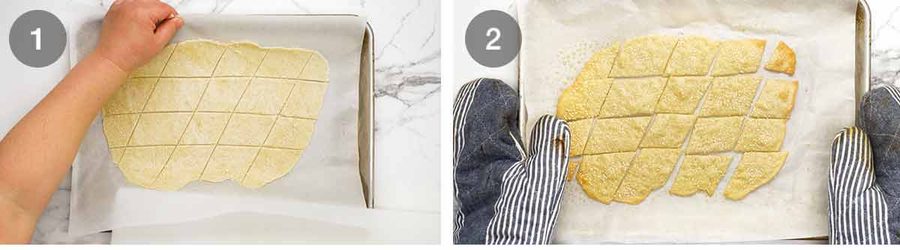
Transfer the cut crackers still on the paper onto baking trays. Don’t re-arrange, they’re too thin to handle.
Bake – Spray the surface of the crackers with the olive oil (or brush lightly with oil, if you don’t have spray). Then bake for 12 minutes at 200°C / 400°F (180°C fan-forced).
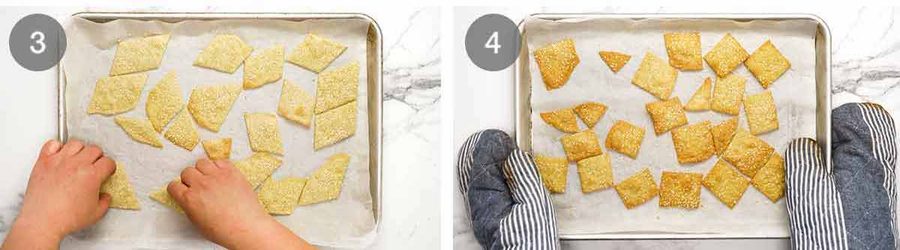
Re-arrange – Remove the trays from the oven and re arrange the crackers to move the ones on the outer rim to the centre, so they brown more evenly. Also, thinner and smaller pieces brown faster so move them to the centre of the tray too.
Golden and crisp! Bake for a further 8 to 10 minutes or until the crackers are light golden and they are all crispy. Pale white crackers = not crispy inside!
Cool on the trays, during which time they will become properly crispy (about 15 minutes). Use this time to assemble your cheese platter or make a dip. Then it’s snack time!
How to serve homemade crackers
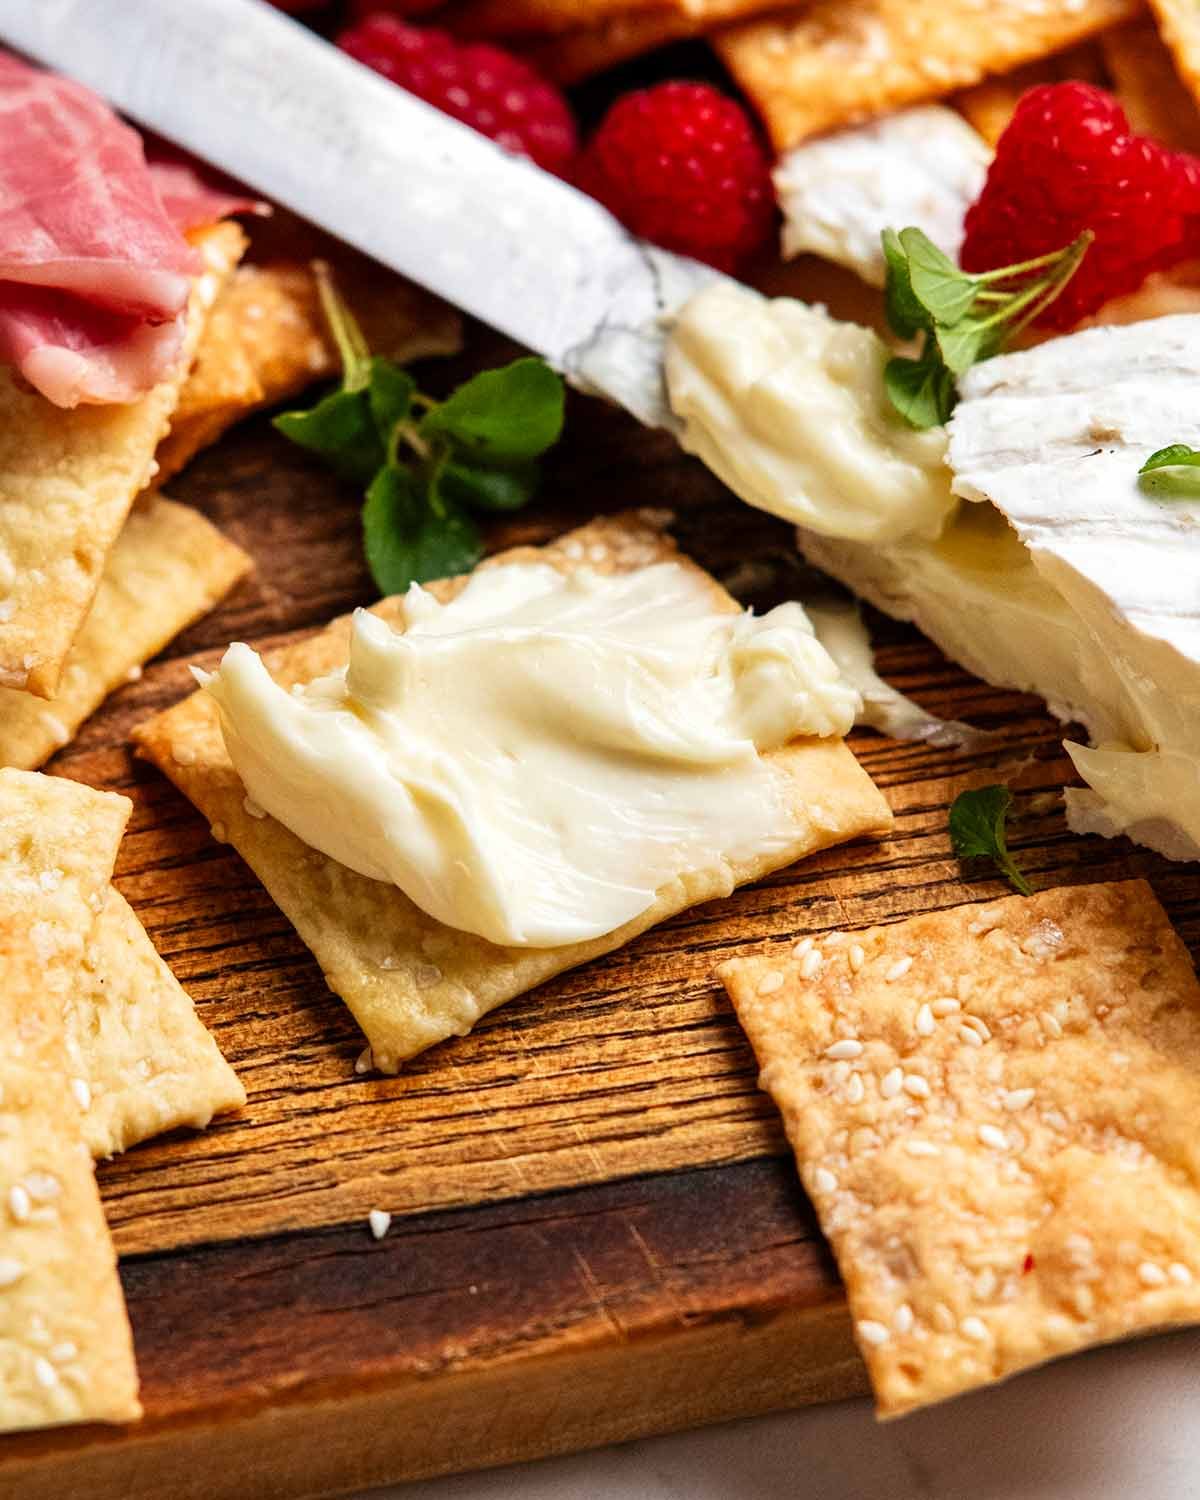
As mentioned in the opening, these are flavoured and salted enough to snack on them plain, like you would chips.
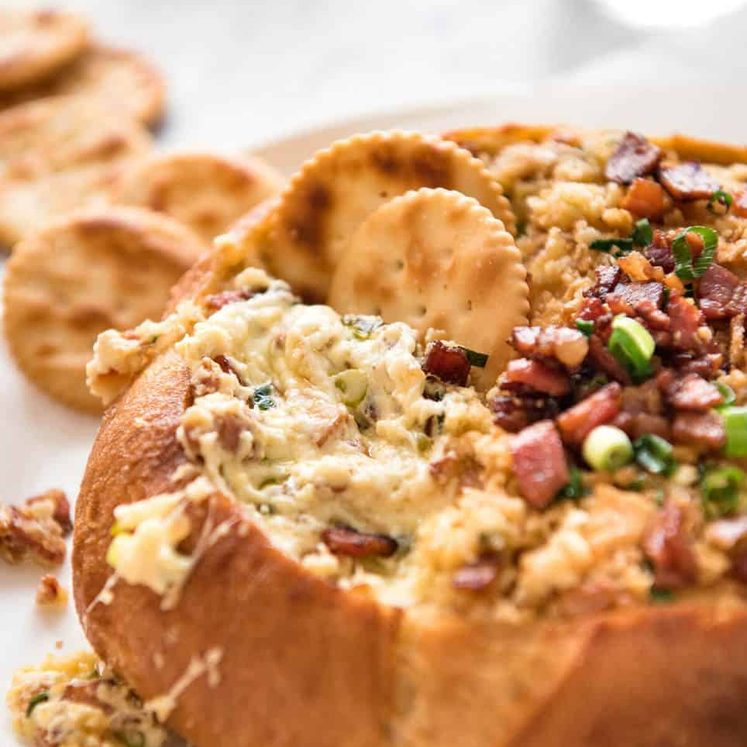
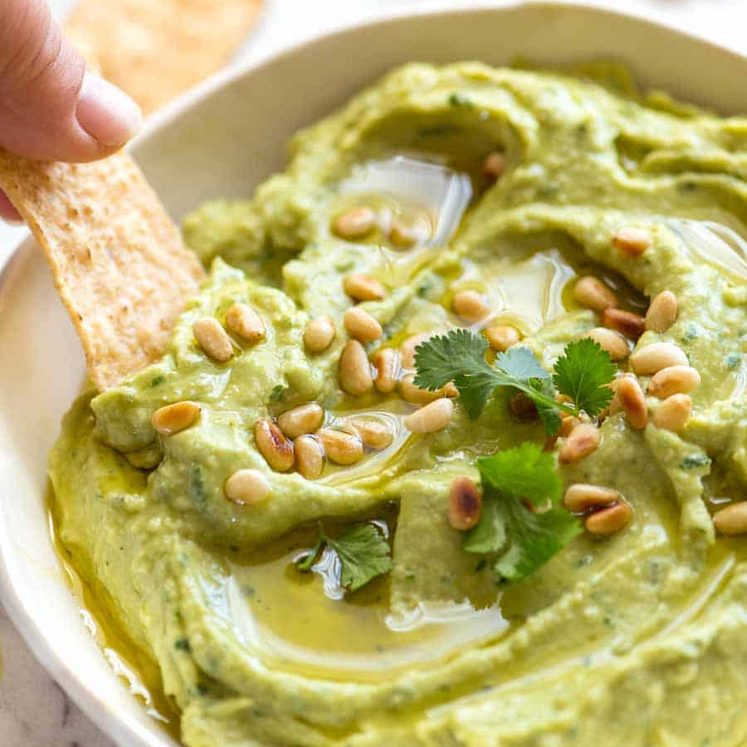
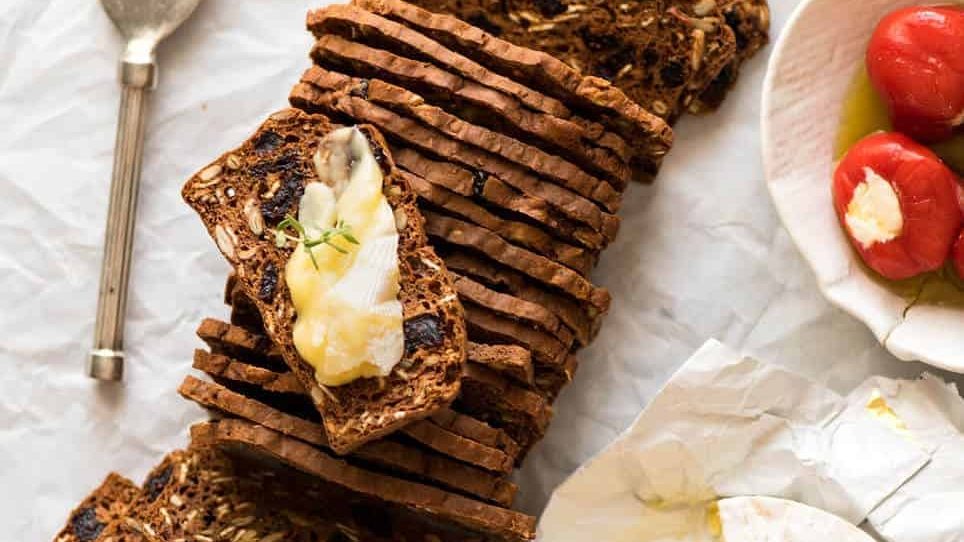
However, they are neutral flavoured enough for dipping and spreading. Think – Guacamole, Whipped Feta dip (great quick one), Avocado sauce (peeking out of the left of the above image), cheese and bacon dip, French onion, potted smoked trout or how about a baked brie!! Head over to my Dips recipe collection for more ideas.


Though honestly, for me, I feel like homemade crackers is the sort of thing that needs to be really showed off to your family and friends, to bask in the glory of their praise (because you deserve it).
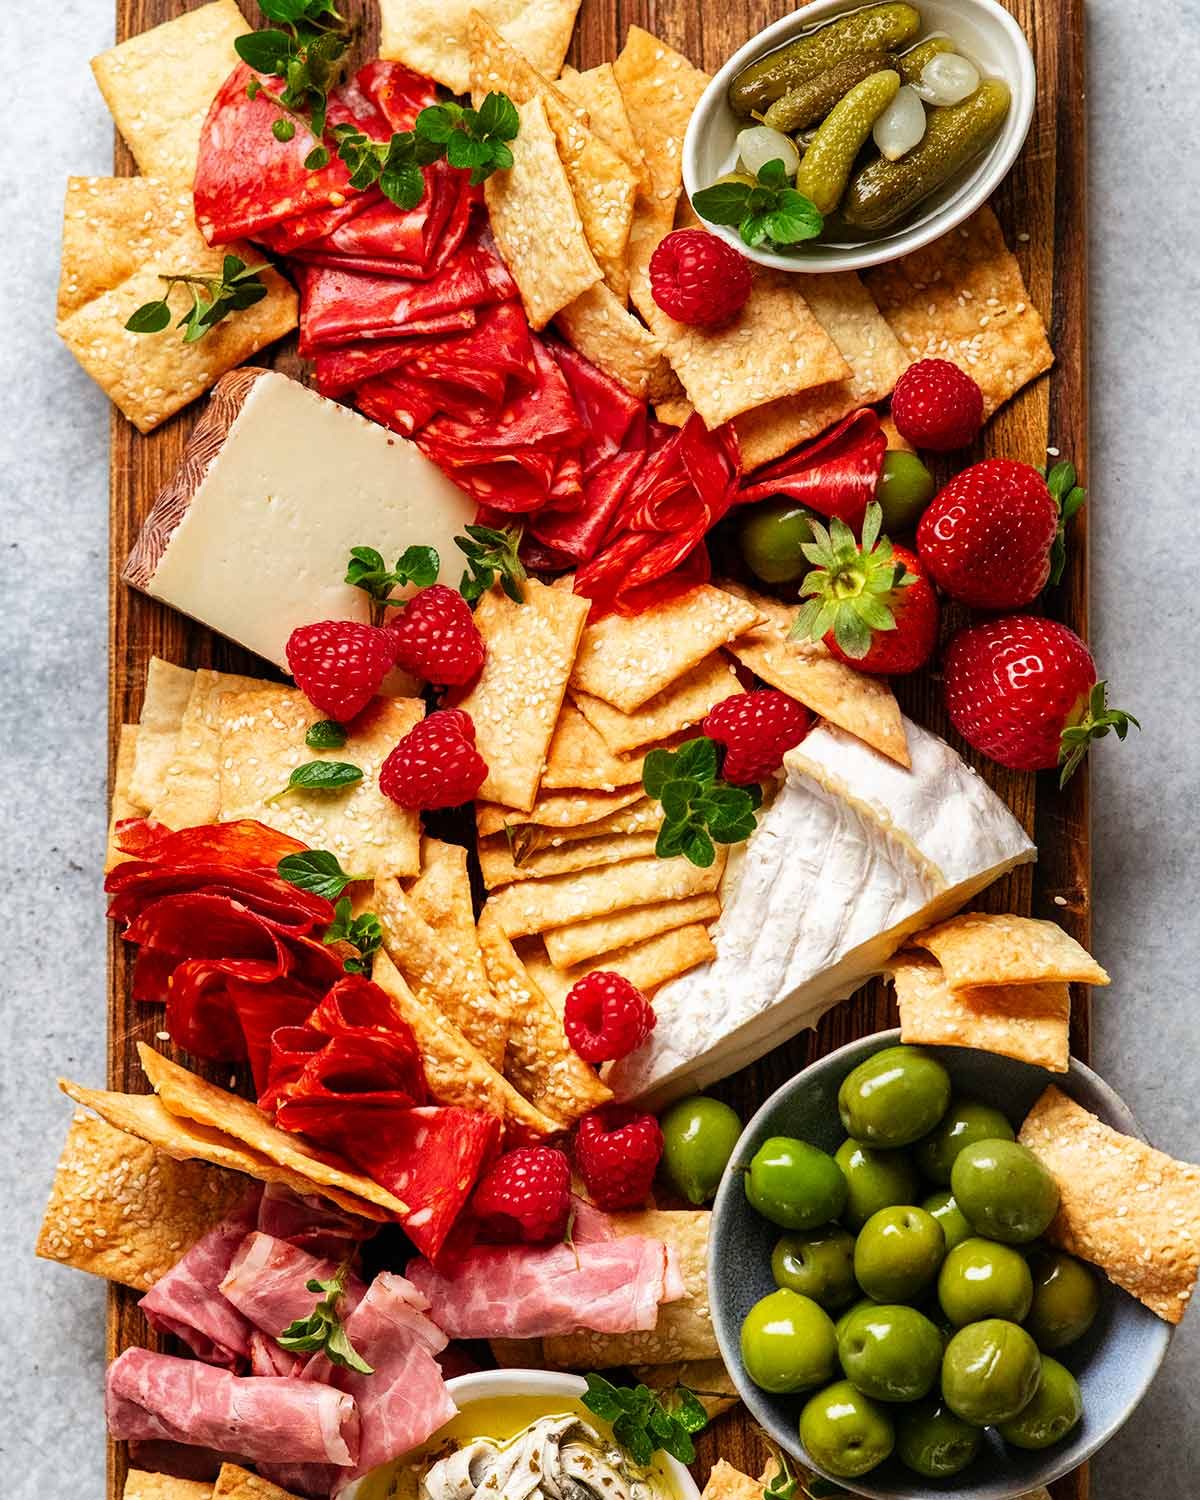
So the highest and best use for homemade crackers? Cheese platter, definitely! All that colour. All that cheese!
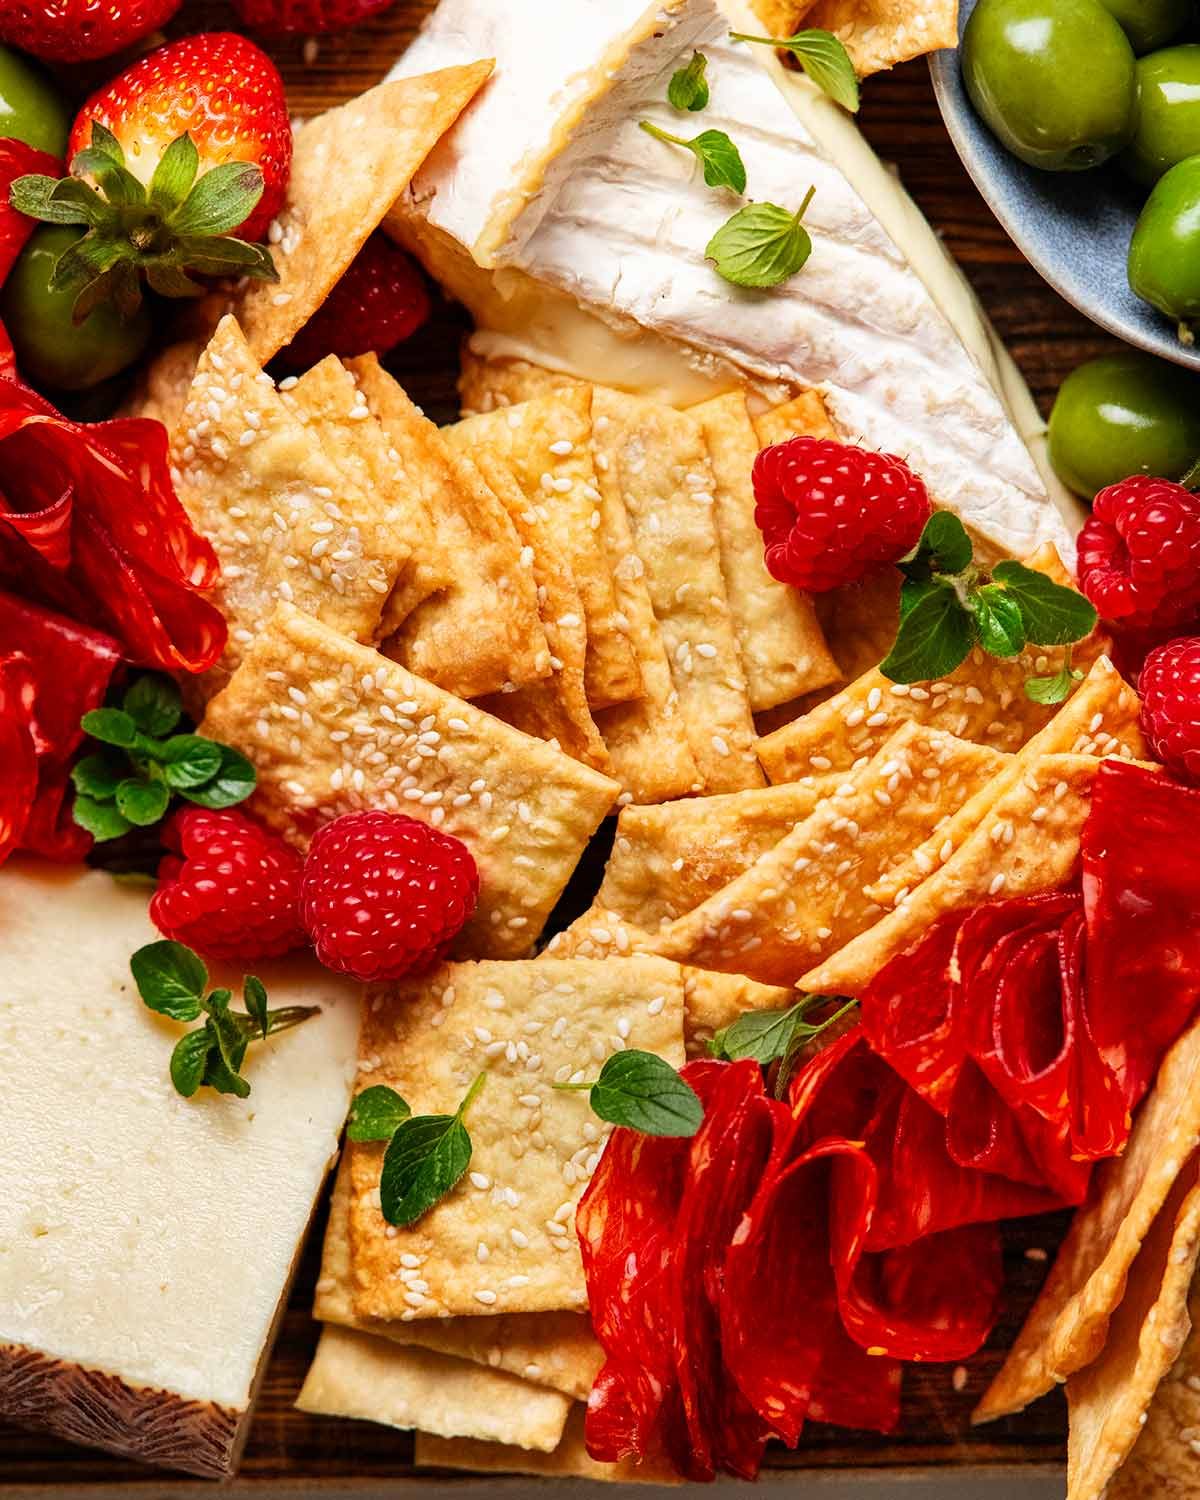
But, don’t reveal how easy they are to make. Let them believe you’re a kitchen-wizard domestic goddess (or god). 😈 – Nagi x
Artisan crackers FAQ
I’m afraid I haven’t tried, sorry to say!
I haven’t tried but it should work. I find the flour is a little more absorbent though so you might need a touch of extra water.
3 to 4 days in an airtight container. Make sure they are nice and crisp when you make them as crackers that are a wee bit soft in the centre will soften more with time.
If your crackers got a bit stale or soft, just pop them back in the oven to crisp up again. Works a treat!
So many possibilities! Just copy the flavours of your favourite crackers at the shops. 🙂 Poppyseed, thyme, mixed seed, cracked pepper and rosemary come to mind.
For parmesan flavoured, you will need to mix finely grated parmesan into the dough. I used around 1/2 cup (50 g) and added a touch of extra water. I mixed most of the parmesan into the dough and rolled some onto the surface. Also, I used butter instead of oil and a good amount of cracked black pepper. It was so good! (I plan to share parmesan crackers separately 🙂 )
For the gourmet crackers with fruit and nut, use this recipe here.
Watch how to make it
Hungry for more? Subscribe to my newsletter and follow along on Facebook, Pinterest and Instagram for all of the latest updates.

Homemade artisan crackers – sesame sea salt flavour
Ingredients
Cracker dough:
- 1 cup plain flour / all-purpose flour , plus extra for rolling out
- 1/4 tsp cooking salt (kosher salt)
- 1 tbsp white sesame seeds
- 1/3 cup water (just regular tap water)
- 2 tbsp extra virgin olive oil
Sprinkling / spraying:
- 1 tbsp white sesame seeds
- 1/2 tsp salt flakes (Note 1)
- Olive oil spray (Note 2)
Instructions
Abbreviated recipe:
- Mix dry ingredients, make well, stir in wet. Divide in half, roll out 3mm / 1/8" thick. Transfer to paper, sprinkle with sesame and flakes, roll to 2mm / 1/12". Cut into 5cm / 2" pieces, transfer to tray, spray with oil. Bake 12 min, rearrange to colour evenly, bake 8 to 10 min until light golden.
Full recipe:
- Preheat the oven to 200°C / 400°F (180°C fan-forced).
- Mix the flour, sesame and salt in a bowl using a rubber spatula or wooden spoon. Make a well in the centre then add the water and oil. Using the handle of the spatula to mix until the flour is incorporated.
- Roll out #1 Sprinkle the counter lightly with flour. Scrape the dough out then knead a few times to bring it together into a ball. Cut in half. Roll one piece out to 3mm / 1/8" thin oval shape. (Note 3)
- Sprinkle – Place a sheet of baking paper (parchment) on a cutting board. Transfer the rolled out dough onto the paper. Sprinkle with half the sesame and half the salt flakes. Roll out even thinner on the paper to 2mm / 1/12" (thinner = crispier).
- Cut into 5cm / 2" squares using a pizza cutter or knife (Note 4). You'll have smaller pieces on the edge and corners, that's fine. Leave the pieces as is, don't try to move them (so thin, it's too hard!). Slide the paper onto a tray. Repeat with the other piece of dough.
- Bake – Spray with oil. Bake both trays together for 12 minutes. Remove from the oven. Re-arrange to move the more golden pieces on the outer rim of the tray to the centre (so they cook evenly). Bake for a further 8 to 10 minutes or until all the pieces are light golden (white = not crispy!).
- Serving – Remove from the oven and leave the crackers to cool on the tray (~20 minutes). Make dip or prepare cheese platter worthy of your homemade crackers. Then attack!
Recipe Notes:
Nutrition Information:
Life of Dozer
Fun little video of Dozer behind the scenes today, in his self-appointed role as Shoot Director!
And just because I have them – some photos of Dozer helping me shoot today’s crackers! My former shoot assistant, apparently now my boss.


These look great. Any thoughts on how to add a cheesy flavour to the crackers?
Try adding cheese powder. You should be able to buy it, or you can make your own by dehydrating thin cheese slices, then blending into a powder.
I’m wondering is nutritional yeast might work ? Not sure how much, but I might give it a try!!
Try adding 1/4 to 1/3 cup of finely shredded parmesan and 1/2 tsp of Italian seasoning and increase water very slightly if needed.
Brilliant! It never even occurred to me to make homemade crackers. Who knew they were so simple. Have to try this one.
OMG, Dozer! With such a director I’m sure nothing can go wrong XD
Amazing recipe, I’ll try it!
As always, thank you very much ♥
Just a few shaky photos when his sizeable rump wacks the tripod legs!! 😂 – N x
We’ll appreciate and enjoy the wobbly Dozer enhanced pictures.
Hi Nagi, these look amazing! Can’t wait to try. Do you think making them with buckwheat flour would work too?
Hi Razia! They will absolutely work, you just might need a touch of extra water 🙂 The extra flavour you will get will be lovely! N x
Dear Nagi: Thank you for saving your millions of followers billions of dollars with this quick n’ easy snack cracker recipe, and for sharing another photo of healthy, happy Dozer with his gazillions of well-wishing fans!
Aww thanks for this lovely message about Dozer! N xx
Thank you for this recipe, would it be possible to substitute with wholemeal flour and what are the changes that would be required if this were appropriate? Thank you so much.
Hi Nancy! You absolutely can, if the dough feels a little more crumbly than what you see in the video, just add a touch of water (I find wholemeal can require a higher hydration 🙂 ) – N x
Made lentil vegetable soup this morning when your crackers popped up in my email, made then this afternoon to go with the soup, easy and delicious 😋
WOW! I want to be your neighbour 🙂 N x
Looking forward to making these! Would they work with gluten free flour?
Hi Tanya! Unfortunately I haven’t tried. I am just not sure how crispy they will turn out 🙂 N x
I’m going to use 2/3 buckwheat (Bouchard from Maine, lighter colour and lighter flavour, Amazon. It’s ratio I use for plain gluten free Irish soda bread) and 1/3 asian white rice flour, erawan brand, very silky.
Looks so yummy, but I can’t eat olive oil, could I use sesame do you think?
Use butter Teresa! I just made a batch with butter to give it a go and it’s even more delicious. Just spray the surface with any oil 🙂 N x
Hi Nagi, did you use melted butter or cold butter, soft???
How much butter, please Nagi? Same amount as oil?
Melted or soft?
Thank you!!!!!!
I’m going to give these a go one question can the dough freeze ie can I make up double dough cut out all and freeze one half on a tray in freezer ready to bake when required?
Hi Ailsa! I haven’t tried but I don’t see why that wouldn’t work because there is no baking powder or yeast in this 🙂 N xx
Oh Nagi – these look amazing! But the video of Dozer being so SAFE with that camera (work with me, Nagi. Work with me, Darling!) was hysterical. He looks really happy and healthy too. Thanks for the recipes. Can’t wait to receive your new cookbook. Bought a copy for my sister in the US too just like I did with Dinner! She loves your recipes too.
I hope your sister loves my book Meryl, thanks for getting it for her!! Isn’t Dozer a cracker. Honestly, he weaves in and out between the tripod legs like it’s some kind of game! 😂
Fantastic and really simple recipe Nagi. Just what I need when I’m asked to “bring a plate” to a function. Who knew how inexpensive this could be? And big bonus – no artificial additives!
Yes!! This is brilliant to take somewhere 🙂 N x
Oooh thanks Nagi! Can’t wait to try, they sound so nice and easy. Ok next challenge… rice crackers?!! Haha. I spent approximately one million dollars per week on those for my kids. Thanks in advance haha xxxx
Never even thought to make them! I find they are on sale quite often?? Have they increased in price? I don’t usually get them – N x
Love this recipe and to make them even thinner, I put them through my pasta roller and sprinkle with lemon myrtle
that’s so clever Liz! It will make them a nice even thickness so they bake more evenly 🙂 N x
Thank you Clever One 🥰🥰🥰
That is a brilliant idea. I’m really not good with a rolling pin but I can make pasta 🙂
👍
I’m going to pinch this idea Liz if you don’t mind😘
Looking forward to trying this recipe. I’m wondering about using infused olive oil (chilli?). Any pros and cons?
DOUGH! You genius. I’m going to try that. Might turn them a bit of a red colour? I feel like that would look amazing! N x