
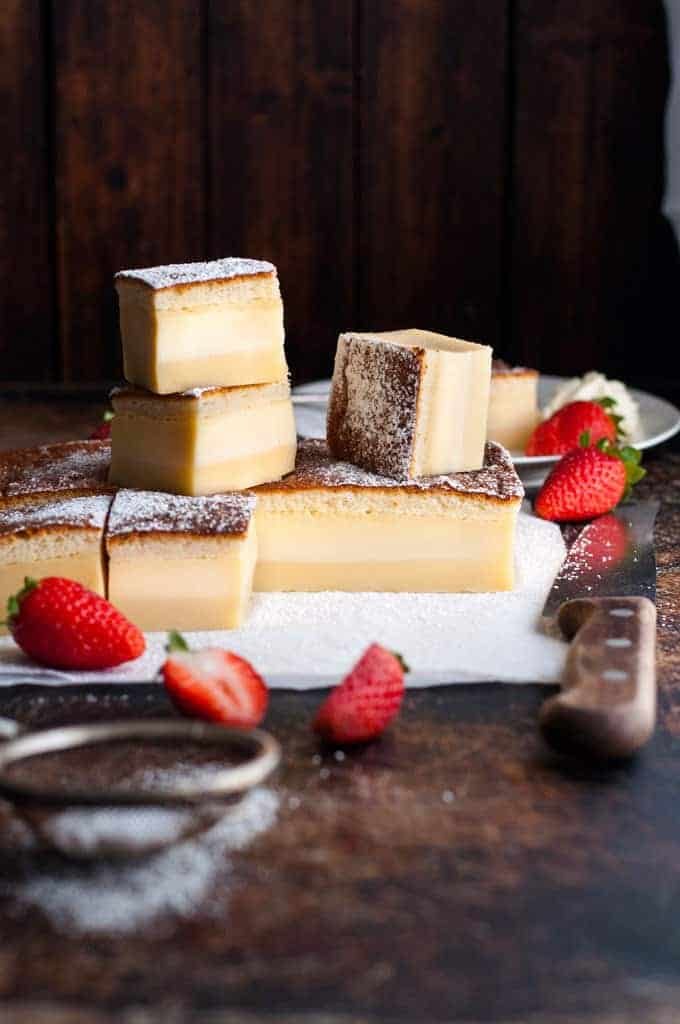
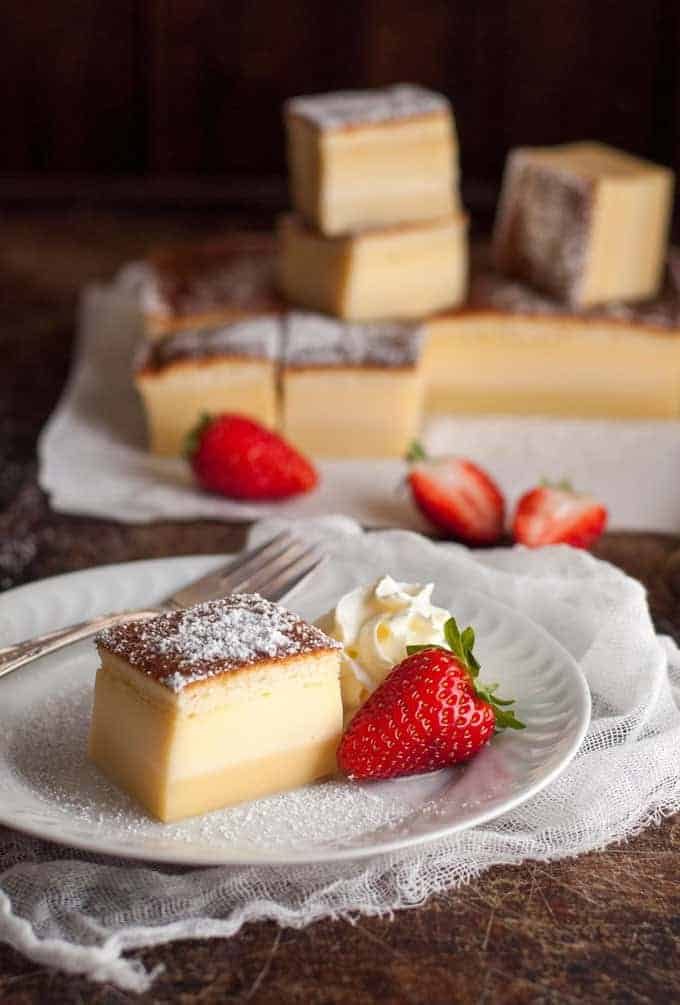
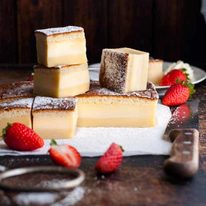
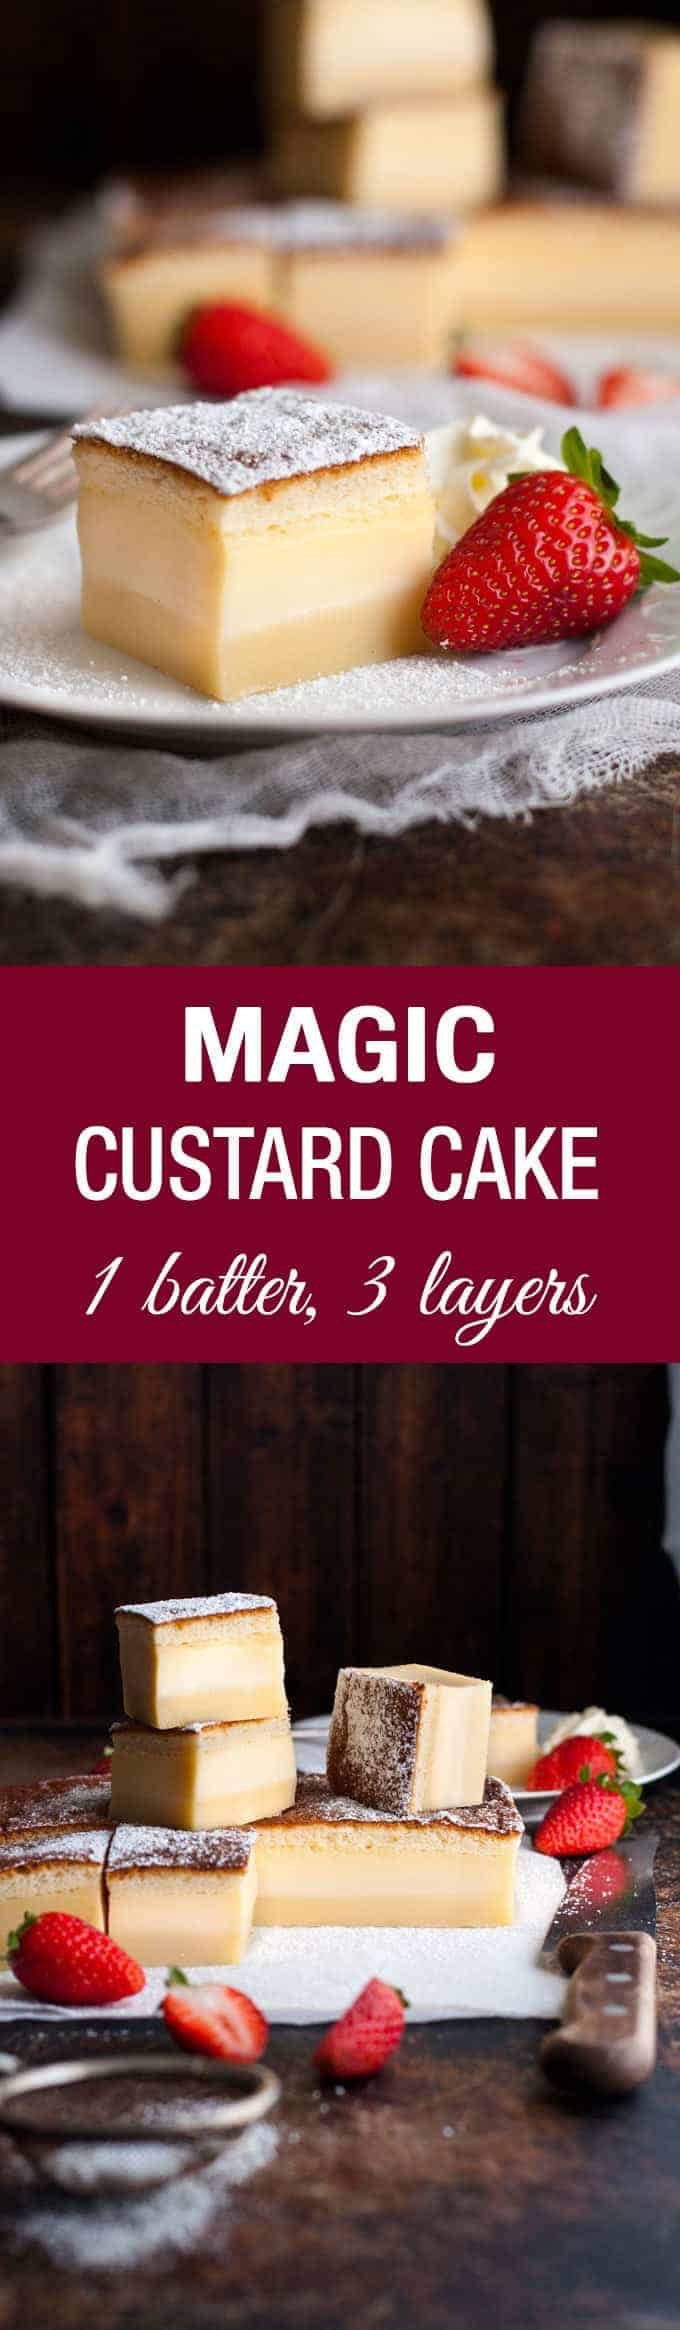
A fudgey base. Soft custard center. Topped with fluffy sponge. Made with one simple batter. Magic Three Layer Custard Cake: It’s like, well ….MAGIC!
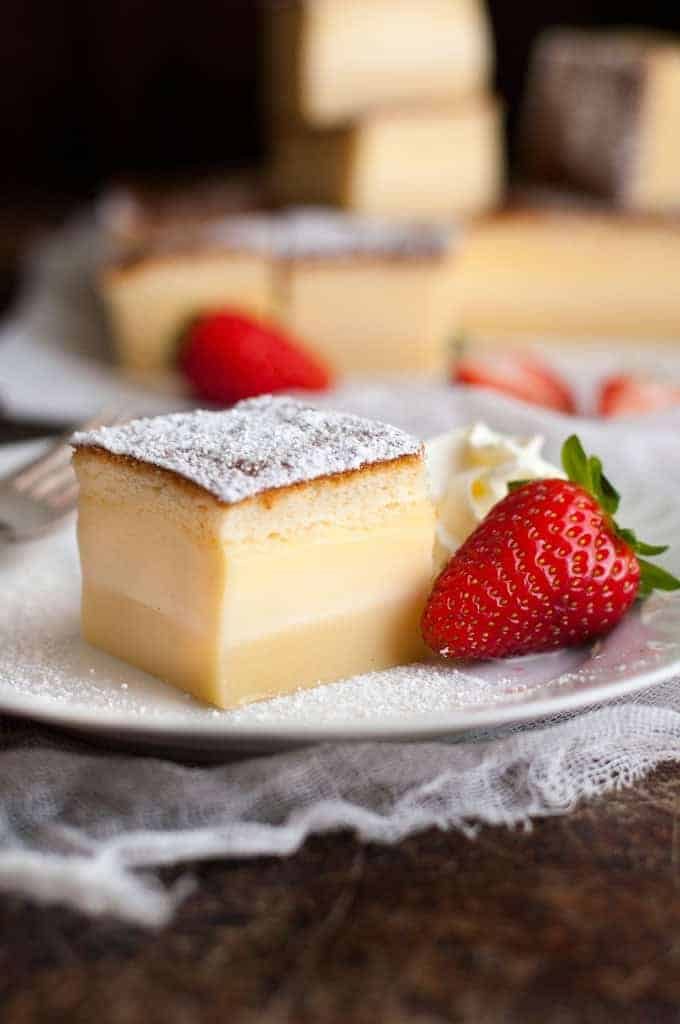
If you love vanilla sponge cakes and custard, you are going to be as obsessed with this cake as I am. It looks like it’s been carefully layered with three different components. But it’s not! You just pour one simple batter into a cake tin, pop in the oven, and this is how it comes out!!
There is no special ingredient nor any tricky technique. The batter is made pretty much like a traditional vanilla sponge cake, it is just much thinner. It’s the consistency of crepe batter. Almost like a thick pouring cream.
The magic happens in the oven. It is baked at a lower temperature than usual – 325F/160C. And when it comes out, the top layer is a sponge, the middle is custard and the bottom is almost like a fudge.
I was dubious the first time I made it, and even when I turned the cake out because you can’t see the layers on the edges. But then when I cut into it, I gasped with astonishment! I mean, look at how perfect the layers are!!
This recipe is the Magic Cake from Jo Cooks. I’ve been reading Jo Cooks for a long time, but it wasn’t until recently that I got to know Jo herself. Though actually, her real name is Ioana – a Romanian name, a beautiful one at that, and one of the first things I nagged her about was why she doesn’t go by her real name!
Jo and I have very similar tastes. We both love food that is absolutely scrumptious, we never compromise on flavour to follow trends or hacks (or diet versions!), we aren’t into the “cool food” scene and there are less salads on our blogs than there probably should be (though she has a lot more than me!!).
What I didn’t realise is that she is probably the reason the world discovered “Magic Cake“. She was very quick to make the point that it was not an original recipe. Perhaps she wasn’t the pioneer of it, but a search on Pinterest clearly shows that she is the reason that the world discovered it.
So I’m adding myself to the long line of people who have tried and been astonished by the miracle of this cake. 🙂
One simple batter.
A three layered custard cake.
It really is….like magic! 🙂
– Nagi
Hungry for more? Subscribe to my newsletter and follow along on Facebook, Pinterest and Instagram for all of the latest updates.
Magic Three Layer Custard Cake (From One Batter)
Ingredients
- 4 eggs , yolks and whites separated (at room temperature)
- 3/4 cup (150g) sugar (ordinary or caster sugar)
- 1 tsp vanilla extract
- 1 stick (4oz / 125g / 1/2 cup) unsalted butter , melted
- 3/4 cup (4oz / 115g) plain all purpose flour
- 2 cups (500 ml / 1 pint) milk (lukewarm) (full fat or low fat but not zero fat)
To Serve (optional)
- Icing sugar (powdered sugar), for dusting
- Fresh strawberries
- Whipped cream
Instructions
- Preheat oven to 325F/160C (standard oven / fan forced or convection)
- Butter a 8" x 8" / 20cm x 20cm square cake tin (Note 4).
- Beat egg whites with a mixer until stiff peaks form. Set aside.
- Place the egg yolks and sugar in a bowl and beat until it turns pale yellow - about 1 minute.
- Add the vanilla extract and butter and beat until well incorporated - about 30 seconds to 1 minute.
- Add the flour and beat until just combined.
- Pour the milk in slowly while beating, and beat until well combined (or if using a hand held mixer, add 1/4 milk at a time, beating in between).
- Use a spatula to fold in the egg whites in the batter, one third at a time, until just incorporated. You don't want to knock the air out of the egg whites. Don't worry if there are a few egg white lumps in the batter. The batter should be very thin, almost like a thick pouring cream.
- Pour the batter into the prepared cake tin.
Baking Directions
- Bake until the top is golden brown and the cake does not "jiggle" when you gently shake the tin - around 40 to 50 minutes. Check the cake at 30 minutes - if the top is already golden brown but the cake is not yet set (i.e. it jiggles), cover loosely with foil and return to the oven, 10 minutes at a time, until set.
- Allow to cool in the tin for 10 minutes, then turn out onto a cooling rack.(Note 3) Cool completely before serving.
To Serve
- Cut into squares - I cut it into 12 in the photo, but 9 is more realistic serving size portions.
- Dust with icing sugar just before serving.
- Serve with a side of whipped cream and strawberries, if using.
Recipe Notes:
a) The cake is ready when the top is golden brown and the cake doesn't "jiggle" when you gently shake the pan. If it jiggles, there is still raw batter inside.
b) I found that 4 of the 5 times I made it, the top became golden brown before the cake was set.
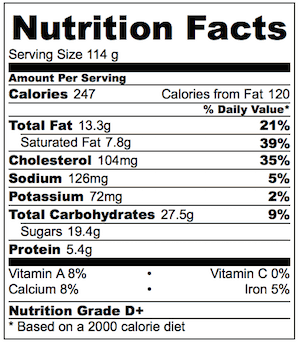
c) So to get the bake time right, check it first at 30 minutes. If the top is golden brown, cover loosely with foil and return to the oven until the cake is set. Check every 10 minutes - any longer, and you'll risk the cake overcooking. 3. Tor get the cake out of the tin, just turn it out like a normal cake. The custard is set, it is not like super soft jelly. What I do is place a cutting board on top of the tin, flip it upside down (it slips right out) then place a cooling rack on top then flip it again (so you end up with the right side up on the cooling rack). 4. I myself have not tried this in a glass pan but readers have - if you scroll through the comments, you will find feedback from a reader on 3 February 2017 confirming this! 5. Nutrition assuming 1 cake is cut into 9 pieces. Note that I cut the cake into 16 pieces for the photo but that is far too small!
 SaveSave
Nutrition Information:
I made this beautiful cake today. I followed your excellent instructions, but I did cook it for 60 minutes. I will top it with fresh strawberries in strawberry glaze and whipped cream. It came out perfectly. I did use a ceramic baking dish as that is what I use. This is a great and different cake recipe. Just follow the directions exactly and success will happen.
Great to hear Jeanne! Thank you for taking the time to let me know! N x
Hallo Nagi.
I have just made this for the first time and its in the oven, very pleased with myself UNTIL I went to put the jar with flour back in the cupboard and discovered that I have just used Self Raising Flour!
So I will let you know if this is a wonderful new change to the recipe or a huge flop! ha ha.
Well after it cooled I cut it and is was a sort of curdled big mess, so not even 2 layers. Looked VERY unappetising.
We did dare to taste it and it had an extremely eggy taste, too strong. Near the edges it tasted a little better.
Luckily I did not throw it out as yesterday it had turned into nearly 2 smoother layers and the strong egg taste had just about disappeared.
So all in all not bad with a result of using the wrong flour but next time I shall double check that I have plain flour.
I double the cake and it kept double and jiggle had it in for 2 1/2 hours. I wanted to make it for work.
Hi Joy – I’m afraid this recipe is not suited to doubling, which is the case with most cakes. I’m sorry to hear it didn’t work out for you 🙁
Tried it for the 1st time on Saturday & making the 2nd batch today (Tuesday). Multiple requests & it really came out yummy!
Glad you enjoyed it Sharen, thanks for letting me know! N x
How long would you have to cook the cake if you double the recipe?
Hi Joy – I’m afraid this recipe is not suited to doubling, I would make two separate cakes instead 🙂 N x
Hi! Do you I think I could substitute full fat coconut milk for the milk and coconut oil or canola oil for the butter? Try to make a dairy free version 🤔
I’m afraid I don’t know for this one Amy. Sorry!
How did it work with the coconut milk and oil Amy? I’m dairy allergic and was wondering them same.
Thank you!
i tried now with some passion fruit: it’s still in the oven but already looking yummy! 🙂 Thanks for sharing the recipe.
Oooh passionfruit! Delightful! N x
I would suggest key lime as a flavoring.mmmmm
Oooh YES!!
I baked mine for 90 minutes, let it cool all the way, and the custard layer wasn’t all the way set. 🙁 I will be trying again though.
So, the good news is the cake baked beautifully with the three layers and tasted wonderful. The bad news is it didn’t want to come out of the pan when I flipped it and I ended up with a pile of crumpled cake. I guess I didn’t grease it enough. 😛 As I said though, it tasted amazing and I love the different textures going on! The next time I make it, I might opt for using parchment paper to make it a bit easier. ^^ Thanks so much for the recipe! I’ll be trying your chocolate peanut butter loaf next. 😉
Is there any reason, you can’t just leave it in the pan to cut and serve? Have it in the oven, worried, I won’t be able to turn it out without ruining it.
Mine is in the oven now- I thought I’d try a ‘tiramisu’ take on it 😐… It has been in the oven for an hour and a half and still jiggly center. Starting to think I messed it up😞 I used 1/2c strong coffee, 1/4c cream (to make up for the lack of fat in the coffee- because in my head that made sense) and 1c 2%milk and I added cocoa powder to the egg whites. So, technically, I should get a creamy/custardy coffee later and a chocolate layer.
Hi LaDonna, I’m sorry to say I don’t know how your subs will affect the outcome 🙁 Sorry!
It actually came out GREAT! It’s DELISH! I got all 3 layers and it tastes very much like tiramisu. Not going to lie- I was pretty impressed with myself upon serving it up to myself and my husband 😇😁. I wish there was a way to share a pic with you here.
I guess the only difference with the cake when you use my substitutions it just bakes longer; which wasn’t a problem for me. I lost track of the time, but I think it baked closer to 2 hours and was still slightly jiggly when I took it out of the oven- come to think of it, that may have had something to do with the ceramic casserole dish that I used 😐. It was difficult to get out of the dish, so I just let it cool almost completely and when I turned it out a little bit of the center got stuck in the casserole; I scooped the stuck part onto the bottom of the cake where it belonged (😂) and placed a cake plate on top of it before flipping it right side up (ignorance is bliss- my husband isn’t a complainer, but I figure u can’t point out a flaw if you don’t know it’s there😉). I thought that the cake was ruined, so I didn’t even cut it or taste it until this morning. When I did finally cut into it, I tasted it before looking for any layers; but the layers are clear and noticeabley different. Like I said- I was pretty impressed with myself this morning 😇
how much cocoa powder?
I think it was 2tbsp. I’m making it for Thanksgiving now, and 2tbsp looks reasonable
Has this been tried with Cup 4 Cup, a gluten free flour. I’m always looking for good recipes for my sister who is gluten free?
I haven’t tried it myself Amy, sorry to say!
Just wondering if you tried it and how it worked?
I made this last night and it was delicious. Not too sweet which is perfect for my family’s not to sweet tooth. I have heard that there are flavor variations. Do you have any suggestions for some varied flavors? Thank you.
I’m so happy you enjoyed this Renee! Thank you for letting me know. If you have a look at Jo Cooks’ website (link in recipe), she has plenty! N x ❤️
Just made it an hour ago! First I thought it wouldn’t come out right since it was too watery.. i just put 1 1/2 cup of milk instead of 2 cups.. and it was just right! Not too amazed how it taste cos it taste like there is something missing though i followed all the ingredients listed.. except for the 2 cups of milk which i just put 1 1/2 instead. And I don’t think it would make any difference either if oli put 2 cups. Cos even then it was already watery.. but anyway, it was layered “YES”. And that’s how it made the magic! 😊
I wish i can post a picture here so you guys can see how I decorated it.. 😍
That’s great to hear Shey! Thanks for taking the time to share your feedback! N xx
It’s in the oven right now… hope it turns out ok..
Have faith! 🙂 N x
Tonight am going to make with my kids , they love u somuch in the picture
Oooh I hope they love it! 🙂
I made this yesterday and will admit I was in a rush and didn’t let it cool completely before cutting a couple of pieces. It tasted awesome but didn’t look right (not surprising). However I cut the rest today and it looks amazing I had the 3 layers and have to say it is the first time I have ever made a cake from scratch and it actually worked. Thank you for sharing.
Hi, I tried making this this today, but sadly it was a fail
The mixture didn’t really seperate and the custard tasted very eggy
I used 70g eggs and wonder if these are to big, also my mixture was more like milk than cream
Any suggestions
Oh dear Sarah, I’m sorry to say it sounds like there was a mismeasurement somewhere along the way if the batter was as thin as milk. 🙁 I will have a recipe video up soon which will hopefully help! N xx
What about chocolate?
Hi Nagi,thank you for your recipe sharing with us, it’s precise,when I first told my mum she is astonished and didn’t believe but then she loved very much,I’ve already baked twice this week,one in 10×10 inch pan (which was little bit thin and the layers can’t be seen clearly) other with 8×8 inch pan (the layers are visible but not baked in 50 min.plus 3×10 min.) now I’m re-calculating the recipe for 25×25 cm pan, thank you again !!!
WOW! That’s amazing Muge! N xx
Here’s a recipe! http://www.jocooks.com/bakery/cakes/chocolate-magic-cake/